If you already know the password for your iiNet account, you can change it at any time in Toolbox.
Forgot your password? Please see How to reset a forgotten password instead.
- Log in to Toolbox and hit My Account. If you're on a mobile device and you don't see this option, click the grey square with three lines to show it.
Never logged into Toolbox before? Check out An Introduction to Toolbox. - Hit Change password. If you're on a mobile device and you don't see this option, click the grey bar labelled My Account actions to show it.

-
Select the Username you want to give a new password from the drop-down menu.

-
Enter your Current password, then type your new password in the New password and New password confirmation boxes. Hit Change Password to finish.
Passwords must be 8-15 characters long, have both a lower case and uppercase letter and contain at least one number (0-9).
You can also use any of the following characters: ` ~ ! @ # $ % ^ & * ( ) _ + - = { [ } ] \ | ; , . / : < > ?
Passwords can't be based on your username or contain any spaces.
If you've forgotten your password or your iiNet login doesn't work for you, you can reset your iiNet password through our website.
- Go to iinet.net.au.
- Hit the Toolbox button at the top right of the page.
- You’ll see “Forgotten your username or password?” next to the Login button. Hit password.
- Follow the steps to reset your password. An email will be sent to the contact email listed on your iiNet account.
Can't reset your password or need to take over an account via Power of Attorney? Call us on 13 22 58 and we'll help you.
Important: We will never call you and ask for your passwords, security codes, or credit card details. For more information, visit: https://help.iinet.net.au/security-information
Here's what you need to know about iiNet billing.
Select one of the links below to jump to a query:
- iiNet Understanding Invoice Alignments video
- Your billing period begins on your anniversary date
- All iiNet services are billed one month in advance
- How to identify the billing period on your invoice
- Example: Internet service activated BEFORE the invoice is issued
- Example: Internet service activated AFTER the invoice is issued
- More information
- Why was my payment taken before the due date?
- Why am I paying in advance?
- Why did I get another invoice after a plan upgrade?
- Why have I only been charged for part of a month?
- Why have I only received part of my plan value?
- What happens to fees I've paid in advance if I change plans or cancel a service?
- What is a credit?
- What is a refund?
- What should I do if I don’t understand a charge on my invoice?
iiNet Understanding Invoice Alignments video
Your billing period begins on your anniversary date
When your first iiNet service is activated, your "anniversary date" is set. This is the date your iiNet bills are typically due each month.
The billing period for your iiNet services is also based on your anniversary date (e.g. Billed period: 04 JAN 2017 - 04 FEB 2017). If you add more iiNet services, their billing is aligned to the same billing period.
All iiNet services are billed one month in advance
As per the Billing Policy in our Customer Relationship Agreement, iiNet services are billed in the following ways:
- Recurring or fixed charges such as monthly plan fees are billed in advance.
- Variable charges such as phone calls are billed in arrears, which means they are paid after the charges have accrued (after all, we can't know which phone calls you've made until after you've made them!).
When you change plans, you'll receive a credit on your iiNet account for any unused plan fees that you paid in advance. You will then be charged in advance at the rate for your new plan.
How to identify the billing period on your invoice
The Service Details section of your invoice lists all charges along with their respective billing periods.
- A) Part Monthly Charge means a partial month has been billed. The dates on the Billing Period will confirm which days you've been billed for.
- B) Monthly Charge means a full month has been billed.

Example: Internet service activated BEFORE the invoice is issued
The example below shows the charges for an internet service that was added to an account BEFORE the invoice for that billing period was issued.
- A) Service active for 27 days of this billing period
- B) Part Monthly Charge for 27 days only
- C) Next billing period (one full month in advance)
- D) Full Monthly Charge in advance

Please note: If you're trying to follow along with a calculator, it's worth noting that our billing system calculates fees right down to the second. It's unlikely that a service would be activated at exactly 12AM, so while a plan may cost $1.97 for each full day of the year, less than that would be charged for the day a service was activated.
Example: Internet service activated AFTER the invoice is issued
However, it's also possible to add a service to an account AFTER the invoice for a billing period is issued. If this is the case, then charges for that billing period would be delayed until the following invoice.
In the example below, the an ADSL2+ service was activated on 28 July. However, the invoice for that month was already been issued on 24 July, so charges for that billing period must be delayed until the following invoice is issued on 24 August. The invoice issued on 24 August would cover the charges for both the previous and current billing periods, plus one full month in advance.
- A) Service active for 10 days of the previous billing period
- B) Part Monthly Charge for 10 days only
- C) Current billing period (the same month invoice issued)
- D) Full Monthly Charge
- E) Next billing period (one full month in advance)
- F) Full Monthly Charge in advance

Please note: If you're trying to follow along with a calculator, it's worth noting that our billing system calculates fees right down to the second. It's unlikely that a service would be activated at exactly 12AM, so while a plan may cost $1.97 for each full day of the year, less than that would be charged for the day a service was activated.
More information
Why was my payment taken before the due date?
Direct debit payments are taken up to 3 working days before the due date to allow time for the payment to clear.
For same-day invoice payments, please switch your payment method to a credit card in Toolbox, as these payments can process instantly.
Why am I paying in advance?
All iiNet services are billed monthly in advance. Having your service charges covered for a month in advance allows you to change plans or move house with fewer service disruptions due to unpaid bills.
Why did I get another invoice after a plan upgrade?
When you upgrade your plan, it’s not a simple matter of adding $5, $10 or $20 to your next bill. Our billing system will immediately make an adjustment for the charges in your current billing period.
For example, say you have a $69.99/mth plan that’s currently paid in advance up to 24 May. If you upgrade to a $74.99/mth plan on 28 April, here’s what the adjustment invoice would look like:
- For the current month (27 days pro-rata):
- $62.13 Credit for your old plan from 28 April to 24 May
- $66.57 Charge for your new plan for 28 April to 24 May
This would result in an adjustment invoice of $4.44, which covers the price increase for 27 days on the new $74.99 plan.
Note: If you're trying to follow along with a calculator, it's worth noting that our billing system calculates fees right down to the second. It's unlikely that a service would be activated at exactly 12AM, so while a $69.99 plan may cost $2.30 for each full day, less than that would be charged for the day the service was activated.
Why have I only been charged for part of a month?
You only get charged for the time you have an active broadband service or a particular plan. If you:
- Have a broadband service activated partway through the month; or
- Change plans partway through the month;
Then you’ll only be charged for part of the month, instead of the full month.
Why have I only received part of my plan value?
This can happen when you change plans, or activate a new service partway through your billing period.
If you've been billed for a part month charge for your plan, then you'll receive a proportionate part of your plan's monthly value for data, calls or SMS, etc.
For example, if you've been billed for 10 days' worth of your new broadband service, you'll receive 10 days' worth of its included monthly data.
This is known as "pro-rating", and it means that you'll pay the correct rate and receive the correct value for the exact days you had each plan. Once your next billing period begins, you'll receive the full monthly value at the full monthly price.
Pro-rating does not affect unlimited or all-inclusive allowances, such as our Liimitless data plans.
What happens to fees I've paid in advance if I change plans or cancel a service?
When you change plans or cancel a service, any amount you've paid in advance for that service is credited back to your account.
- If you've changed plans, you'll then be billed in advance at the rate for your new plan. Any remaining credit will be used to balance charges on your next invoice.
- If you're cancelling one service but you still have others, the credit will be used to balance charges on your next invoice.
- If you're closing your account, any remaining credit after your final invoice can be refunded back to your nominated bank account or credit card.
What is a credit?
A credit is an amount of money added to your iiNet account, usually to correct a billing error or to cover downtime during a service fault.
Credits stay on your iiNet account until they're used towards charges on your next iiNet invoice. For example, if your iiNet account had a credit of $50 and your next iiNet invoice was due for $59.99, you'd only have to pay $9.99 after the credit is used.
What is a refund?
A refund is when a credit on your iiNet account is returned to your nominated bank account or credit card. You can ask for a credit on your iiNet account to be refunded by calling us on 13 22 58.
If you close your iiNet account and your final invoice is in credit, the credit will be refunded.
What should I do if I don’t understand a charge on my invoice?
If you have any issues with your iiNet bill, please send us an invoice query.
It’s easy to update your payment details in Toolbox. Your payment details will be used to auto-pay your iiNet invoice each month.
Select one of the links below to jump to a query:
Update your payment details
- Log in to Toolbox and hit Bills & Payments. If you're on a mobile device and you don't see this option, click the grey square with three lines to show it.
Never logged into Toolbox before? Check out An Introduction to Toolbox. - Select Update payment details. If you're on a mobile device and you don't see this option, click the grey bar labelled Billing & Payments actions to show it.
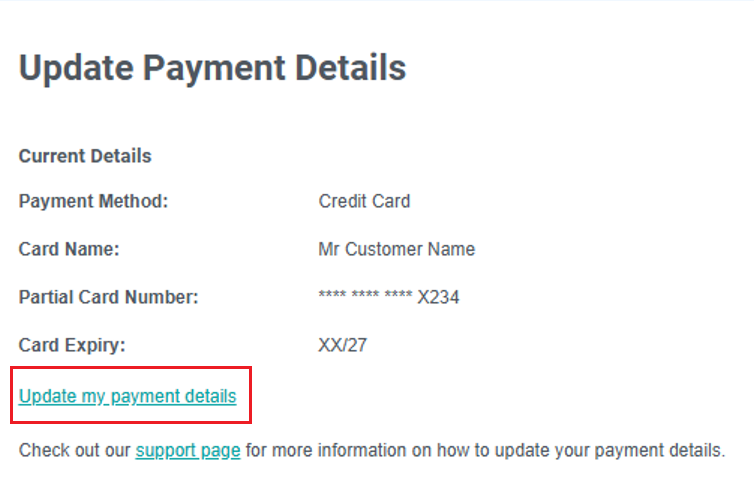
- You’ll see a summary of your current payment details. For security reasons, only a partial bank account or credit card number will be shown on screen.

- To edit these details, click Update my payment details. You can then choose to fill out and save a set of credit card or bank account details.
- Select either Credit Card or Direct Debit, then fill out the required details for your selected payment method:
- Credit Card (Credit or Debit cards) requires a Name on Card, Card Number, Expiration Date and Security Code. Applicable surcharges for Amex cards will be noted at the end of the form.
- Direct Debit requires a BSB, Account number, and Account name.
- Click Save to finish. The details you save will become the default payment method for your iiNet account.

Can I use a gift card as my payment details?
Sorry, but your payment details must use an Authorised Deposit-taking Institution (ADI). Gift cards such as Visa Debit gift cards aren’t considered ADIs, so they can’t be used as your iiNet payment details.
Surcharge information
iiNet regularly reviews our Amex and Diners Club surcharges as per RBA merchant pricing rules. Our current surcharges are based on actual costs and can be found in our Pricing Schedule.
You can make a payment at any time in Toolbox.
Select one of the links below to jump to a query:
How to pay an invoice
- Log in to Toolbox and select Bills & Payments from the navigation bar. If you're on a mobile device and you don't see this option, click the grey square with three lines to show the navigation menu.
Never logged into Toolbox before? Check out An Introduction to Toolbox. - Make sure Invoices is selected from the Actions menu. If you're on a mobile device and you don't see the Actions menu, click the grey bar labelled Billing & Payments actions to show it.

- You’ll see a summary of your Outstanding invoice(s). If you see the Status is “Scheduled”, that means that an automatic payment using your nominated payment method is already scheduled to occur in time for your due date (if you expect this scheduled payment to fail, see step 5).

- However, if the Status is “Overdue”, you’ll see a Pay Now option. Click it to make a one-off payment using a credit card.

- If you ever want to make an advanced payment on your account using a credit card (such as when you expect your usual payment method to fail e.g. due to an expired card) select Add credit from the Actions menu and then click Add credit to my account.

- After making an advance payment, the amount paid will exist on your iiNet account as a credit note. It never expires and will remain on your account until there have been enough charges to use it up.
- Alternatively, you can always make a secure payment using a credit card over the phone by calling us on 13 22 58.
How to request an invoice extension
- Log in to Toolbox and select Bills & Payments from the navigation bar. If you're on a mobile device and you don't see this option, click the grey square with three lines to show the navigation menu.
- Make sure Invoices is selected from the Actions menu. If you're on a mobile device and you don't see the Actions menu, click the grey bar labelled Billing & Payments actions to show it.
- You’ll see a summary of your Outstanding invoice(s). Click Request extension next to the relevant invoice.

- You’ll see a summary of the proposed invoice extension, including the extended due date. Click Confirm to lodge your request.

- If your request fails or you need to make alternate arrangements due to Financial Hardship, please contact us.