If your Ultra Broadband Cable service is offline, you won’t be able to visit a website, browse, stream, or download. Email and any other services that use the internet will not work. These steps will help you identify the issue.
- Your service may just be affected by an outage or planned maintenance. You can check your address on our Network Status page.
If there is an outage or planned maintenance, the results will give you an estimated fix time. -
Find your Cable modem and make sure the cables are plugged in securely and not damaged. Our setup guide will show you how to plug in.
You’ll need to replace any broken or chewed cables.

-
Turn off your modem’s power outlet for at least 10 seconds.
-
Turn the outlet back on and wait for your modem’s Internet light to come on, then see if you can visit a website.
-
Do you have any devices connected to your modem with an Ethernet cable? If these devices can visit a website but devices on Wi-Fi can’t, switch to troubleshooting Wi-Fi No Connection.
- If you can view websites on some devices but not others, even when they’re both connected the same way, you may need to fix some browser settings. Check out our guide on Browsing issues.
- Still can't get online? Please call us on 13 22 58 and we’ll help you. To investigate your connection issue, we'll need the Serial Number (S/N) and CMAC Number for your Cable NTU or modem barcode sticker:
Example: VM3000GS NTU
Example: CG3000 Modem
Example: CG2200 Modem
If your Ultra Broadband Cable service is running slowly, these steps will help you identify the issue.
- Your service may just be affected by planned maintenance. You can check your address on our Network Status page.
If there is planned maintenance, the results will give you an estimated fix time. - Find your Cable modem and turn off its power outlet for at least 10 seconds.
-
Turn the outlet back on and wait for your modem’s Internet light to come on, then run a speed test.
-
Do you have any devices connected to your modem with an Ethernet cable? If speeds on these devices are fine but devices on Wi-Fi are slow, switch to Troubleshooting Wi-Fi speed.
-
Make sure your modem’s Ethernet cables are in good condition, with “CAT6” or “CAT5e” printed on them.
Older Cat5 Ethernet cables are not recommended for Cable services. You’ll need to replace any broken or chewed cables.
-
Your speed may temporarily slow down if you’re running more devices or apps than your connection can handle at the same time. For example, if a device is downloading a large file or running a 4K streaming app, your speed should improve when it’s finished.
If you need to run more devices or apps at the same time, you can change your plan in Toolbox or call us on 13 19 17 for support. -
Run a scan on your antivirus/anti-malware software. If any infections are detected, make sure they are quarantined and removed.
Contact your software’s Customer Support if you need help. -
Still getting slow speeds? Please call us on 13 22 58 and we’ll help you.
Your modem will take care of the hard stuff like internet settings, but we’ll need your help to plug it in. The main cables you need will come in the box, and you can grab extra Ethernet cables from the shops if you need them.
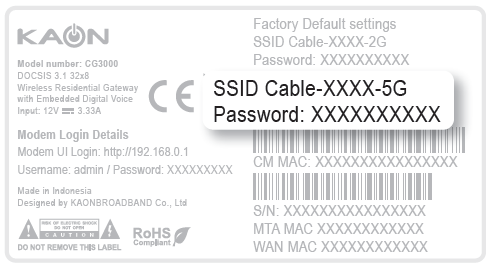
Not sure which model you have? Please check your modem's barcode sticker on the base.
Choose your modem to get started:
| Picture | Modem |
|---|---|
 |
Wi-Fi Max Modem with NTU |
 |
|
 |
Cable Gateway Pro (CG3000) |
 |
Wi-Fi Max Modem with NTU
- Your Cable Network Termination Unit (NTU) should already be connected by the Cable installer. If not, wait until your Cable installation is complete.
- Use the Ethernet cable to connect your modem’s red 2.5G WAN port to the NTU’s 2.5G LAN port.
- To use your Cable phone service, just plug a handset into your modem’s grey Phone port.

- Leave your modem alone for 20 minutes while it runs through its automatic setup.
- Check the light on the front of your modem. If it’s green, you’re online and you can start connecting your devices.
No green light? Call us on 13 22 58 and we can help you out. - It’s easy to set up your home network by downloading the My Internet Connect App (Android / iOS). To connect your devices to Wi-Fi, you have these options:
- Use the default Wi-Fi name and Wi-Fi Password on your modem's barcode sticker.
- Use a smartphone to scan the QR code on your modem’s barcode sticker.

- Enable Wi-Fi Protected Setup (WPS) on your device then press the Pair button on the back of your modem for 3 seconds.
If you want to change your Wi-Fi name or password, see this guide.
- For online gaming or HD/4K streaming, Ethernet is better than Wi-Fi. If you have extra Ethernet cables, you can connect up to 2 devices to your modem’s yellow LAN ports.
- You’re now good to go.
If you don’t want to keep your old modem, see if your local council has any eWaste recycling facilities.
VX420-G2V Modem with NTU
- Your Cable Network Termination Unit (NTU) should already be connected by your Cable installer. If not, wait until your Cable installation is complete.
- Use the Ethernet cable to connect your modem’s blue WAN port to the NTU’s 2.5G LAN port.
- Use the power cable to connect your modem's 12V IN Port to a power outlet and press your modem’s ON/OFF button.
- Wait 20 minutes for your modem to connect automatically.
- Check the Internet light on your modem. If it’s green, you’re online and you can start connecting your devices.
No green light? Call us on 13 22 58 and we can help you out.
- The default WiFi name (SSID) and Wireless password/PIN is on your modem’s barcode sticker. If you want to change your Wi-Fi name or password, use this guide.

- Your devices will automatically connect to the best Wi-Fi possible. If your Wi-Fi’s running slow, check out Improving Wi-Fi Signal.
- For online gaming or HD/4K streaming, Ethernet is better than Wi-Fi. If you have extra Ethernet cables, you can connect up to 4 devices to your modem’s yellow LAN ports.
- If you want to use your Cable Phone service, plug a VoIP-compatible handset into your modem’s green Phone port.
- You’re now good to go.
If you don’t want to keep your old modem, see if your local council has any eWaste recycling facilities.
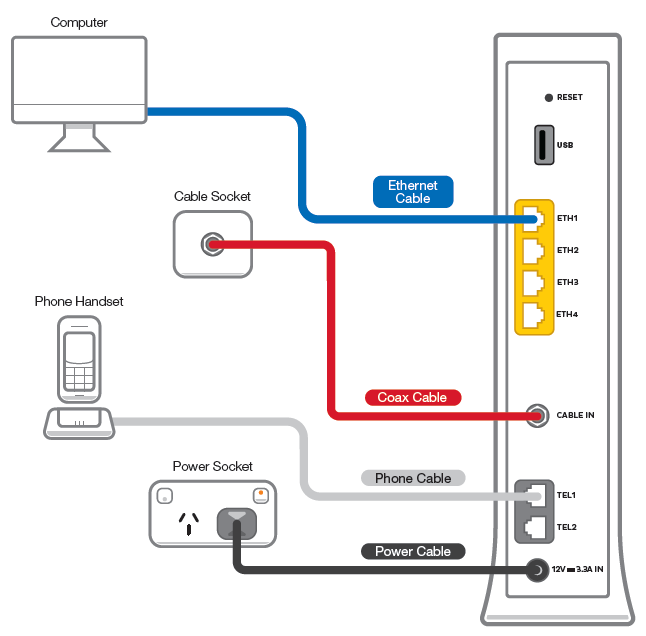
Cable Gateway Pro (CG3000)
- First, make sure you’ve got a message from us asking you to plug in your modem. We need to get your connection ready on our side first.
- Connect the power cables from your modem's 12V IN Port to an electrical outlet.
- Connect the included RF coaxial cable from the CABLE IN connector on your modem to your cable wall outlet.
Important: Make sure the cable is connected securely at both ends, as a lose connection can affect your internet performance. - Make sure the electrical outlet for your modem is ON.
- Allow 15 minutes for your modem to boot up and connect automatically.
- Check the lights on your modem. If the Online light is green, you can start connecting your devices and get online.
- The default WiFi name (SSID) and password is on your modem’s barcode sticker. If you want to change your Wi-Fi name or password, use this guide.
- Your devices will automatically connect to the best Wi-Fi possible. If your Wi-Fi’s running slow, check out Improving Wi-Fi Signal.
- For online gaming or HD/4K streaming, Ethernet is better than Wi-Fi. If you have extra Ethernet cables, you can connect up to 4 devices to your modem’s yellow LAN ports.
- If you wish to use your Cable Phone service, plug a compatible handset into the TEL1 port on your modem.
- You’re now good to go.
If you don’t want to keep your old modem, see if your local council has any eWaste recycling facilities.
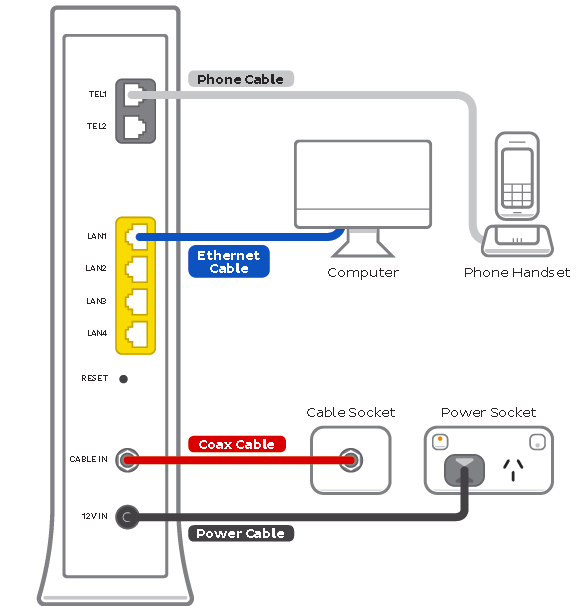
Cable Gateway Pro (CG2200)
- First, make sure you’ve got a message from us asking you to plug in your modem. We need to get your connection ready on our side first.
- Connect the power cables from your modem's 12V IN Port to an electrical outlet.
- Connect the included RF coaxial cable from the CABLE IN connector on your modem to your cable wall outlet.
Important: Make sure the cable is connected securely at both ends, as a lose connection can affect your internet performance. - Make sure the electrical outlet for your modem is ON.
- Allow 15 minutes for your modem to boot up and connect automatically.
- Check the lights on your modem. If the Online light is green, you can start connecting your devices and get online.
- The default WiFi name (SSID) and Wireless password/PIN is on your modem’s barcode sticker. If you want to change your Wi-Fi name or password, use this guide.

- Your devices will automatically connect to the best Wi-Fi possible. If your Wi-Fi’s running slow, check out Improving Wi-Fi Signal.
- For online gaming or HD/4K streaming, Ethernet is better than Wi-Fi. If you have extra Ethernet cables, you can connect up to 4 devices to your modem’s yellow LAN ports.
- If you wish to use your Cable Phone service, plug a compatible handset into the TEL1 port on your modem.
- You’re now good to go.
If you don’t want to keep your old modem, see if your local council has any eWaste recycling facilities.
Here's everything you need to know about iiNet Ultra Broadband VDSL2.
Select one of the links below to jump to a query:
- Where is Ultra Broadband VDSL2 available?
- What do I need for an Ultra Broadband VDSL2 connection?
- What happens when Ultra Broadband VDSL2 is installed?
- Will my medical alarm, security alarm, EFTPOS machine or fax machine work on the VDSL2 network?
Where is Ultra Broadband VDSL2 available?
iiNet Ulta Broadband VDSL2 is only available in the ACT. You can check your address on our website.
What do I need for an Ultra Broadband VDSL2 connection?
We'll provide an iiNet modem. If you'd like to use the included VDSL2 Phone service to make calls over the internet, you'll need a VoIP-compatible phone to plug into your modem.
Some premises may also require a Network Termination Unit (NTU). If this is the case, we’ll supply this to you without charge. The NTU remains the property of iiNet and should not be removed from the premises once installed.
Note: You must use the iiNet modem to get online. You can connect your own Wi-Fi router to the iiNet modem if you want to.
What happens when Ultra Broadband VDSL2 is installed?
If a VDSL2 installer is required to visit your premises, we'll be in touch to book a suitable appointment with you. An installation may not be needed if VDSL2 has been connected at your address before.
A standard installation normally takes up to an hour, or two hours if you're getting an overhead cable connected to your property. The installer will complete your connection and run a test to make sure you can get online.
Note: If your iiNet modem hasn't been delivered before your installation, don't worry. The technician will use their own modem to test the connection, and you can plug in your iiNet modem once it's delivered.
Will my medical alarm, security alarm, EFTPOS machine or fax machine work on the VDSL2 network?
The following services may not work on VDSL2:
- Priority Assistance phone services
- Fax machines
- EFTPOS or vending machines
- Back-to-base VPN
- Monitored security alarms
- Dial-up security cameras
- Digital Pay TV
Please contact your service provider to make arrangements before you order VDSL2. It may be possible to switch to an alternative service that does work with VDSL2.
Please note: iiNet does not offer a Priority Assistance service. If you are a Priority Assistance customer, please consider this before you order.
If your Ultra Broadband VDSL2 service is having dropouts, it means your internet will go offline and come back online intermittently. These steps will help you identify the issue.
- Your service may just be affected by an outage or planned maintenance. You can check your address on our Network Status page.
If there is an outage or planned maintenance, the results will give you an estimated fix time. -
Do you have any devices connected to your modem with an Ethernet cable? If these devices stay connected when devices on Wi-Fi drop out, switch to troubleshooting Wi-Fi Dropouts.
- Find your VDSL2 modem and make sure the cables are plugged in securely and not damaged. Our setup guide will show you how to plug in.
You’ll need to replace any broken or chewed cables. - If you have a Network Termination Unit (NTU) and you notice any of these status light behaviours, please call us on 13 22 58.
The phone cable for an NTU must not be longer than 1 metre.
ZyXel GM4100-B0 G.Fast NTU - Slow blinking green G.Fast light
Adtran® 422G G.Fast NTU - Flashing green G.Fast light
- Still getting dropouts? Please call us on 13 22 58 and we’ll help you.
If your Ultra Broadband VDSL2 service is offline, you won’t be able to visit a website, browse, stream, or download. Email and any other services that use the internet will not work. These steps will help you identify the issue.
- Your service may just be affected by an outage or planned maintenance. You can check your address on our Network Status page.
If there is an outage or planned maintenance, the results will give you an estimated fix time. - Find your Cable modem and make sure the cables are plugged in securely and not damaged. Our setup guide will show you how to plug in.
You’ll need to replace any broken or chewed cables. - Turn off your modem’s power outlet for at least 10 seconds.
- Turn the outlet back on and wait for your modem’s Internet light to come on, then see if you can visit a website.
- If you have a Network Termination Unit (NTU) and you notice any of these status light behaviours, please call us on 13 22 58.
The phone cable for an NTU must not be longer than 1 metre.
ZyXel GM4100-B0 G.Fast NTU - Slow blinking green G.Fast light
Adtran® 422G G.Fast NTU - Flashing green G.Fast light - Do you have any devices connected to your modem with an Ethernet cable? If these devices can visit a website but devices on Wi-Fi can’t, switch to troubleshooting Wi-Fi No Connection.
- If you can view websites on some devices but not others, even when they’re both connected the same way, you may need to fix some browser settings. Check out our guide on Browsing issues.
- Still can't get online? Please call us on 13 22 58 and we’ll help you.
If your Ultra Broadband VDSL2 service is running slowly, these steps will help you identify the issue.
- Your service may just be affected by planned maintenance. You can check your address on our Network Status page.
If there is planned maintenance, the results will give you an estimated fix time. - Find your VDSL2 modem and turn off its power outlet for at least 10 seconds.
-
Turn the outlet back on and wait for your modem’s Internet light to come on, then run a speed test.
-
Do you have any devices connected to your modem with an Ethernet cable? If speeds on these devices are fine but devices on Wi-Fi are slow, switch to Troubleshooting Wi-Fi speed.
-
Make sure your modem’s Ethernet cables are in good condition, with “CAT6” or “CAT5e” printed on them.
Older Cat5 Ethernet cables are not recommended for Cable services. You’ll need to replace any broken or chewed cables.
-
Your speed may temporarily slow down if you’re running more devices or apps than your connection can handle at the same time. For example, if a device is downloading a large file or running a 4K streaming app, your speed should improve when it’s finished.
If you need to run more devices or apps at the same time, you can change your plan in Toolbox or call us on 13 19 17 for support. -
Run a scan on your antivirus/anti-malware software. If any infections are detected, make sure they are quarantined and removed.
Contact your software’s Customer Support if you need help. -
Still getting slow speeds? Please call us on 13 22 58 and we’ll help you.
Your modem will take care of the hard stuff like internet settings, but we’ll need your help to plug it in. The main cables you need will come in the box, and you can grab extra Ethernet cables from the shops if you need them.
Choose your modem (with or without NTU) to get started:

Wi-Fi Max Modem
- Wait for a message from us asking you to plug in your modem. We need to get your connection ready on our side first.
- Use the power cable to connect your modem's Power port to a power outlet.
- Use the phone cable to connect your modem’s grey DSL port to your phone wall socket.
- Turn on the power outlet and press your modem’s ON/OFF button.
- To use your VDSL2 phone service, just plug a handset into your modem’s grey Phone port.

- Leave your modem alone for 20 minutes while it runs through its automatic setup.
- Check the light on the front of your modem. If it’s green, you’re online and you can start connecting your devices.
No green light? Call us on 13 22 58 and we can help you out. - It’s easy to set up your home network by downloading the My Internet Connect App (Android / iOS). To connect your devices to Wi-Fi, you have these options:
- Use the default Wi-Fi name and Wi-Fi Password on your modem's barcode sticker.
- Use a smartphone to scan the QR code on your modem’s barcode sticker.
- Enable Wi-Fi Protected Setup (WPS) on your device then press the Pair button on the back of your modem for 3 seconds.
If you want to change your Wi-Fi name or password, see this guide.
- For online gaming or HD/4K streaming, Ethernet is better than Wi-Fi. If you have extra Ethernet cables, you can connect up to 2 devices to your modem’s yellow LAN ports.
- You’re now good to go.
If you don’t want to keep your old modem, see if your local council has any eWaste recycling facilities.
Wi-Fi Max Modem with a Network Termination Unit (NTU)
- Wait for a message from us asking you to plug in your modem. We need to get your connection ready on our side first.
- Use the power cables to connect the Power ports on your modem and NTU to power outlets.
- Use an Ethernet cable to connect your modem’s red WAN port to your NTU's LAN 1 port.
Older NTUs may have a LAN port instead. Learn more. - Use the phone cable to connect your NTU's G.Fast port to your phone wall socket.
- Turn on both power outlets and press your modem’s ON/OFF button.
- To use your VDSL2 phone service, just plug a handset into your modem’s grey Phone port.

- Leave your modem alone for 20 minutes while it runs through its automatic setup.
- Check the light on the front of your modem. If it’s green, you’re online and you can start connecting your devices.
No green light? Call us on 13 22 58 and we can help you out. - It’s easy to set up your home network by downloading the My Internet Connect App (Android / iOS). To connect your devices to Wi-Fi, you have these options:
- Use the default Wi-Fi name and Wi-Fi Password on your modem's barcode sticker.
- Use a smartphone to scan the QR code on your modem’s barcode sticker.
- Enable Wi-Fi Protected Setup (WPS) on your device then press the Pair button on the back of your modem for 3 seconds.
If you want to change your Wi-Fi name or password, see this guide.
- For online gaming or HD/4K streaming, Ethernet is better than Wi-Fi. If you have extra Ethernet cables, you can connect up to 2 devices to your modem’s yellow LAN ports.
- You’re now good to go.
If you don’t want to keep your old modem, see if your local council has any eWaste recycling facilities.
VX420-G2V Modem
- First, make sure you’ve got a message from us asking you to plug in your modem. We need to get your connection ready on our side before you plug in.
- Use the power cable to connect your modem's Power port to a power outlet and press your modem's ON/OFF button.
- Use the phone cable to connect your modem's grey DSL port to your phone wall socket.
- Leave your modem alone for 15 minutes while it runs through its automatic setup.
- Check the Internet light on your modem. If it's green, you're online and you can start connecting your devices
No green light? Call us on 13 22 58 and we can help you out.
- The default Wi-Fi name (SSID) and Wireless password/PIN is on your modem’s barcode sticker. If you want to change your Wi-Fi name or password, use this guide.
- Your devices will automatically connect to the best Wi-Fi possible. If your Wi-Fi’s running slow, check out Improving Wi-Fi Signal.
- For online gaming or HD/4K streaming, Ethernet is better than Wi-Fi. If you have extra Ethernet cables, you can connect up to 4 devices to your modem’s yellow LAN ports.
- If you want to use your VDSL2 Phone service, plug a VoIP-compatible handset into your modem’s green Phone port.

VX420-G2V Modem with G.Fast NTU
The Adtran® G.Fast NTU is supplied with our ULTRA VDSL Max plan.
- First, make sure you’ve got a message from us asking you to plug in your modem. We need to get your connection ready on our side before you plug in.
- Use the power cables to connect your modem and NTU's Power ports to power outlets, then press your modem's ON/OFF button.
- Use the Ethernet cable to connect your modem’s blue WAN port to your NTU's LAN 1 port.
Older NTUs may have a LAN port instead. Learn more. - Use the phone cable to connect your NTU's G.Fast port to your phone wall socket.
- Leave your modem alone for 15 minutes while it runs through its automatic setup.
- Check the Internet light on your modem. If it's green, you're online and you can start connecting your devices
No green light? Call us on 13 22 58 and we can help you out. - The default Wi-Fi name (SSID) and Wireless password/PIN is on your modem’s barcode sticker. If you want to change your Wi-Fi name or password, use this guide.
- Your devices will automatically connect to the best Wi-Fi possible. If your Wi-Fi’s running slow, check out Improving Wi-Fi Signal.
- For online gaming or HD/4K streaming, Ethernet is better than Wi-Fi. If you have extra Ethernet cables, you can connect up to 4 devices to your modem’s yellow LAN ports.
- If you want to use your VDSL2 Phone service, plug a VoIP-compatible handset into your modem’s green Phone port.

Smart Modem Gateway (VX420-G2H)
- First, make sure you’ve got a message from us asking you to plug in your modem. We need to get your connection ready on our side before you plug in.
- Use the power cable to connect your modem's Power port to a power outlet and press your modem's ON/OFF button.
- The the phone cable to connect your modem's grey DSL port to your phone wall socket.
- Leave your modem alone for 15 minutes while it runs through its automatic setup.
- Check the Internet light on your modem. If it's green, you're online and you can start connecting your devices
No green light? Call us on 13 22 58 and we can help you out.
- The default Wi-Fi name (SSID) and Wireless password/PIN is on your modem’s barcode sticker. If you want to change your Wi-Fi name or password, use this guide.

- Your devices will automatically connect to the best Wi-Fi possible. If your Wi-Fi’s running slow, check out Improving Wi-Fi Signal.
- For online gaming or HD/4K streaming, Ethernet is better than Wi-Fi. If you have extra Ethernet cables, you can connect up to 4 devices to your modem’s yellow LAN ports.
- If you want to use your VDSL2 Phone service, plug a VoIP-compatible handset into your modem’s green Phone port.

VX220-G2V Modem
- First, make sure you’ve got a message from us asking you to plug in your modem. We need to get your connection ready on our side before you plug in.
- Use the power cable to connect your modem's Power port to a power outlet and press your modem's ON/OFF button.
- Use the phone cable to connect your modem's grey DSL port to your phone wall socket.
- Leave your modem alone for 15 minutes while it runs through its automatic setup.
- Check the Internet light on your modem. If it's blue, you're online and you can start connecting your devices
No blue light? Call us on 13 22 58 and we can help you out.
- The default Wi-Fi name (SSID) and Wi-Fi Password is on your modem’s barcode sticker. If you want to change your Wi-Fi name or password, use this guide.

- Your devices will automatically connect to the best Wi-Fi possible. If your Wi-Fi’s running slow, check out Improving Wi-Fi Signal.
- For online gaming or HD/4K streaming, Ethernet is better than Wi-Fi. If you have extra Ethernet cables, you can connect up to 4 devices to your modem’s yellow LAN ports.
- If you want to use your VDSL2 Phone service, plug a VoIP-compatible handset into your modem’s green Phone port.

TP-Link VR1600v
- First, make sure you’ve got a message from us asking you to plug in your modem. We need to get your connection ready on our side before you plug in.
- Use the power cable to connect your modem's Power port to a power outlet and press your modem's Power button.
- Use the phone cable to connect your modem's grey DSL portto your phone wall socket.
- Leave your modem alone for 15 minutes while it runs through its automatic setup.
- Check the Internet light on your modem. If it's green, you're online and you can start connecting your devices
No green light? Call us on 13 22 58 and we can help you out.
- The default Wi-Fi name (SSID) and Wireless Password/PIN is on your modem’s barcode sticker. If you want to change your Wi-Fi name or password, use this guide.

- Your devices will automatically connect to the best Wi-Fi possible. If your Wi-Fi’s running slow, check out Improving Wi-Fi Signal.
- For online gaming or HD/4K streaming, Ethernet is better than Wi-Fi. If you have extra Ethernet cables, you can connect up to 4 devices to your modem’s yellow LAN ports.
- If you want to use your VDSL2 Phone service, plug a VoIP-compatible handset into your modem’s grey Phone 1 port.

TG-789 Broadband Gateway
- First, make sure you’ve got a message from us asking you to plug in your modem. We need to get your connection ready on our side before you plug in.
- Use the power cable to connect your modem's Power port to a power outlet and press your modem's Power button.
- Use the phone cable to connect your modem's grey DSL port to your phone wall socket.
- Leave your modem alone for 15 minutes while it runs through its automatic setup.
- Check the Internet light on your modem. If it's green, you're online and you can start connecting your devices
No green light? Call us on 13 22 58 and we can help you out. - The default Wi-Fi name (SSID) and password (Wireless Key) is on your modem’s barcode sticker. If you want to change your Wi-Fi name or password, use this guide.

- Your devices will automatically connect to the best Wi-Fi possible. If your Wi-Fi’s running slow, check out Improving Wi-Fi Signal.
- For online gaming or HD/4K streaming, Ethernet is better than Wi-Fi. If you have extra Ethernet cables, you can connect up to 4 devices to your modem’s yellow LAN ports.
- If you want to use your VDSL2 Phone service, plug a VoIP-compatible handset into your modem’s green Phone 1 port.

Choose your issue to get started.
Select one of the links below to jump to a query:
- Troubleshoot nbn® Satellite No Connection
- Troubleshoot nbn® Satellite Dropouts
- Troubleshoot nbn® Satellite Speed Issues
- nbn® Satellite Connection Box Status Lights
Troubleshoot nbn® Satellite No Connection
- Check your address on nbn®'s Network status and outages page to see if an unforeseen incident or planned maintenance is affecting your connection.
- Check your address on our Network Status page to see if there are any known issues in your area.
- Check your nbn Satellite dish for obstructions such as tree branches. If your dish has been damaged, please call us on 13 22 58 for assistance.
Note: Severe weather conditions resulting in heavy cloud cover may also cause connection issues. - Find your modem and ensure that it's connected correctly, with cables in good condition and plugged in securely.

- Turn off the electrical outlet for your modem and leave it off for at least 10 seconds.
- Turn the outlet back on and wait for modem lights to settle, then attempt to view a website.
- Attempt to view a website on a device connected to your modem via Ethernet cable, not Wi-Fi. If Ethernet works but Wi-Fi doesn't, see troubleshooting Wi-Fi No Connection.
- If you can view websites on some devices but not others, see our guide on Browsing issues.
- Locate your indoor nbn Connection Box. This is most commonly installed on the inside of an outer wall of the premises, sometimes in the garage.
- Turn off the electrical outlet for your nbn Connection Box and unplug the POWER and SAT cables for at least 30 minutes. This time allows your current connection session to expire, forcing a fresh connection.

- After 30 minutes, plug the POWER and SAT cables back in, turn the electrical outlet back on and allow your nbn Connection Box to reboot.
Note: If your nbn Connection Box light is red after rebooting, please call us on 13 22 58 for assistance. - Attempt to view a website.
- If you still can't get online, please call us on 13 22 58 for further assistance.
Troubleshoot nbn® Satellite Dropouts
- Turn off the electrical outlet for your modem and leave it off for at least 10 seconds.
- Turn the outlet back on and wait for modem lights to settle. Continue monitoring for dropouts.
- When your connection drops out, check other devices connected to your modem via Wi-Fi or Ethernet cable to see if they've dropped out, too.
- If devices connected via Ethernet cable stay online when devices connected via Wi-Fi drop out, switch to troubleshooting Wi-Fi Dropouts.
- Ensure that your modem is connected correctly, with cables in good condition and plugged in securely.
- Turn off the electrical outlet for your nbn Connection Box and unplug the POWER and SAT cables for at least 30 minutes. This time allows your current connection session to expire, forcing a fresh connection.
- After 30 minutes, plug the POWER and SAT cables back in, turn the electrical outlet back on and allow your nbn Connection Box to reboot. Continue monitoring for dropouts.
Note: If your nbn Connection Box light is red after rebooting, please call us on 13 22 58 for assistance. - Check your nbn Satellite dish for obstructions such as tree branches.
Note: Severe weather conditions resulting in heavy cloud cover may also cause connection dropouts. - If you still experience dropouts or your nbn Satellite dish has been damaged, please call us on 13 22 58 for further assistance.
Troubleshoot nbn® Satellite Speed Issues
- Visit our Network Status page to see any known issues in your area that may be affecting your service speed.
- Turn off your modem and leave it off for at least 10 seconds.
- Turn your modem back on and wait for the modem lights to settle.
- Run a speed test.
- Do you have any devices connected to your modem with an Ethernet cable? If speeds on these devices are fine but devices on Wi-Fi are slow, switch to Troubleshooting Wi-Fi speed.
- Make sure your modem’s Ethernet cables are in good condition. Replace any damaged cables.
- Your speed may temporarily slow down if you’re running more devices or apps than your connection can handle at the same time. For example, if a device is downloading a large file or running a 4K streaming app, your speed should improve when it’s finished.
- Perform a scan on your antivirus/anti-malware software. If any infections are detected, make sure they are quarantined and removed. Please contact your software’s Customer Support if you need assistance.
- Check your nbn Satellite dish for obstructions such as tree branches.
Note: Severe weather conditions resulting in heavy cloud cover may also cause speed issues. - If you still experience speed issues or your nbn Satellite dish has been damaged, please call us on 13 22 58 for further assistance.
nbn® Satellite Connection Box Status Lights
The nbn Satellite Connection Box has just one status light on the front of the modem which changes colour to indicate certain states:
| Light colour | States(s) and Meaning | |
|---|---|---|
| No light | Off - No AC power supply. Please ensure the Connection Box has power. | |
| White | Solid - Initial power-up. Wait for Connection Box to finish powering up. Flashing - Connection Box is attempting to connect to the network. Wait for the connection attempt to finish. |
|
| Blue | Solid - Connection Box is online. Flashing - Indicates network activity on a successful connection. |
|
| Yellow | Solid - Connection Box is in sleep mode. Flashing - Connection Box is in installation mode. Wait for installation to complete. |
|
| Red | Solid - The Connection Box needs to be rebooted. For a quick reboot, simply use a pen or paper clip to press and release the RESET button on the back of the Connection Box. If the light remains red after rebooting, please call us on 13 22 58 for assistance. Flashing - May indicate a fault. Please call us on 13 22 58 for assistance. |
|

UNI-D Indicator lights
In addition to the main status light, each of the four UNI-D ports on the side of your nbn Satellite Connection Box has a light to indicate internal Ethernet networking speed. Please note that this is the transmission speed between the nbn Satellite Connection Box and the computer or router connected via Ethernet, not your overall broadband speed.
- If the green light is lit, this indicates a 100/10Mbps internal network speed, meaning a CAT5 Ethernet cable has been used. The light may flash during network activity.
- If the yellow light is lit, this indicates a 1000Mbps internal network speed, meaning a CAT5e or CAT6 Ethernet cable has been used. The light may flash during network activity.
- If both lights are out even though the Ethernet cable is connected at both ends and both devices have power, this may indicate that the UNI-D port is inactive, or a fault with the Ethernet cable. Try another Ethernet cable. If the issue persists or you're not sure which UNI-D port to use, please call us on 13 22 58 for assistance.
Choose your modem to get started:
| Picture | Modem |
|---|---|
 |
Wi-Fi Max Modem |
 |
VX420-G2V Modem |
 |
Smart Modem Gateway (VX420-G2H) |
 |
VX220-G2V Modem |
 |
TP-Link VR1600v |
 |
TG-789 Broadband Gateway |
Wi-Fi Max Modem
First, ensure you have:
- A message from us advising you to plug in your nbn modem.
- An electrical outlet near your nbn Connection Box (NCB).
- An Ethernet cable.
- (Optional) 2 additional Ethernet cables to connect devices via Ethernet.
Set up with the My Internet Connect app
You can download the My Internet Connect App (Android / iOS). Don't want to use the app? You can set up without the app instead.
- Open the App and follow the prompts until you get to Check your modem status.
- Use the power cables to connect the Power ports on your modem and nbn® Connection Box (NCB) to power outlets.
- Press your modem’s ON/OFF button.
- Click Next to Connect to your modem’s Wi-Fi.
- Click Open Camera to scan the QR code on your modem's barcode sticker. Once connected, you’ll automatically go to the next step
- Click Enter Your Wi-Fi Password to follow the instructions to connect the Wi-Fi, then press Next to continue.
- Follow the steps below to connect your nbn® Satellite.
- Use the ethernet cable to connect your modem's red WAN port to your NCB's UNI-D1 port.
- Allow 20 minutes for it to boot up and configure automatically.
- Wait for the light on the front of your modem to turn solid green.
- Click Done to continue.
- You’ll be prompted to Enter the Login Password. This is the Login Password found on on your modem's barcode sticker on the bottom of the modem. Once entered, click Remember Password, then Login.
Note: You’ll be prompted to Change the Login Password, or Skip to continue. If you change the Login Password, make sure you save it somewhere secure so you can easily access it later—especially if you need to access the modem dashboard, set up the app again or switch to a new device.

- Allocate a name for your modem or click Skip to continue.
- Connect your devices.
Got extra ethernet cables? You can connect 2 devices to your modem’s yellow LAN ports.
If you want to connect your devices via Wi-Fi, you have 3 options:
- Use the Wi-Fi Name and Password on your modem's barcode sticker.
- Scan the QR code on your modem's barcode sticker (Smartphones only).
- Enable Wi-Fi Protected Setup (WPS) on your device then press the Pair button on the back of your modem for 3 seconds.
Set up without the My Internet Connect app
- Use the power cables to connect the Power ports on your modem and nbn® Connection Box (NCB) to power outlets.
- Make sure the electrical outlet for your modem is on and press your modem's ON/OFF button.
- Connect the ethernet cable from your modem’s red WAN port to your NCB's UNI-D1 port.

- Allow 20 minutes for it to boot up and configure automatically.
- Check the light on the front your modem. If it’s solid green, you can start connecting your devices and getting online.
No green light? Give us a call us on 13 22 58 and we'll help you out. - Connect your devices.
Got extra ethernet cables? You can connect 2 devices to your modem’s yellow LAN ports.
If you want to connect your devices via Wi-Fi, you have 3 options:
- Use the Wi-Fi Name and Password on your modem's barcode sticker.
- Scan the QR code on your modem's barcode sticker (Smartphones only).
- Enable Wi-Fi Protected Setup (WPS) on your device then press the Pair button on the back of your modem for 3 seconds.
Your modem will automatically connect your devices to the best Wi-Fi network possible. Older devices may only be able to connect to the slower 2.4GHz Wi-Fi. See Improving Wi-Fi Signal.
If you want to change your Wi-Fi name or password, use this guide.
VX420-G2V Modem
First, ensure you have:
- A message from us advising you to plug in your nbn modem.
- An electrical outlet near your nbn Connection Box.
- An Ethernet cable.
- (Optional) Up to 4 additional Ethernet cables to connect devices via Ethernet.
- Connect the power cable from your modem's Power port to an electrical outlet.
- Connect the included Ethernet cable from the UNI-D1 port on your nbn Connection Box to your modem's blue WAN port.
- Make sure the electrical outlets for your modem and nbn Connection Box are on, and press the modem's ON/OFF button.
- Allow 15 minutes for your modem to boot up and connect automatically.
- Check the lights on your modem. If the Internet light is green, you can start connecting your devices and getting online.
- To plug in additional devices via Ethernet cable, simply connect the Ethernet cables to any of the four yellow LAN ports on your modem.

- If you wish to connect your devices via Wi-Fi, you'll find the Wi-Fi name (SSID) and Wireless Password/PIN on the modem's barcode sticker.
Your modem will automatically connect your devices to the best Wi-Fi network possible (i.e. 5GHz). Older devices may only be able to connect to the slower 2.4GHz Wi-Fi. See Improving Wi-Fi Signal.
Smart Modem Gateway (VX420-G2H)
First, ensure you have:
- A message from us advising you to plug in your nbn modem.
- An electrical outlet near your nbn Connection Box.
- An Ethernet cable.
- (Optional) Up to 4 additional Ethernet cables to connect devices via Ethernet.
- Connect the power cable from your modem's Power port to an electrical outlet.
- Connect the included Ethernet cable from the UNI-D1 port on your nbn Connection Box to your modem's blue WAN port.
- Make sure the electrical outlets for your modem and nbn Connection Box are on, and press the modem's ON/OFF button.
- Allow 15 minutes for your modem to boot up and connect automatically.
- Check the lights on your modem. If the Internet light is green, you can start connecting your devices and getting online.

- To plug in additional devices via Ethernet cable, simply connect the Ethernet cables to any of the four yellow LAN ports on your modem.

- If you wish to connect your devices via Wi-Fi, you'll find the Wi-Fi name (SSID) and Wireless Password/PIN on the modem's barcode sticker.
Your modem will automatically connect your devices to the best Wi-Fi network possible (i.e. 5GHz). Older devices may only be able to connect to the slower 2.4GHz Wi-Fi. Improving Wi-Fi Signal.
VX220-G2V Modem
First, ensure you have:
- A message from us advising you to plug in your nbn modem.
- An electrical outlet near your nbn Connection Box.
- An Ethernet cable.
- (Optional) Up to 4 additional Ethernet cables to connect devices via Ethernet.
- Connect the power cable from your modem's Power port to an electrical outlet.
- Connect the included Ethernet cable from the UNI-D1 port on your nbn Connection Box to your modem's blue WAN port.
- Make sure the electrical outlets for your modem and nbn Connection Box are on, and press the modem's ON/OFF button.
- Allow 15 minutes for your modem to boot up and connect automatically.
- Check the lights on your modem. If the Internet light is blue, you can start connecting your devices and getting online.

- To plug in additional devices via Ethernet cable, simply connect the Ethernet cables to any of the four yellow LAN ports on your modem.

- If you wish to connect your devices via Wi-Fi, you'll find the Wi-Fi name (SSID) and Wi-Fi Password on the modem's barcode sticker.
Your modem will automatically connect your devices to the best Wi-Fi network possible (i.e. 5GHz). Older devices may only be able to connect to the slower 2.4GHz Wi-Fi. See Improving Wi-Fi Signal.
TP-Link VR1600v
First, ensure you have:
- A message from us advising you to plug in your nbn modem.
- An electrical outlet near your indoor nbn Connection Box.
- Connect the power cable from your modem's Power Port to an electrical outlet.
- Connect the included Ethernet cable from the blue WAN port on your modem to the UNI-D1 port on your nbn Connection Box.
- Make sure the electrical outlets for your modem and nbn Connection Box are on, and press the modem's Power button.
- Allow 15 minutes for your modem to boot up and connect automatically.
- Check the lights on your modem. If the Internet light is green, you can start connecting your devices and getting online.
- To plug in additional devices via Ethernet cable, simply connect the Ethernet cables to any of the four yellow LAN ports on your modem.
- If you wish to connect your devices via Wi-Fi, you'll find the Wi-Fi name (SSID) and Wireless Password/PIN on the barcode sticker at the bottom of your modem.
We recommend connecting over the 5GHz Wi-Fi channel for faster performance. See Improving Wi-Fi Signal.
TG-789 Broadband Gateway
First, ensure you have:
- A message from us advising you to plug in your nbn modem.
- An electrical outlet near your indoor nbn Connection Box.
- Connect the power cable from your modem's Power Port to an electrical outlet.
- Connect the included Ethernet cable from the red WAN port on your modem to the UNI-D1 port on your nbn Connection Box.
- Make sure the electrical outlets for your modem and nbn Connection Box are on, and press the modem's Power button.
- Allow 15 minutes for your modem to boot up and connect automatically.
- Check the lights on your modem. If the Internet light is green, you can start connecting your devices and getting online.
- To plug in additional devices via Ethernet cable, simply connect the Ethernet cables to any of the four yellow LAN ports on your modem.

- If you wish to connect your devices via Wi-Fi, you'll find the Wi-Fi 2.4GHz and 5GHz Network names and password (Wireless Key) on your modem's barcode sticker.
We recommend connecting over the 5GHz Wi-Fi channel for faster performance. See Improving Wi-Fi Signal.