Connect to Wi-Fi
Choose your device's operating system to connect to Wi-Fi.
Select one of the links below to jump to a query:
- Connect to Wi-Fi on Windows 11
- Connect to Wi-Fi on Windows 10
- Connect to Wi-Fi on Windows 7
- Connect to Wi-Fi on macOS
- Connect to Wi-Fi on iPhone or iPad
- Connect to Wi-Fi on Android OS
Connect to Wi-Fi on Windows 11
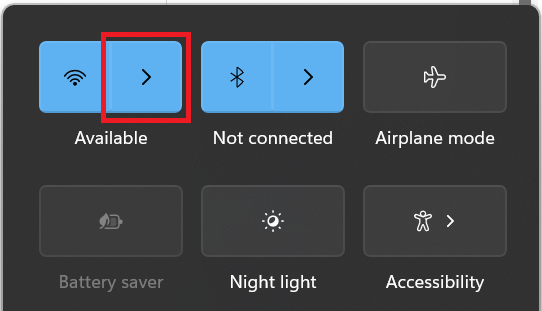
- On your desktop or laptop, click the Network icon in bottom right-hand corner of your screen to bring up the menu.

- Click the arrow next to the Network icon to bring up the list of available Wi-Fi networks.
- Find and click your Wi-Fi network name. If you're using your modem's default Wi-Fi settings, please note that the Wi-Fi network name may also be called a "SSID".
Not seeing your Wi-Fi network? Follow our basic Wi-Fi settings guide for iiNet modems. If your modem isn't from iiNet, you should be able to find help on the manufacturer's website. - If you want to stay connected to the Wi-Fi whenever you're in range, click the Connect Automatically box. Otherwise, just click Connect.
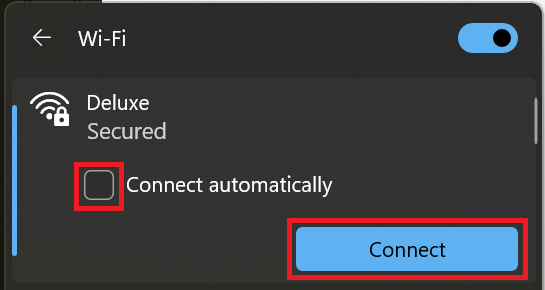
- Enter your Wi-Fi password and click Next to connect to the Wi-Fi. Your computer will remember your password for next time.
Connect to Wi-Fi on Windows 10
- On your desktop, click the Network icon in bottom right-hand corner of your screen to bring up a list of available connections.

- Find and click your Wi-Fi network name. If you're using the default Wi-Fi settings on your modem's barcode sticker, please note that the Wi-Fi network name may also be called a "SSID".
Not seeing your Wi-Fi network? Follow our basic Wi-Fi settings guide for iiNet modems. If your modem isn't from iiNet, you should be able to find help on the manufacturer's website. -
If you want to stay connected to the Wi-Fi whenever you're in range, tick the Connect Automatically box. Otherwise, just click Connect.
-
Enter your Wi-Fi password and click OK to connect to the Wi-Fi. Your computer will remember your password for next time.
Connect to Wi-Fi on Windows 7
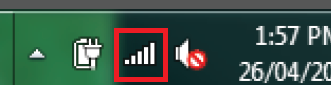
- On your desktop or laptop, click the Network icon in bottom right-hand corner of your screen.
- Find and click your Wi-Fi network name. If you're using the default Wi-Fi settings on your modem's barcode sticker, please note that the Wi-Fi network name may also be called a "SSID".
Not seeing your Wi-Fi network? Follow our basic Wi-Fi settings guide for iiNet modems. If your modem isn't from iiNet, you should be able to find help on the manufacturer's website. - If you want to stay connected to the Wi-Fi whenever you're in range, tick the Connect Automatically box. Otherwise, just click Connect.
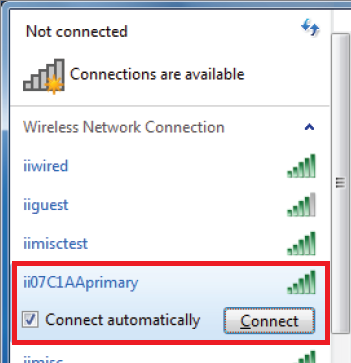
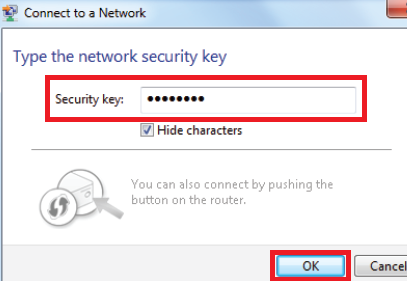
- Enter your Wi-Fi password in the Security key box and click OK to connect to the Wi-Fi. Your computer will remember your password for next time.
Connect to Wi-Fi on macOS
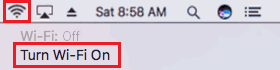
- Click the Wi-Fi icon in the top right-hand corner of your screen and hit Turn Wi-Fi On.
- Click the Wi-Fi icon again, then find and click your Wi-Fi network name. If you're using the default Wi-Fi settings on your modem's barcode sticker, please note that the Wi-Fi network name may also be called a "SSID".
Not seeing your Wi-Fi network? Follow our basic Wi-Fi settings guide for iiNet modems. If your modem isn't from iiNet, you should be able to find help on the manufacturer's website.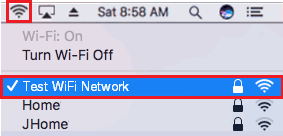
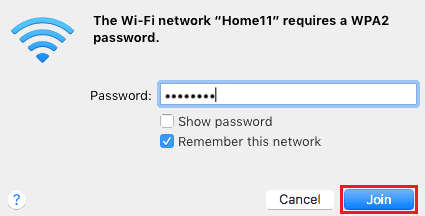
- Enter your Wi-Fi password and tick Remember this network, then click Join to connect to the Wi-Fi. Your Mac will remember your password for next time.
Connect to Wi-Fi on iPhone or iPad
- Open the Settings app and tap Wi-Fi.
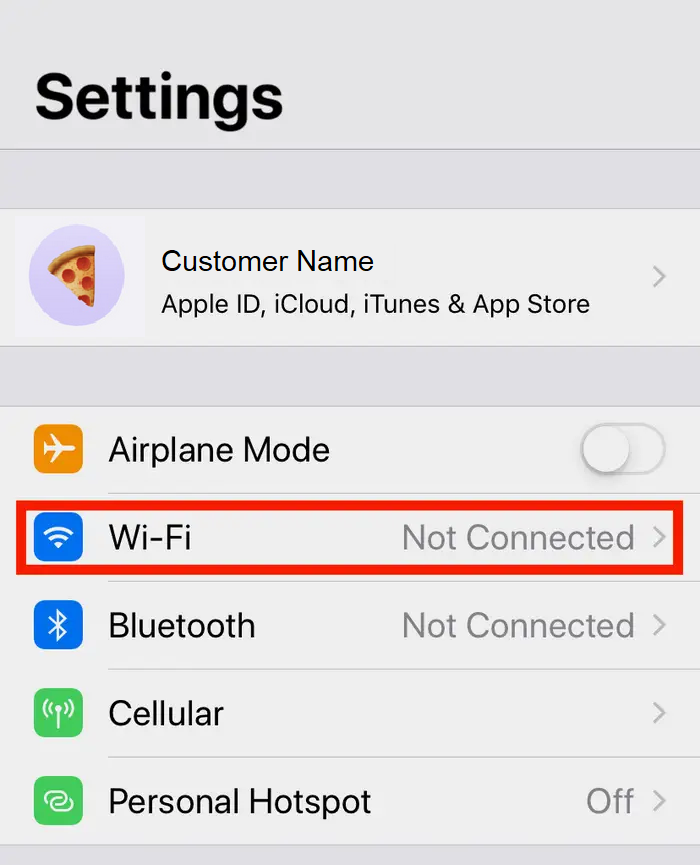
- Find and tap your Wi-Fi network name. If you're using the default Wi-Fi settings on your modem's barcode sticker, please note that the Wi-Fi network name may also be called a "SSID".
Not seeing your Wi-Fi network? Follow our basic Wi-Fi settings guide for iiNet modems. If your modem isn't from iiNet, you should be able to find help on the manufacturer's website.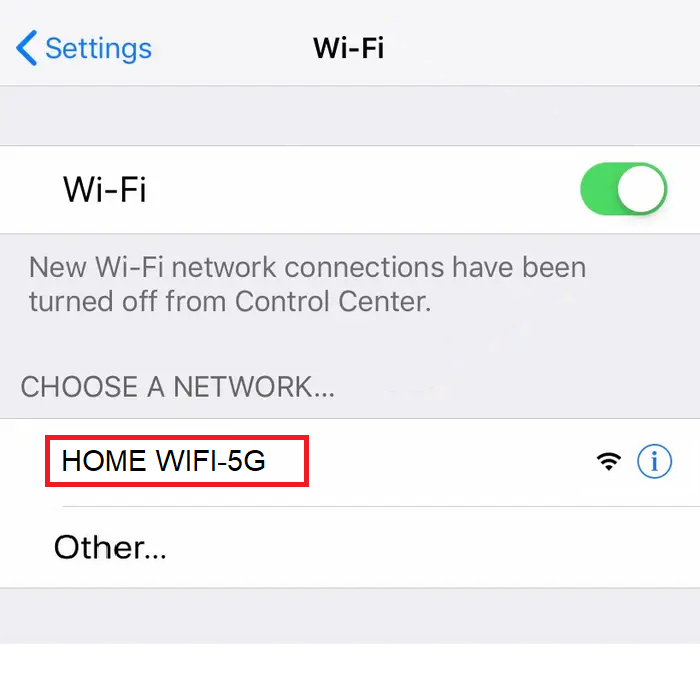
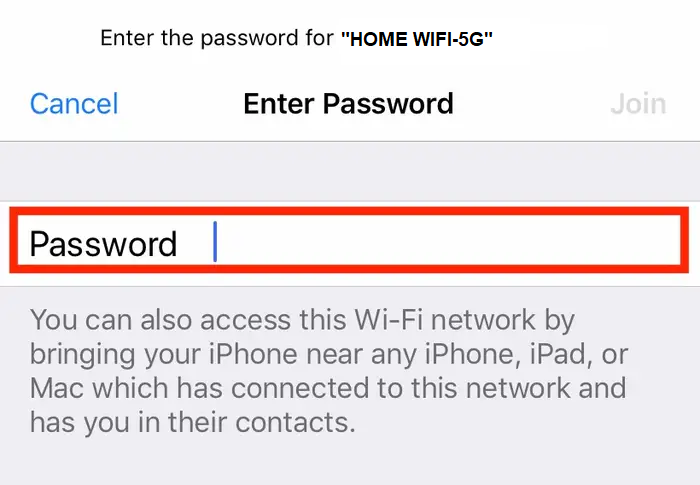
- Enter your Wi-Fi password and tap Join to connect to the Wi-Fi. Your phone or tablet will remember your password for next time.
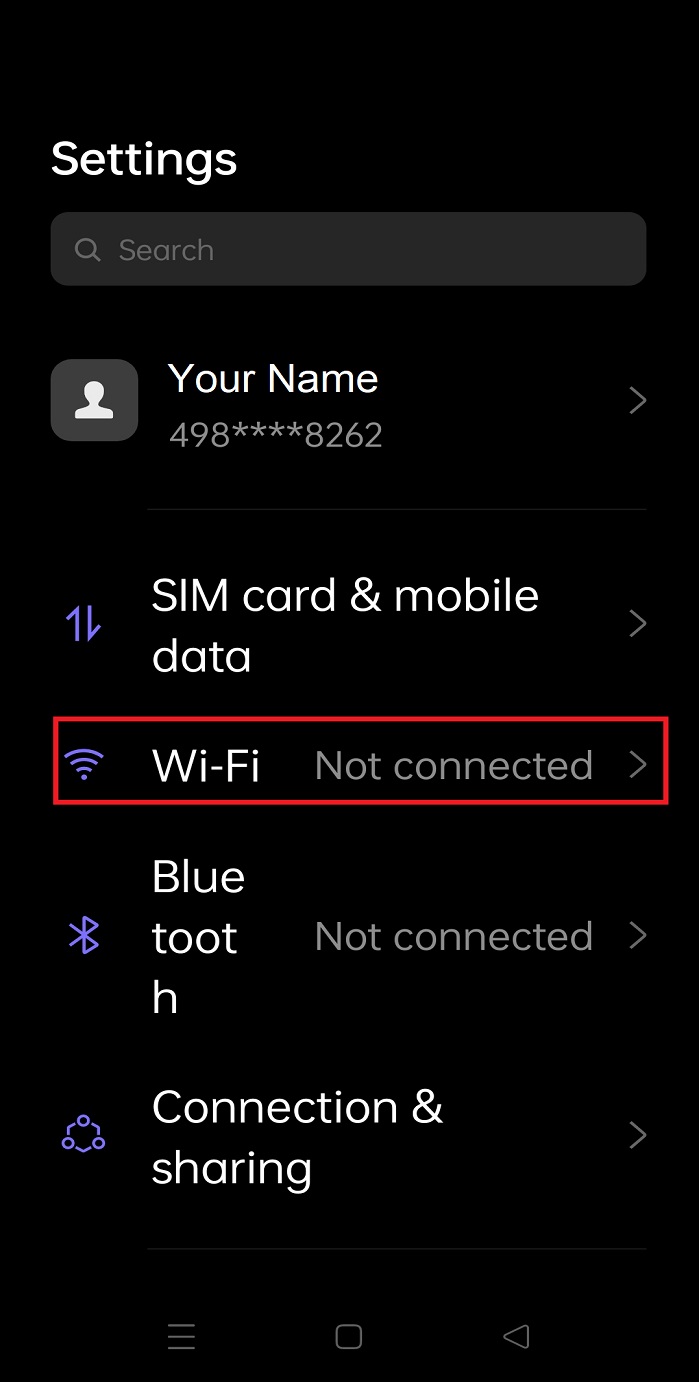
Connect to Wi-Fi on Android OS
Android OS looks different depending on your software version. If this guide doesn't work for you, please check your phone manufacturer's website for help.
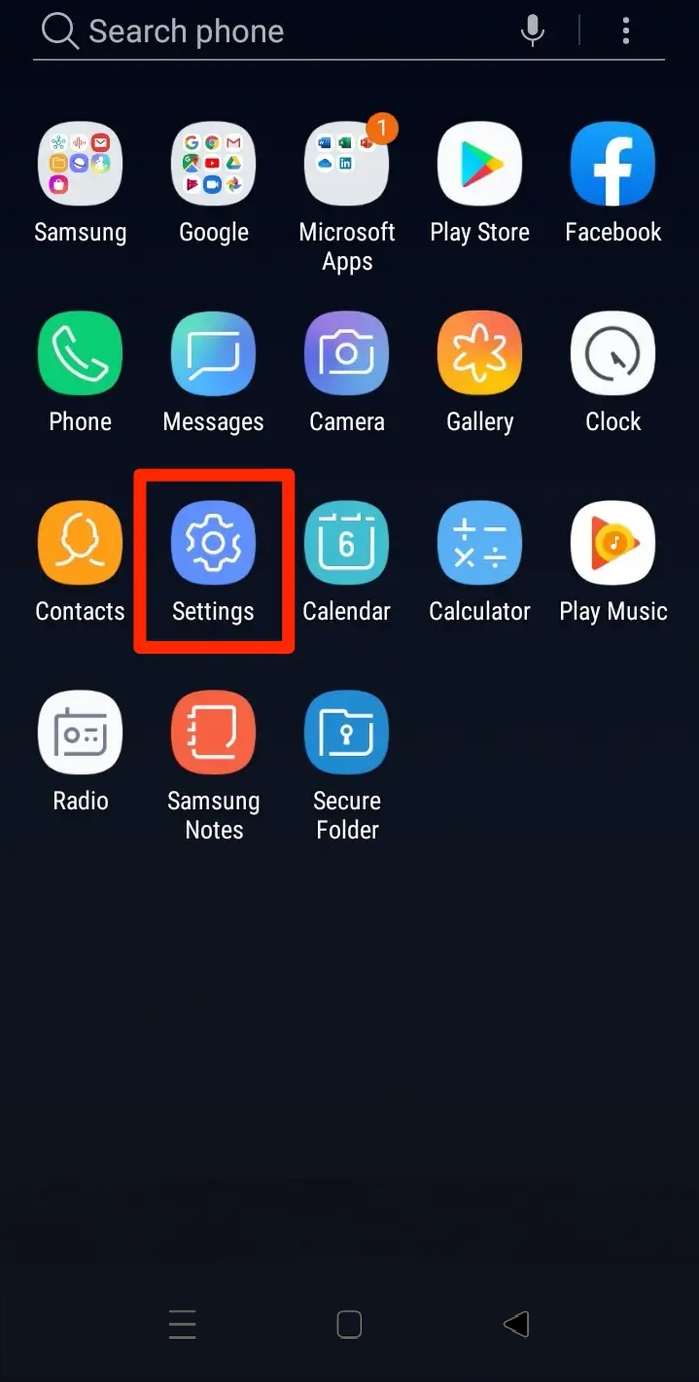
- Open the Settings app.
- Tap Wi-Fi or Wireless & Networks and make sure Wi-Fi is turned on.
- Find and tap your Wi-Fi network name. If you're using the default Wi-Fi settings on your modem's barcode sticker, please note that the Wi-Fi network name may also be called a "SSID".
Not seeing your Wi-Fi network? Follow our basic Wi-Fi settings guide for iiNet modems. If your modem isn't from iiNet, you should be able to find help on the manufacturer's website.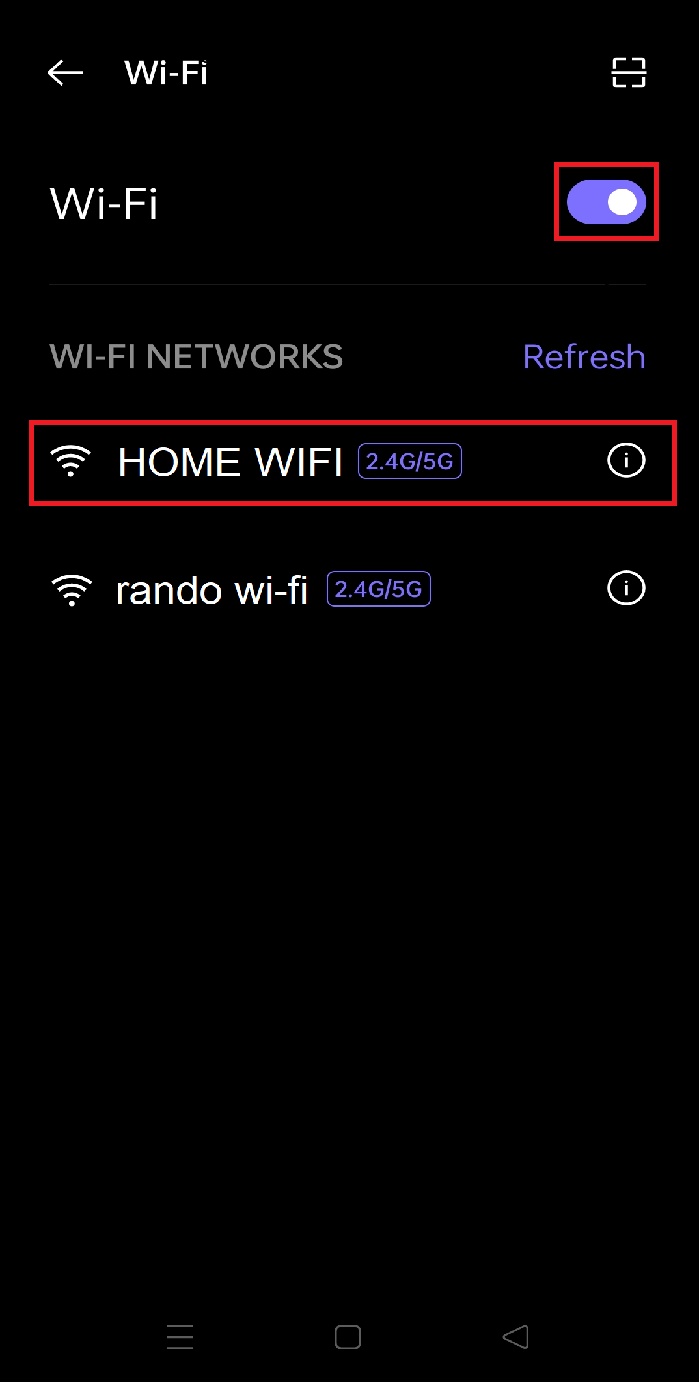
- Enter your Wi-Fi password and tap the tick icon to connect to the Wi-Fi. Your phone will remember your password for next time.