If your iiNet nbn Wireless service is having dropouts, it means your internet will go offline and come back online intermittently. These steps will help you identify the issue.
-
Your service may just be affected by an outage or planned maintenance. You can check your address on nbn®'s Network status and outages page and our Network Status page.
If there is an outage or planned maintenance, the results will give you an estimated fix time. - Make sure that your nbn Wireless antenna is clear of any tree branches or other objects. Severe weather or heavy clouds can also cause connection issues.
-
If your antenna has been damaged, please call us on 13 22 58.
-
Do you have any devices connected to your modem with an Ethernet cable? If these devices stay connected when devices on Wi-Fi drop out, switch to troubleshooting Wi-Fi Dropouts.
-
Find your nbn modem and make sure the cables are plugged in securely and not damaged. Our setup guide will show you how to plug in.
You’ll need to replace any broken or chewed cables.

-
Log into Toolbox and run an nbn connection test.
If the nbn connection test identifies an issue, we’ll contact you.
- Still getting dropouts? Please call us on 13 22 58 and we’ll help you.
If your iiNet nbn Wireless service is offline, you won’t be able to visit a website, browse, stream, or download. Email and any other services that use the internet will not work. These steps will help you identify the issue.
-
Your service may just be affected by an outage or planned maintenance. You can check your address on nbn®'s Network status and outages page and our Network Status page.
If there is an outage or planned maintenance, the results will give you an estimated fix time. -
Make sure that your nbn Wireless antenna is clear of any tree branches or other objects. Severe weather or heavy clouds can also cause connection issues.
If your antenna has been damaged, please call us on 13 22 58. -
Find your nbn modem and make sure the cables are plugged in securely and not damaged. Our setup guide will show you how to plug in.
You’ll need to replace any broken or chewed cables.
-
Turn off the power outlets for your modem and nbn Connection Box for at least 10 seconds.
-
Turn the outlets back on and wait for your modem’s Internet light to come on, then see if you can visit a website.
-
Check your nbn Connection Box's Status light. If it's red, please call us on 13 22 58 and we’ll help you.

-
Do you have any devices connected to your modem with an Ethernet cable? If these devices can visit a website but devices on Wi-Fi can’t, switch to troubleshooting Wi-Fi No Connection.
-
If you can view websites on some devices but not others, even when they’re both connected the same way, you may need to fix some browser settings. Check out our guide on Browsing issues.
-
If you have a phone with mobile data, use it to run an nbn connection test in Toolbox.
If the nbn connection test identifies an issue, we’ll contact you.
-
Still can't get online? Please call us on 13 22 58 and we’ll help you.
If your iiNet nbn Wireless service is running slowly, these steps will help you identify the issue.
-
Your service may just be affected by planned maintenance. You can check your address on nbn®'s Network status and outages page and our Network Status page.
If there is planned maintenance, the results will give you an estimated fix time. -
If you have a phone with mobile data, use it to run an nbn connection test in Toolbox.
If the nbn connection test identifies an issue, we’ll contact you.
-
Make sure that your nbn Wireless antenna is clear of any tree branches or other objects. Severe weather or heavy clouds can also cause connection issues.
-
If your antenna has been damaged, please call us on 13 22 58.
-
Find your nbn modem and turn off its power outlet for at least 10 seconds.
-
Turn the outlet back on and wait for your modem’s Internet light to come on, then run a speed test.
-
Do you have any devices connected to your modem with an Ethernet cable? If speeds on these devices are fine but devices on Wi-Fi are slow, switch to Troubleshooting Wi-Fi speed.
-
Make sure your modem’s Ethernet cables are in good condition, with “CAT6” or “CAT5e” printed on them.
Older Cat5 Ethernet cables are not recommended for nbn services. You’ll need to replace any broken or chewed cables.
-
Your speed may temporarily slow down if you’re running more devices or apps than your connection can handle at the same time. For example, if a device is downloading a large file or running a 4K streaming app, your speed should improve when it’s finished.
If you need to run more devices or apps at the same time, you can change your plan in Toolbox or call us on 13 19 17 for support. -
Run a scan on your antivirus/anti-malware software. If any infections are detected, make sure they are quarantined and removed.
Contact your software’s Customer Support if you need help. -
Still getting slow speeds? Please call us on 13 22 58 and we’ll help you.
Your modem will take care of the hard stuff like internet settings, but we’ll need your help to plug it in. The main cables you need will come in the box, and you can grab extra Ethernet cables from the shops if you need them.
Choose your modem to get started:
| Picture | Modem |
|---|---|
 |
Wi-Fi Max Modem (HWG2025) |
 |
VX420-G2V Modem |
 |
Smart Modem Gateway (VX420-G2H) |
 |
VX220-G2V Modem |
 |
TP-Link VR1600v |
 |
TG-789 Broadband Gateway |
 |
iiNet modem not listed here? See Guides for older modems. |
 |
Don't have an iiNet modem? See our BYO modem guide. |
How to plug in your Wi-Fi Max Modem for nbn Wireless
- Plug in your Wi-Fi Max Modem
- Find your nbn® Connection Box (NCB) and unplug any old modem
- Use the red Ethernet cable to connect your modem’s red 2.5G WAN port to the yellow UNI-D1 port.
If UNI-D1 doesn't work, try each other port and wait a few minutes to see if the Connection Box gets a flashing green STATUS light. The lights are behind the front panel on the Connection Box.
- Power on your Wi-Fi Max modem.
- Use the power cable to connect your Wi-Fi modem to a power outlet, then press the ON/OFF button.
- Wait 20 minutes for the automatic setup to complete.
- You should have a green light on the front of your Wi-Fi modem. If it’s red, call 13 22 58 for help.

- Connect devices via Ethernet.
- For online gaming and HD/4K streaming, Ethernet is better than Wi-Fi. Use Ethernet for desktop PCs, gaming consoles or TVs if you can.
- You can use additional Ethernet cables to connect up to 2 devices to the yellow LAN ports.
- You can connect more devices over Wi-Fi.

- Connect your Wi-Fi devices.
- Find the default name of your Wi-Fi network printed next to “Wi-Fi Name” on your modem’s barcode sticker.
- Select your Wi-Fi Name on your device, then enter the password printed next to “Wi-Fi Password” on your modem’s barcode sticker.
- If you’re using a smartphone, you can just scan the QR code on your modem’s barcode sticker.
Want to customise your Wi-Fi name and password? You can use the My Internet Connect app.

- Plug in your phone.
Got an nbn Phone service?- Use a phone cable to plug your VoIP-ready phone into the grey Phone port.
- Make sure your phone is plugged into a power outlet.
- You should have a green Phone light on the back of your modem. If it’s off or flashing blue, call us for help.

- Download the My Internet Connect app.
It’s easy to manage your home network with the My Internet Connect app.- Make sure your device is connected to your modem’s Wi-Fi network.
- Enter the Login Password on your modem’s barcode sticker.

- Need help? Call our team using these numbers:
- 13 22 58 in Australia.
- +61 8 9214 2222 from overseas.
- National Relay Service for hearing impaired customers.
How to plug in your VX420-G2V Modem for nbn Wireless
- Wait for a message from us asking you to plug in your nbn modem. We need to get your connection ready on our side first.
- Find your nbn Connection Box (NCB) – this will be connected to the wall socket for your nbn Wireless antenna. You may already have a modem plugged in from your last internet service. Unplug any old modem from the NCB and power outlet.
- Use the power cable to connect your modem's Power port to a power outlet, then press your modem’s ON/OFF button.
- Use the Ethernet cable to connect your modem's blue WAN port to your NCB's UNI-D1 port.
- Leave your modem alone for 15 minutes while it runs through its automatic setup.
- Check the Internet light on your modem. If it’s green, you’re online and you can start connecting your devices.
No green light? Call us on 13 22 58 and we can help you out.
- You'll find the default Wi-Fi name (SSID) and Wireless Password/PIN on your modem's barcode sticker. If you want to change your Wi-Fi name or password, use this guide.

- Your devices will automatically connect to the best Wi-Fi possible. If your Wi-Fi’s running slow, check out Improving Wi-Fi Signal.
- For online gaming or HD/4K streaming, Ethernet is better than Wi-Fi. If you have extra Ethernet cables, you can connect up to 4 devices to your modem’s yellow LAN ports.
- To use your iiNet nbn Phone service, just plug a handset into your modem’s green Phone port.

- You’re now good to go.
If you don’t want to keep your old modem, see if your local council has any eWaste recycling facilities.
How to plug in your Smart Modem Gateway (VX420-G2H) for nbn Wireless
- Wait for a message from us asking you to plug in your nbn modem. We need to get your connection ready on our side first.
- Find your nbn Connection Box (NCB) – this will be connected to the wall socket for your nbn Wireless antenna. You may already have a modem plugged in from your last internet service. Unplug any old modem from the NCB and power outlet.
- Use the power cable to connect your modem's Power port to a power outlet, then press your modem’s ON/OFF button.
- Use the Ethernet cable to connect your modem's blue WAN port to your NCB's UNI-D1 port.
- Leave your modem alone for 15 minutes while it runs through its automatic setup.
- Check the Internet light on your modem. If it’s green, you’re online and you can start connecting your devices.
No green light? Call us on 13 22 58 and we can help you out.
- You'll find the default Wi-Fi name (SSID) and Wireless Password/PIN on your modem's barcode sticker. If you want to change your Wi-Fi name or password, use this guide.

- Your devices will automatically connect to the best Wi-Fi possible. If your Wi-Fi’s running slow, check out Improving Wi-Fi Signal.
- For online gaming or HD/4K streaming, Ethernet is better than Wi-Fi. If you have extra Ethernet cables, you can connect up to 4 devices to your modem’s yellow LAN ports.
- To use your iiNet nbn Phone service, just plug a handset into your modem’s green Phone port.

- You're now good to go.
If you don’t want to keep your old modem, see if your local council has any eWaste recycling facilities.
How to plug in your VX220-G2V Modem for nbn Wireless
- Wait for a message from us asking you to plug in your nbn modem. We need to get your connection ready on our side first.
- Find your nbn Connection Box (NCB) – this will be connected to the wall socket for your nbn Wireless antenna. You may already have a modem plugged in from your last internet service. Unplug any old modem from the NCB and power outlet.
- Use the power cable to connect your modem's Power port to a power outlet, then press your modem’s ON/OFF button.
- Use the Ethernet cable to connect your modem's blue WAN port to your NCB's UNI-D1 port.
- Leave your modem alone for 15 minutes while it runs through its automatic setup.
- Check the Internet light on your modem. If it’s blue, you’re online and you can start connecting your devices.
No blue light? Call us on 13 22 58 and we can help you out.
- You'll find the default Wi-Fi name (SSID) and Password on your modem's barcode sticker. If you want to change your Wi-Fi name or password, use this guide.

- Your devices will automatically connect to the best Wi-Fi possible. If your Wi-Fi’s running slow, check out Improving Wi-Fi Signal.
- For online gaming or HD/4K streaming, Ethernet is better than Wi-Fi. If you have extra Ethernet cables, you can connect up to 4 devices to your modem’s yellow LAN ports.
- To use your iiNet nbn Phone service, just plug a handset into your modem’s green Phone port.

- You’re now good to go.
If you don’t want to keep your old modem, see if your local council has any eWaste recycling facilities.
How to plug in your TP-Link VR1600v for nbn Wireless
- Wait for a message from us asking you to plug in your nbn modem. We need to get your connection ready on our side first.
- Find your nbn Connection Box (NCB) – this will be connected to the wall socket for your nbn Wireless antenna. You may already have a modem plugged in from your last internet service. Unplug any old modem from the NCB and power outlet.
- Use the power cable to connect your modem's Power port to a power outlet, then press your modem’s ON/OFF button.
- Use the Ethernet cable to connect your modem's blue WAN port to your NCB's UNI-D1 port.
- Leave your modem alone for 15 minutes while it runs through its automatic setup.
- Check the Internet light on your modem. If it’s green, you’re online and you can start connecting your devices.
No green light? Call us on 13 22 58 and we can help you out.
- You'll find the default Wi-Fi name (SSID) and Wireless Password/PIN on your modem's barcode sticker. If you want to change your Wi-Fi name or password, use this guide.

- We recommend connecting over the 5GHz Wi-Fi channel for faster performance. If your Wi-Fi’s running slow, check out Improving Wi-Fi Signal.
- For online gaming or HD/4K streaming, Ethernet is better than Wi-Fi. If you have extra Ethernet cables, you can connect up to 4 devices to your modem’s yellow LAN ports.
- To use your iiNet nbn Phone service, just plug a handset into your modem’s grey Phone 1 port.
- You’re now good to go.
If you don’t want to keep your old modem, see if your local council has any eWaste recycling facilities.
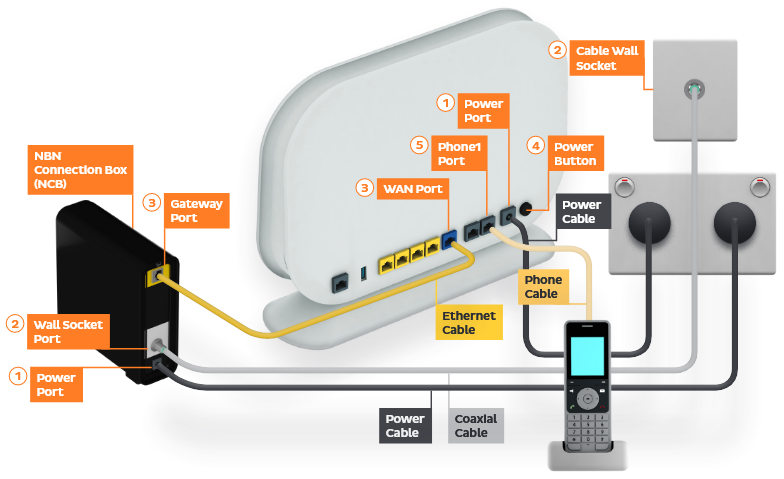
TG-789 Broadband Gateway
- Wait for a message from us asking you to plug in your nbn modem. We need to get your connection ready on our side first.
- Find your nbn Connection Box (NCB) – this will be connected to the wall socket for your nbn Wireless antenna. You may already have a modem plugged in from your last internet service. Unplug any old modem from the NCB and power outlet.
- Use the power cable to connect your modem's Power port to a power outlet, then press your modem’s ON/OFF button.
- Use the Ethernet cable to connect your modem's red WAN port to your NCB's UNI-D1 port.
- Leave your modem alone for 15 minutes while it runs through its automatic setup.
- Check the Internet light on your modem. If it’s green, you’re online and you can start connecting your devices.
No green light? Call us on 13 22 58 and we can help you out.
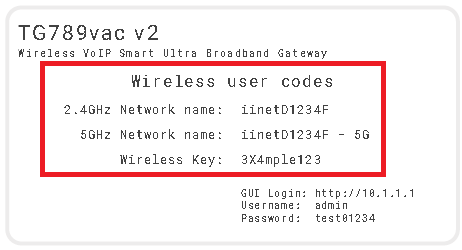
- You'll find the default Wi-Fi Network name and password (Wireless Key) on your modem's barcode sticker. If you want to change your Wi-Fi name or password, use this guide.
- We recommend connecting over the 5GHz Wi-Fi channel for faster performance. If your Wi-Fi’s running slow, check out Improving Wi-Fi Signal.
- For online gaming or HD/4K streaming, Ethernet is better than Wi-Fi. If you have extra Ethernet cables, you can connect up to 4 devices to your modem’s yellow LAN ports.
- To use your iiNet nbn Phone service, just plug a handset into your modem’s green Phone 1 port.

- You’re now good to go.
If you don’t want to keep your old modem, see if your local council has any eWaste recycling facilities.
If your nbn HFC service is having dropouts, it means your internet will go offline and come back online intermittently. These steps will help you identify the issue.
-
Your service may just be affected by an outage or planned maintenance. You can check your address on nbn®'s Network status and outages page and our Network Status page.
If there is an outage or planned maintenance, the results will give you an estimated fix time. - Do you have any devices connected to your modem with an Ethernet cable? If these devices stay connected when devices on Wi-Fi drop out, switch to troubleshooting Wi-Fi Dropouts.
-
Find your nbn modem and make sure the cables are plugged in securely and not damaged. Our setup guide will show you how to plug in.
You’ll need to replace any broken or chewed cables.

-
Log into Toolbox and run an nbn connection test.
If the nbn connection test identifies an issue, we’ll contact you.
- Still getting dropouts? Please call us on 13 22 58 and we’ll help you. Take note of the Serial Number (S/N) and CMAC Number on your nbn Connection Device's barcode sticker because we'll need these details to investigate further.
Arris CM8200 (supplied before 1 October 2024)
Arris CM3500 (supplied after 1 October 2024)
If your iiNet nbn HFC service is offline, you won’t be able to visit a website, browse, stream, or download. Email and any other services that use the internet will not work. These steps will help you identify the issue.
-
Your service may just be affected by an outage or planned maintenance. You can check your address on nbn®'s Network status and outages page and our Network Status page.
If there is an outage or planned maintenance, the results will give you an estimated fix time. - Find your nbn modem and make sure the cables are plugged in securely and not damaged. Our setup guide will show you how to plug in.
You’ll need to replace any broken or chewed cables. If you have an advanced setup with a network switch, it must be plugged into a router instead of directly into the nbn Connection Box (NCB).

- Turn off the power outlets for your modem and NCB for at least 10 seconds.
-
Turn the outlets back on and wait for your modem’s Internet light to come on, then see if you can visit a website.
-
Do you have any devices connected to your modem with an Ethernet cable? If these devices can visit a website but devices on Wi-Fi can’t, switch to troubleshooting Wi-Fi No Connection.
-
If you can view websites on some devices but not others, even when they’re both connected the same way, you may need to fix some browser settings. Check out our guide on Browsing issues.
-
If you have a phone with mobile data, use it to run an nbn connection test in Toolbox.
If the nbn connection test identifies an issue, we’ll contact you.
-
Still can't get online? Please call us on 13 22 58 and we’ll help you. Take note of the Serial Number (S/N) and CMAC Number on your NCB's barcode sticker because we'll need these details to investigate further.
Arris CM8200 (supplied before 1 October 2024)
Arris CM3500 (supplied after 1 October 2024)
If your iiNet nbn HFC service is running slowly, these steps will help you identify the issue.
-
Your service may just be affected by planned maintenance. You can check your address on nbn®'s Network status and outages page and our Network Status page.
If there is planned maintenance, the results will give you an estimated fix time. -
If you have a phone with mobile data, use it to run an nbn connection test in Toolbox.
If the nbn connection test identifies an issue, we’ll contact you.
- Find your nbn modem and turn off its power outlet for at least 10 seconds.
-
Turn the outlet back on and wait for your modem’s Internet light to come on, then run a speed test.
-
Do you have any devices connected to your modem with an Ethernet cable? If speeds on these devices are fine but devices on Wi-Fi are slow, switch to Troubleshooting Wi-Fi speed.
-
Make sure your modem’s Ethernet cables are in good condition, with “CAT6” or “CAT5e” printed on them.
Older Cat5 Ethernet cables are not recommended for nbn services. You’ll need to replace any broken or chewed cables.
-
Your speed may temporarily slow down if you’re running more devices or apps than your connection can handle at the same time. For example, if a device is downloading a large file or running a 4K streaming app, your speed should improve when it’s finished.
If you need to run more devices or apps at the same time, you can change your plan in Toolbox or call us on 13 19 17 for support. -
Run a scan on your antivirus/anti-malware software. If any infections are detected, make sure they are quarantined and removed.
Contact your software’s Customer Support if you need help. -
Still getting slow speeds? Please call us on 13 22 58 and we’ll help you.
Your modem will take care of the hard stuff like internet settings, but we’ll need your help to plug it in. The main cables you need will come in the box, and you can grab extra Ethernet cables from the shops if you need them.
Choose your modem to get started:
| Picture | Modem |
|---|---|
|
|
Wi-Fi Max Modem (HWG2025) |
|
|
VX420-G2V Modem |
|
|
Smart Modem Gateway (VX420-G2H) |
|
|
VX220-G2V Modem |
|
|
TP-Link VR1600v |
|
|
TG-789 Broadband Gateway |
|
|
iiNet modem not listed here? See Guides for older modems. |
|
|
Don't have an iiNet modem? See our BYO modem guide. |

How to plug in your Wi-Fi Max Modem for nbn HFC
- Plug in your Wi-Fi Max Modem
- Find your nbn® Connection Box (NCB) and unplug any old modem
- Leave the NCB plugged into the coaxial wall outlet.
- Use the red Ethernet cable to connect your modem’s red 2.5G WAN port to the yellow 2.5G or UNI-D1 port.

- Power on your Wi-Fi Max modem.
- Use the power cable to connect your Wi-Fi modem to a power outlet, then press the ON/OFF button.
- Wait 20 minutes for the automatic setup to complete.
- You should have a green light on the front of your Wi-Fi modem. If it’s red, call 13 22 58 for help.
- Connect devices via Ethernet.
- For online gaming and HD/4K streaming, Ethernet is better than Wi-Fi. Use Ethernet for desktop PCs, gaming consoles or TVs if you can.
- You can use additional Ethernet cables to connect up to 2 devices to the yellow LAN ports.
- You can connect more devices over Wi-Fi.
- Connect your Wi-Fi devices.
- Find the default name of your Wi-Fi network printed next to “Wi-Fi Name” on your modem’s barcode sticker.
- Select your Wi-Fi Name on your device, then enter the password printed next to “Wi-Fi Password” on your modem’s barcode sticker.
- If you’re using a smartphone, you can just scan the QR code on your modem’s barcode sticker.
Want to customise your Wi-Fi name and password? You can use the My Internet Connect app.
- Plug in your phone.
Got an nbn Phone service?- Use a phone cable to plug your VoIP-ready phone into the grey Phone port.
- Make sure your phone is plugged into a power outlet.
- You should have a green Phone light on the back of your modem. If it’s off or flashing blue, call us for help.
- Download the My Internet Connect app.
It’s easy to manage your home network with the My Internet Connect app.- Make sure your device is connected to your modem’s Wi-Fi network.
- Enter the Login Password on your modem’s barcode sticker.
- Need help? Call our team using these numbers:
- 13 22 58 in Australia.
- +61 8 9214 2222 from overseas.
- National Relay Service for hearing impaired customers.
How to plug in your VX420-G2V Modem for nbn HFC
- Wait for a message from us asking you to plug in your nbn modem. We need to get your connection ready on our side first.
- Find your phone wall socket and nbn Connection Box (NCB) – you probably already have a modem plugged in from your last internet service. Unplug any old modem from the NCB and power outlet.
If your NCB is missing, please call us on 1300 634 515. - Use the power cable to connect your modem's Power port to a power outlet and press your modem’s ON/OFF button.
Your NCB should already be connected to a power outlet - if not, plug it in. - Use the Ethernet cable to connect your modem's blue WAN port to your NCB's UNI-D1 port or 2.5G port.
NCBs with 2.5G ports were supplied from 1 October 2024. - Leave your modem alone for 20 minutes while it runs through its automatic setup.
- Check the Internet light on your modem. If it’s green, you’re online and you can start connecting your devices.
No green light? Call us on 13 22 58 and we can help you out. - You'll find the default Wi-Fi name (SSID) and Wireless Password/PIN on your modem's barcode sticker. If you want to change your Wi-Fi name or password, use this guide.
- Your devices will automatically connect to the best Wi-Fi possible. If your Wi-Fi’s running slow, check out Improving Wi-Fi Signal.
- For online gaming or HD/4K streaming, Ethernet is better than Wi-Fi. If you have extra Ethernet cables, you can connect up to 4 devices to your modem’s yellow LAN ports.
- To use your iiNet nbn Phone service, just plug a handset into your modem’s green Phone port.

- You’re now good to go.
If you don’t want to keep your old modem, see if your local council has any eWaste recycling facilities..
How to plug in your Smart Modem Gateway (VX420-G2H) for nbn HFC
Note for video: If you got your NCB after 1 October 2024, you'll have a different model with a 2.5G port instead of a UNI-D1 port.
- Wait for a message from us asking you to plug in your nbn modem. We need to get your connection ready on our side first.
- Find your phone wall socket and nbn Connection Box (NCB) – you probably already have a modem plugged in from your last internet service. Unplug any old modem from the NCB and power outlet.
If your NCB is missing, please call us on 1300 634 515. - Use the power cable to connect your modem's Power port to a power outlet and press your modem’s ON/OFF button.
Your NCB should already be connected to a power outlet - if not, plug it in. - Use the Ethernet cable to connect your modem's blue WAN port to your NCB's UNI-D1 port or 2.5G port.
NCBs with 2.5G ports were supplied from 1 October 2024. - Leave your modem alone for 20 minutes while it runs through its automatic setup.
- Check the Internet light on your modem. If it’s green, you’re online and you can start connecting your devices.
No green light? Call us on 13 22 58 and we can help you out. - You'll find the default Wi-Fi name (SSID) and Wireless Password/PIN on your modem's barcode sticker. If you want to change your Wi-Fi name or password, use this guide.
- Your devices will automatically connect to the best Wi-Fi possible. If your Wi-Fi’s running slow, check out Improving Wi-Fi Signal.
- For online gaming or HD/4K streaming, Ethernet is better than Wi-Fi. If you have extra Ethernet cables, you can connect up to 4 devices to your modem’s yellow LAN ports.
- To use your iiNet nbn Phone service, just plug a handset into your modem’s green Phone port.

- You're now good to go.
If you don’t want to keep your old modem, see if your local council has any eWaste recycling facilities.
Note for nbn services with 4G Backup: Whenever your modem’s 4G light is lit, that means your modem has automatically connected to the 4G Backup service because your nbn service is unavailable, such as during initial setup or network maintenance.
Your nbn Phone will not work while 4G Backup is in use.
Once you're connected to nbn, if you notice the 4G Backup service has turned back on for an extended period of time:
- Restart your modem.
- Make sure your modem is plugged in correctly for nbn.
- Contact us if the issue persists as we may need to investigate.

How to plug in your VX220-G2V Modem for nbn HFC
Note for video: If you got your NCB after 1 October 2024, you'll have a different model with a 2.5G port instead of a UNI-D1 port.
- Wait for a message from us asking you to plug in your nbn modem. We need to get your connection ready on our side first.
- Find your phone wall socket and nbn Connection Box (NCB) – you probably already have a modem plugged in from your last internet service. Unplug any old modem from the NCB and power outlet.
If your NCB is missing, please call us on 1300 634 515. - Use the power cable to connect your modem's Power port to a power outlet and press your modem’s ON/OFF button.
Your NCB should already be connected to a power outlet - if not, plug it in. - Use the Ethernet cable to connect your modem's blue WAN port to your NCB's UNI-D1 port or 2.5G port.
NCBs with 2.5G ports were supplied from 1 October 2024. - Leave your modem alone for 20 minutes while it runs through its automatic setup.
- Check the Internet light on your modem. If it’s blue, you’re online and you can start connecting your devices.
No blue light? Call us on 13 22 58 and we can help you out. - You'll find the default Wi-Fi name (SSID) and Password on your modem's barcode sticker. If you want to change your Wi-Fi name or password, use this guide.
- Your devices will automatically connect to the best Wi-Fi possible. If your Wi-Fi’s running slow, check out Improving Wi-Fi Signal.
- For online gaming or HD/4K streaming, Ethernet is better than Wi-Fi. If you have extra Ethernet cables, you can connect up to 4 devices to your modem’s yellow LAN ports.
- To use your iiNet nbn Phone service, just plug a handset into your modem’s green Phone port.

- You’re now good to go.
If you don’t want to keep your old modem, see if your local council has any eWaste recycling facilities.
How to plug in your TP-Link VR1600v for nbn HFC
Note for video: If you got your NCB after 1 October 2024, you'll have a different model with a 2.5G port instead of a UNI-D1 port.
- Wait for a message from us asking you to plug in your nbn modem. We need to get your connection ready on our side first.
- Find your phone wall socket and nbn Connection Box (NCB) – you probably already have a modem plugged in from your last internet service. Unplug any old modem from the NCB and power outlet.
If your NCB is missing, please call us on 1300 634 515. - Use the power cable to connect your modem's Power port to a power outlet and press your modem’s ON/OFF button.
Your NCB should already be connected to a power outlet - if not, plug it in. - Use the Ethernet cable to connect your modem's blue WAN port to your NCB's UNI-D1 port or 2.5G port.
NCBs with 2.5G ports were supplied from 1 October 2024. - Leave your modem alone for 20 minutes while it runs through its automatic setup.
- Check the Internet light on your modem. If it’s green, you’re online and you can start connecting your devices.
No green light? Call us on 13 22 58 and we can help you out. - You'll find the default Wi-Fi name (SSID) and Wireless Password/PIN on your modem's barcode sticker. If you want to change your Wi-Fi name or password, use this guide.
- We recommend connecting over the 5GHz Wi-Fi channel for faster performance. If your Wi-Fi’s running slow, check out Improving Wi-Fi Signal.
- For online gaming or HD/4K streaming, Ethernet is better than Wi-Fi. If you have extra Ethernet cables, you can connect up to 4 devices to your modem’s yellow LAN ports.
- To use your iiNet nbn Phone service, just plug a handset into your modem’s grey Phone 1 port.
- You’re now good to go.
If you don’t want to keep your old modem, see if your local council has any eWaste recycling facilities.
How to plug in your TG-789 Broadband Gateway for nbn HFC
- Wait for a message from us asking you to plug in your nbn modem. We need to get your connection ready on our side first.
- Find your phone wall socket and nbn Connection Box (NCB) – you probably already have a modem plugged in from your last internet service. Unplug any old modem from the NCB and power outlet.
If your NCB is missing, please call us on 1300 634 515. - Use the power cable to connect your modem's Power port to a power outlet and press your modem’s ON/OFF button.
Your NCB should already be connected to a power outlet - if not, plug it in. - Use the Ethernet cable to connect your modem's red WAN port to your NCB's UNI-D1 port or 2.5G port.
NCBs with 2.5G ports were supplied from 1 October 2024. - Leave your modem alone for 20 minutes while it runs through its automatic setup.
- Check the Internet light on your modem. If it’s green, you’re online and you can start connecting your devices.
No green light? Call us on 13 22 58 and we can help you out. - You'll find the default Wi-Fi Network name and password (Wireless Key) on your modem's barcode sticker. If you want to change your Wi-Fi name or password, use this guide.
- We recommend connecting over the 5GHz Wi-Fi channel for faster performance. If your Wi-Fi’s running slow, check out Improving Wi-Fi Signal.
- For online gaming or HD/4K streaming, Ethernet is better than Wi-Fi. If you have extra Ethernet cables, you can connect up to 4 devices to your modem’s yellow LAN ports.
- To use your iiNet nbn Phone service, just plug a handset into your modem’s green Phone 1 port.

- You’re now good to go.
If you don’t want to keep your old modem, see if your local council has any eWaste recycling facilities.
If your iiNet nbn FTTB/N service is having dropouts, it means your internet will go offline and come back online intermittently. These steps will help you identify the issue.
-
Your service may just be affected by an outage or planned maintenance. You can check your address on nbn®'s Network status and outages page and our Network Status page.
If there is an outage or planned maintenance, the results will give you an estimated fix time. - Do you have any devices connected to your modem with an Ethernet cable? If these devices stay connected when devices on Wi-Fi drop out, switch to troubleshooting Wi-Fi Dropouts.
-
Find your nbn modem and make sure the cables are plugged in securely and not damaged. Our setup guide will show you how to plug in.
You’ll need to replace any broken or chewed cables. Line filters that were used for ADSL broadband must not be used for nbn.

-
Log into Toolbox and run an nbn connection test.
If the nbn connection test identifies an issue, we’ll contact you.
- Still getting dropouts? Please call us on 13 22 58 and we’ll help you.
If your iiNet nbn FTTB/N service is offline, you won’t be able to visit a website, browse, stream, or download. Email and any other services that use the internet will not work. These steps will help you identify the issue.
-
Your service may just be affected by an outage or planned maintenance. You can check your address on nbn®'s Network status and outages page and our Network Status page.
If there is an outage or planned maintenance, the results will give you an estimated fix time. -
If you think an incompatible modem has been plugged in at your place, please call us on 13 22 58 so we can get your connection unblocked. If an incompatible modem is detected, nbn® will block a connection to stop wider network issues.
All iiNet modems are white-listed with nbn®. -
Find your nbn modem and make sure the cables are plugged in securely and not damaged. Our setup guide will show you how to plug in.
You’ll need to replace any broken or chewed cables.

-
Turn off your modem’s power outlet for at least 10 seconds.
-
Turn the outlet back on and wait for your modem’s Internet light to come on, then see if you can visit a website.
-
Do you have any devices connected to your modem with an Ethernet cable? If these devices can visit a website but devices on Wi-Fi can’t, switch to troubleshooting Wi-Fi No Connection.
-
If you can view websites on some devices but not others, even when they’re both connected the same way, you may need to fix some browser settings. Check out our guide on Browsing issues.
-
If you have a phone with mobile data, use it to run an nbn connection test in Toolbox.
If the nbn connection test identifies an issue, we’ll contact you.
-
Still can't get online? Please call us on 13 22 58 and we’ll help you.