Your modem will take care of the hard stuff like internet settings, but we’ll need your help to plug it in. The main cables you need will come in the box, and you can grab extra Ethernet cables from the shops if you need them.
Choose your modem to get started:
| Picture | Modem |
|---|---|
 |
Wi-Fi Max Modem (HWG2025) |
 |
VX420-G2V Modem |
 |
Smart Modem Gateway (VX420-G2H) |
 |
VX220-G2V Modem |
 |
TP-Link VR1600v |
 |
TG-789 Broadband Gateway |
 |
iiNet modem not listed here? See Guides for older modems. |
 |
Don't have an iiNet modem? See our BYO modem guide. |
How to plug in your Wi-Fi Max Modem for nbn FTTP
- Plug in your Wi-Fi Max modem.
- Find your nbn® Connection Box (NCB) and unplug any old modem.
- Use the red Ethernet cable to connect your modem’s red 2.5G WAN port to the yellow PORT port.
Does your NCB have 4 yellow ports? Plug into the UNI-D1 or PORT 1 port first. If that doesn’t work, try each other port and wait a few minutes to see if the Connection Box gets a green OPTICAL light.
- Power on your Wi-Fi Max modem.
- Use the power cable to connect your Wi-Fi modem to a power outlet, then press the ON/OFF button.
- Wait 20 minutes for the automatic setup to complete.
- You should have a green light on the front of your Wi-Fi modem. If it’s red, call 13 22 58 for help.

- Connect devices via Ethernet.
- For online gaming and HD/4K streaming, Ethernet is better than Wi-Fi. Use Ethernet for desktop PCs, gaming consoles or TVs if you can.
- You can use additional Ethernet cables to connect up to 2 devices to the yellow LAN ports.
- You can connect more devices over Wi-Fi.

- Connect your Wi-Fi devices.
- Find the default name of your Wi-Fi network printed next to “Wi-Fi Name” on your modem’s barcode sticker.
- Select your Wi-Fi Name on your device, then enter the password printed next to “Wi-Fi Password” on your modem’s barcode sticker.
- If you’re using a smartphone, you can just scan the QR code on your modem’s barcode sticker.
Want to customise your Wi-Fi name and password? You can use the My Internet Connect app.

- Plug in your phone.
Got an nbn Phone service?- Use a phone cable to plug your VoIP-ready phone into the grey Phone port.
- Make sure your phone is plugged into a power outlet.
- You should have a green Phone light on the back of your modem. If it’s off or flashing blue, call us for help.

- Download the My Internet Connect app.
It’s easy to manage your home network with the My Internet Connect app.- Make sure your device is connected to your modem’s Wi-Fi network.
- Enter the Login Password on your modem’s barcode sticker.

- Need help? Call our team using these numbers:
- 13 22 58 in Australia.
- +61 8 9214 2222 from overseas.
- National Relay Service for hearing impaired customers.
How to plug in your VX420-G2V Modem for nbn FTTP
Note for video: If your nbn Connection Box (NCB) doesn’t have UNI-D ports, you’ll need to plug into the yellow PORT or PORT 1 instead.
- Wait for a message from us asking you to plug in your nbn modem. We need to get your connection ready on our side first.
- Find your nbn Connection Box (NCB) – it's usually installed on the inside of an exterior wall, sometimes in the garage. Unplug any old modem from the NCB and power outlet.
- Use the power cable to connect your modem's Power port to a power outlet, turn it on, then press your modem’s ON/OFF button.
- Use the Ethernet cable to connect your modem's blue WAN port to your NCB's yellow PORT.
NCB has 4 ports? Plug into UNI-D1 or PORT 1 first. If that doesn’t work, try each other port and wait a few minutes to see if your NCB gets a green Optical light. If all NCB lights are off, press the LED ON/OFF button to turn them back on. - Take a break for 30 minutes while your modem runs an automatic setup.
- Check your modem's Internet light. If it's green, you’re online and you can start connecting devices.
No green light? Call us on 13 22 58 and we can help you out.
- You'll find the default Wi-Fi name (SSID) and Wireless Password/PIN on your modem's barcode sticker. If you want to change your Wi-Fi name or password, use this guide.

- Your devices will automatically connect to the best Wi-Fi possible. If your Wi-Fi’s running slow, check out Improving Wi-Fi Signal.
- For online gaming or HD/4K streaming, Ethernet is better than Wi-Fi. If you have extra Ethernet cables, you can connect up to 4 devices to your modem’s yellow LAN ports.
- To use your iiNet nbn Phone service, just plug a handset into your modem’s green Phone port.
If your service was connected before 15 May 2024 then plug your handset into your NCB's UNI-V1 port instead.
- You’re now good to go.
If you don’t want to keep your old modem, see if your local council has any eWaste recycling facilities.
How to plug in your Smart Modem Gateway (VX420-G2H) for nbn FTTP
Note for video: If your nbn Connection Box (NCB) doesn’t have UNI-D ports, you’ll need to plug into the yellow PORT or PORT 1 instead.
- Wait for a message from us asking you to plug in your nbn modem. We need to get your connection ready on our side first.
- Find your nbn Connection Box (NCB) – it's usually installed on the inside of an exterior wall, sometimes in the garage. Unplug any old modem from the NCB and power outlet.
- Use the power cable to connect your modem's Power port to a power outlet, turn it on and press your modem’s ON/OFF button.
- Use the Ethernet cable to connect your modem's blue WAN port to your NCB's yellow PORT.
NCB has 4 ports? Plug into UNI-D1 or PORT 1 first. If that doesn’t work, try each other port and wait a few minutes to see if your NCB gets a green Optical light. If all NCB lights are off, press the LED ON/OFF button to turn them back on. - Take a break for 30 minutes while your modem runs an automatic setup.
- Check your modem's Internet light. If it’s green, you’re online and you can start connecting your devices.
No green light? Call us on 13 22 58 and we can help you out.
- You'll find the default Wi-Fi name (SSID) and Wireless Password/PIN on your modem's barcode sticker. If you want to change your Wi-Fi name or password, use this guide.

- Your devices will automatically connect to the best Wi-Fi possible. If your Wi-Fi’s running slow, check out Improving Wi-Fi Signal.
- For online gaming or HD/4K streaming, Ethernet is better than Wi-Fi. If you have extra Ethernet cables, you can connect up to 4 devices to your modem’s yellow LAN ports.
- To use your iiNet nbn Phone service, just plug a handset into your modem’s green Phone port.
If your service was connected before 15 May 2024 then plug your handset into your NCB's UNI-V1 port instead.
- You're now good to go.
If you don’t want to keep your old modem, see if your local council has any eWaste recycling facilities.
Note for nbn services with 4G Backup: Whenever your modem’s 4G light is lit, that means your modem has automatically connected to the 4G Backup service because your nbn service is unavailable, such as during initial setup or network maintenance.
Your nbn Phone will not work while 4G Backup is in use.
Once you're connected to nbn, if you notice the 4G Backup service has turned back on for an extended period of time:
- Restart your modem.
- Make sure your modem is plugged in correctly for nbn.
- Contact us if the issue persists as we may need to investigate.

How to plug in your VX220-G2V Modem for nbn FTTP
Note for video: If your nbn Connection Box (NCB) doesn’t have UNI-D ports, you’ll need to plug into the yellow PORT or PORT 1 instead. After 15 May 2024, you'll need to plug your handset into your modem's green Phone port instead of the UNI-V port on the nbn Connection Box.
- Wait for a message from us asking you to plug in your nbn modem. We need to get your connection ready on our side first.
- Find your nbn Connection Box (NCB) – it's usually installed on the inside of an exterior wall, sometimes in the garage. Unplug any old modem from the NCB and power outlet.
- Use the power cable to connect your modem's Power port to a power outlet, turn it on, then press your modem’s ON/OFF button.
- Use the Ethernet cable to connect your modem's blue WAN port to your NCB's yellow PORT.
NCB has 4 ports? Plug into UNI-D1 or PORT 1 first. If that doesn’t work, try each other port and wait a few minutes to see if your NCB gets a green Optical light. If all NCB lights are off, press the LED ON/OFF button to turn them back on. - Take a break for 30 minutes while your modem runs an automatic setup.
- Check your modem's Internet light. If it’s blue, you’re online and you can start connecting devices.
No blue light? Call us on 13 22 58 and we can help you out.
- You'll find the default Wi-Fi name (SSID) and Password on your modem's barcode sticker. If you want to change your Wi-Fi name or password, use this guide.

- Your devices will automatically connect to the best Wi-Fi possible. If your Wi-Fi’s running slow, check out Improving Wi-Fi Signal.
- For online gaming or HD/4K streaming, Ethernet is better than Wi-Fi. If you have extra Ethernet cables, you can connect up to 4 devices to your modem’s yellow LAN ports.
- To use your iiNet nbn Phone service, just plug a handset into your modem’s green Phone port.
If your service was connected before 15 May 2024 then plug your handset into your NCB's UNI-V1 port instead.
- You’re now good to go.
If you don’t want to keep your old modem, see if your local council has any eWaste recycling facilities.
How to plug in your TP-Link VR1600v for nbn FTTP
- Wait for a message from us asking you to plug in your nbn modem. We need to get your connection ready on our side first.
- Find your nbn Connection Box (NCB) – it's usually installed on the inside of an exterior wall, sometimes in the garage. Unplug any old modem from the NCM and power outlet.
- Use the power cable to connect your modem's Power port to a power outlet, turn it on, then press your modem’s ON/OFF button.
- Use the Ethernet cable to connect your modem's blue WAN port to your NCB's yellow PORT.
NCB has 4 ports? Plug into UNI-D1 or PORT 1 first. If that doesn’t work, try each other port and wait a few minutes to see if your NCB gets a green Optical light. If all NCB lights are off, press the LED ON/OFF button to turn them back on. - Take a break for 30 minutes while your modem runs an automatic setup.
- Check your modem's Internet light. If it’s green, you’re online and you can start connecting devices.
No green light? Call us on 13 22 58 and we can help you out.
- You'll find the default Wi-Fi name (SSID) and Wireless Password/PIN on your modem's barcode sticker. If you want to change your Wi-Fi name or password, use this guide.

- We recommend connecting over the 5GHz Wi-Fi channel for faster performance. If your Wi-Fi’s running slow, check out Improving Wi-Fi Signal.
- For online gaming or HD/4K streaming, Ethernet is better than Wi-Fi. If you have extra Ethernet cables, you can connect up to 4 devices to your modem’s yellow LAN ports.
- To use your iiNet nbn Phone service, just plug a handset into your modem’s grey Phone 1 port.
If your service was connected before 15 May 2024 then plug your handset into your NCB's UNI-V1 port instead.

- You’re now good to go.
If you don’t want to keep your old modem, see if your local council has any eWaste recycling facilities.
How to plug in your TG-789 Broadband Gateway for nbn FTTP
- Wait for a message from us asking you to plug in your nbn modem. We need to get your connection ready on our side first.
- Find your nbn Connection Box (NCB) – it's usually installed on the inside of an exterior wall, sometimes in the garage. Unplug any old modem from the NCM and power outlet.
- Use the power cable to connect your modem's Power port to a power outlet, turn it on, then press your modem’s ON/OFF button.
- Use the Ethernet cable to connect your modem's red WAN port to your NCB's yellow PORT.
NCB has 4 ports? Plug into UNI-D1 or PORT 1 first. If that doesn’t work, try each other port and wait a few minutes to see if your NCB gets a green Optical light. If all NCB lights are off, press the LED ON/OFF button to turn them back on. - Take a break for 30 minutes while your modem runs an automatic setup.
- Check your modem's Internet light. If it’s green, you’re online and you can start connecting devices.
No green light? Call us on 13 22 58 and we can help you out.
- You'll find the default Wi-Fi Network name and password (Wireless Key) on your modem's barcode sticker. If you want to change your Wi-Fi name or password, use this guide.

- We recommend connecting over the 5GHz Wi-Fi channel for faster performance. If your Wi-Fi’s running slow, check out Improving Wi-Fi Signal.
- For online gaming or HD/4K streaming, Ethernet is better than Wi-Fi. If you have extra Ethernet cables, you can connect up to 4 devices to your modem’s yellow LAN ports.
- To use your iiNet nbn Phone service, just plug a handset into your modem’s green Phone 1 port.
If your service was connected before 15 May 2024 then plug your handset into your NCB's UNI-V1 port instead.

- You’re now good to go.
If you don’t want to keep your old modem, see if your local council has any eWaste recycling facilities.
This article will explain what to do if you’re getting unwanted phone calls to your home phone number.
Select one of the links below to jump to a query:
- Are the callers telemarketers?
- Phone harassment and other malicious calls
- What do I need to do to stop unwanted calls?
Are the callers telemarketers?
If the calls are unsolicited telemarketers from businesses you haven’t dealt with before, then you should register on the Do Not Call Register.
This register is managed by the Australian Communications and Media Authority on behalf of the Australian Government. Once you have registered, Australian telemarketers and fax marketers must not contact you.
Phone harassment and other malicious calls
If you’re getting threatening or otherwise unwelcome calls that:
- Total 10 or more unwelcome calls spread over a 24 hour period;
- Total 3 or more unwelcome calls over a 48 to 120 hour period; or
- Are made at consistent and/or regular intervals,
Please call us on 13 22 58 and request assistance as soon as possible. We can assist by:
- Capturing trace logs for VoIP internet phone services (e.g. NBN Phone).
- Setting up a Malicious Call Trace for fixed line phone services (e.g. landline).
- Facilitating a change of phone number if desired.
What do I need to do to stop unwanted calls?
-
Write down the time and date of each unwelcome call, using the exact date and time in your phone's call history.
-
Once you have recorded enough unwelcome calls according to the list below, please call us on 13 22 58 and we'll investigate.
- 10 or more times within 24 hours; or
- 3 or more times within 48 to 120 hours; or
- Any number of calls made at consistent and/or regular intervals (e.g. every Thursday night for 3 weeks in a row, or calls every 2 days) and where there are special circumstances.
Special circumstances may include threats against your personal safety, vulnerable situations like domestic or family violence, or a result of your financial, employment or other circumstances. -
If we find that there's been a pattern of unwelcome calls, a Warning Letter (Cease and Desist) will be sent to the malicious caller by their phone provider. At no point is the malicious caller's identity supplied to iiNet or to you.
Note: A Warning Letter can't be sent if the caller is using an international number, multiple different phone numbers, or a payphone. -
If the calls are threatening or criminal in nature, please contact your local police department and tell them about the malicious calls. The police can contact iiNet to get the trace logs.
-
Once a trace has been requested, please record the date and time of any further unwelcome calls and send the details to us. The ticket will be closed if no further reports are received after 30 days.
There is a wide variety of methods that scammers can use to impersonate legitimate businesses to try and gain access to your personal information. This is known as phishing and can be difficult to spot.
If you believe you’ve been targeted by a scam, report it at: https://www.scamwatch.gov.au/report-a-scam
Common tricks:
Scammers may ask for personal information like your login details, date of birth, ID numbers, or banking details. These requests can come through text messages, phone calls, or emails, and often include a link to click or a number to call back.
They may also pretend to be a real business by using a name that looks familiar. To help with this, the ACMA has created a Sender ID Register, which lists business names that are used to send messages.
If you receive a message that seems suspicious or you weren't expecting, it’s a good idea to contact the business directly using their official website or published contact details to verify it before reporting it as a scam. Do not use any contact details in the message to contact the business.
iiNet will never call you and ask for your PINs, passwords, or send you a one-time passcode for verification.
You can find out more about how we protect your information here: Privacy Policy.
If you think you’ve been scammed or shared financial information, contact your bank or financial institution as soon as possible.
If you receive a call, letter, email, or message claiming to be from iiNet and you’re unsure if it’s real, call us on 13 22 58.
To learn more about how to spot and avoid scams, or report that you have been impacted by a scam visit: Scamwatch.
Select one of the links below to jump to a query:
- What to do if you receive suspicious correspondence or calls claiming to be from iiNet
- Latest known scams
- SIM Swap scam
- Vehicle History Report scam
- nbn® Faults and Works scam
- Gambling scams
- Email closure phishing email
- “Hi mum”/Family impersonation scams
- Parcel delivery scam
- Fake road toll SMS scam
- My Gov/tax time scams
- Number spoofing
- nbn® Disconnection scam
- Remote access scams
- Fake job recruitment scams
- Wangiri Fraud (missed call scam)
- How to protect your device
What to do if you receive suspicious correspondence or calls claiming to be from iiNet
If you receive a call, letter, email, text message or other communication that claims to be from iiNet and you suspect it may be a scam or hoax, give us a call on 13 22 58.
Scam Emails and Text Messages
If you receive an email or text message that is unknown, unsolicited or you suspect to be fraudulent including messages with a one-time code that you didn’t initiate, this is what we advise:
- Don’t reply to the SMS or email.
- Don’t provide any personal details.
- Don’t click on any links.
- Don’t open any attachments.
- Don’t call any numbers associated with the SMS or email.
- Don’t share any content of the SMS or email with anyone.
- Report the email or SMS to Scamwatch.
- Forward the email as an attachment to abuse@iinet.net.au.
Scam Phone Calls
Scammers often use a method called call spoofing, which means they falsify the caller ID to hide their identity. The call may look like it’s coming from a local or trusted number, but it is not.
Call spoofing is common and while it can't be fully stopped, we have added a new feature where a "Warning Suspected Scam" banner will appear on some calls which we think look suspicious.
Some flagged calls may be legitimate but letting them go to voicemail is a safer choice. This warning system will not catch every spoofed or scam call. To stay safe, do not share personal details during unexpected or unsolicited calls.
If you receive a phone call that you suspect is fraudulent, this is what we advise:
- Don’t give the caller any personal details and hang up.
- Check that the call is coming from a number that’s not a number that we use.
- Block the caller/sender’s number using your phone’s built-in call rejection features or by downloading an app to restrict incoming calls and messages.
- Let the call go to voicemail and then listen to any message left to ascertain if this might be a genuine call. For more information on how to set up and manage voicemail, head to our support page.
- Report the call to Scamwatch.
- Report the email or SMS to Scamwatch.
How to tell whether a call you’ve received is legitimate
- When we call you, we will not ask for a one-time passcode sent to your mobile or email, to verify you.
- We will never call you and ask for your credit card details for refunds, reimbursements, or compensation.
- Any refunds or reimbursements will only be provisioned through your original method of payment.
- We will never call you from a private number.
- If you order a device over the phone or online, we will send you a confirmation SMS with the details of your order including your preferred delivery address.
- We will never proactively reach out to you on social media, we will only ever respond to you, if you contact us.
Latest known scams
SIM Swap scam
We are aware of fraudsters targeting our customers by attempting to perform fraudulent SIM swaps. These scammers may use tactics such as reporting a network outage, offering a discount on your service, or offering an upgrade of your phone.
SIM swaps can lead to banking fraud, identity theft, and fraudulent orders being placed on your account.
iiNet will never contact you to request a SIM swap or ask you to provide a one-time code. If someone contacts you claiming to be from iiNet and asks for a one-time code, hang up immediately and contact us on 13 22 58.
Vehicle History Report scam
We’re aware of scammers targeting people selling cars, motorbikes, and caravans with fake vehicle history report requests.
These fraudsters pose as interested buyers and insist you use a specific website to purchase a report, claiming it’s the only one they’ll accept.
The site is fake, and once you enter your credit card and personal details, your money and information are stolen.
How to spot this scam:
- Genuine buyers will usually get and pay for a vehicle history report themselves.
- It’s the buyer’s responsibility to check the vehicle, not yours.
- The official government site for vehicle checks is ppsr.gov.au, and it only costs $2.
If someone insists you use their link or pay for a report, stop immediately and report the scam directly to us here: abuse@iinet.net.au.
nbn® Faults and Works scam
iiNet is aware of a scam targeting customers relating to nbn faults or works in their area.
The scammers may contact consumers in person or over the phone to offer either a new nbn connection or support in setting up an existing connection. The scammers will then try to gain payment details or access computers either remotely or in person. Scammers may also send a fake SMS posing as iiNet offering or confirming an nbn appointment.
iiNet will never contact you and ask for your payment details relating to an nbn appointment or fault and will never request to access your computer or devices in person or ask you to load a website that gives them access remotely.
- If someone contacts you in person or over the phone and requests access to your computer or devices, close the door or hang up on them.
- If you are ever contacted by someone posing as iiNet and you are uncomfortable or unsure if it is a scam, hang up and call us back on 13 22 58.
- If you ever receive an SMS from iiNet confirming an nbn installation appointment that you haven’t requested, do not respond, and report it.
- Always request identification before allowing technicians to enter your home.
- Never allow anyone to access your personal computer or device either in person or over the phone.
- iiNet technicians will never request payment or payment details from customers.
Report any suspicious behaviour to Scamwatch. If you think you have been a victim of fraud, or a scammer has gained access to your banking information contact your financial institution immediately.
Gambling scams
We’ve seen an increase in scammers sending unsolicited messages posing as online gambling sites and casinos. These messages invite the recipient to click a link promising bonuses and the potential to win money. While the website and SMS may look like it is from a gambling site, the websites are used to harvest personal information by requesting sign up information and banking credentials and may infect your device with malware.
If you receive an unsolicited SMS inviting you to a gambling site, do not click the link or provide personal information.
Email closure phishing email
We are aware of a phishing campaign targeting iiNet customers.
We may have emailed you recently, asking you to express interest in retaining the email account you hold with iiNet. We have observed examples of scammers attempting to replicate these emails, with the intent to phish personal information from our customers.
iiNet will not ask you to provide your Toolbox login details, personal information, or payment details as part of this campaign.
If you receive an email relating to this campaign with a link asking for your personal or iiNet login information, please report it to us at abuse@iinet.net.au.
If you have clicked on a link and filled in your personal, iiNet login, or payment information, please change any related passwords immediately and report this to scamwatch.gov.au. If you have been a victim of fraud, you should immediately contact your financial services provider.
For further support, please call us on 13 22 58.
“Hi mum”/Family impersonation scams
Some of our customers have reported receiving WhatsApp or text messages from scammers alleging to be children in need of funds. The scammers are targeting parents and the messages generally start by claiming the child has lost or broken their phone, or it has been stolen so they insist the parent does not contact them on their old number. The messages will then develop into the scammer requesting money for things like bills or emergency funds as they have been locked out of their internet banking accounts.
If you receive an SMS or WhatsApp message from an unknown number asking for money or claiming to be a loved one, do not transfer any funds. If you are ever unsure of the legitimacy of a message, it’s always best to pick up the phone and contact the sender to be sure.
If you receive any SMS relating to this scam, please report it to Scamwatch.
Parcel delivery scam
Receiving SMS updates from postage companies when you have a parcel coming is something many of us see. Fraudsters are taking advantage of this by sending scam messages posing as legitimate postage companies.
These messages typically say that information is missing for the delivery or that there is a customs fee that needs to be paid and provide a link where your personal information is requested. Once the information is entered, personal and banking information is harvested to commit banking fraud and identity theft.
If you receive an SMS asking you to update details or pay a customs fee, do not click on the link or provide personal information. If you are expecting a parcel, make sure you check the original tracking details and contact the company if in doubt.
Fake road toll SMS scam
We’ve seen an increase in road toll SMS scams where messages are sent claiming that you have an unpaid toll and requesting payment.
The SMS will contain a malicious link which takes you to a website that looks like a legitimate companies’, and typically, the payment requests are for a small amount. The scammers will use the stolen financial information that is provided by the victim to commit fraud or infect their device with malware.
If you receive a SMS from a road toll company that you are not expecting, do not click on any of the links and contact the toll company directly to verify any outstanding payments.
My Gov/tax time scams
You may receive scam SMS, calls or emails purporting to be the ATO or Services Australia when it’s close to tax time. There are many variations of tax time scams and fraudsters will try to obtain personal and credit card information by claiming you are eligible for a payment or that your account information is incorrect.
If you receive an SMS, call, or email purporting to be from the ATO asking for your payment or personal information, we suggest contacting the ATO directly using the contact methods on their website.
Number spoofing
Number spoofing is where scammers manipulate their caller ID to display a different phone number.
Historically, scam calls used to come from Private or International numbers, so a call from a mobile number does look more legitimate and scammers have more success in deceiving recipients into believing the call is from a legitimate source. Number spoofing is commonly used in phishing and telemarketing scams.
We’ve also seen examples of customer’s legitimate mobile numbers being spoofed. If your number has been used for spoofing calls, you will likely start to receive calls and SMS from people who have received calls from your spoofed number.
We recommend that you ask these people to contact their service provider to report the call. While this can be frustrating, typically your number will only be spoofed for a short period of time.
nbn® Disconnection scam
Scammers are calling customers posing as nbn co limited or internet service providers and threatening disconnection of your service. Typically, an unexpected robocall will be made giving you an option to select so speak to someone.
The scammers will threaten disconnection of the service unless you provide personal information or make a payment. Scammers obtain this information to commit fraud and identity theft. If you receive a call threatening disconnection of your nbn®, do not provide any information and disconnect the call.
Remote access scams
A common tactic used by scammers is to try and gain remote access to your mobile and computer devices. Scammers will make contact posing as a legitimate company and try to coerce the victim into providing access to their device by creating a sense of urgency.
They may claim there is suspicious activity on your internet or phone service, that your service has been accessed from overseas or that you have been hacked.
Once they have access to the device, they may install malware or request that you login to applications such as email and internet banking which allows them access to your personal and banking information.
If you receive a call alleging to be a company that requires remote access to your devices, hang up and do not provide any personal information.
Fake job recruitment scams
Received an unsolicited job offer through SMS or a WhatsApp message recently? We have seen recent examples of scam messages being sent posing as recruitment companies or businesses offering employment opportunities with enticing offers.
Once responded to, scammers will request personal information and sometimes an upfront payment as a recruitment fee.
Other examples include fake social media pages, such as LinkedIn, posing as employees of a company using the same method to try and phish for personal and credit card information.
If you receive a message regarding an employment opportunity, do not respond. Research the job offer and the company on the companies legitimate website and avoid sharing personal information.
Wangiri Fraud (missed call scam)
Wangiri fraud is a scam that involves receiving a missed call from an international number. The scammers generate calls to a range of mobile numbers with the hopes that the victims will return the call. The scammers will then profit from the returned call due to the exorbitant charges of calling the international number.
If you receive a call from an international number you do not recognise or were not expecting, we recommend not returning the call.
We proactively monitor our network for Wangiri activity and to shut down fraudulent international ranges as we find them.
This is an issue affecting customers of mobile and fixed line operators around the globe, and we’re working with a number of different operators and industry groups to reduce Wangiri fraud levels.
How to protect your device
- Make sure to use strong PINs and passwords and change them regularly. Avoid easy to guess PINs and passwords like ‘1234’, ‘0000’ and ‘password’.
- Lock your mobile handset and voicemail with strong PINs.
- Think carefully before clicking on a link or opening suspicious emails and attachments.
- Pay attention to your app permissions (what your apps are allowed to do and access, e.g. location, call history, etc). Only allow necessary permissions.
You can check the call history for your iiNet phone service at any time.
Select one of the links below to jump to a query:
Basic call tracker (current billing period only)
- Log in to Toolbox and view the Dashboard.
Never logged into Toolbox before? Check out An Introduction to Toolbox. - Check the Call tracker meter in the panel for the phone service.

- If you’re not seeing a specific panel on the dashboard, make sure it is turned ON by clicking Customise Dashboard Panels at the bottom of the page.
Detailed Call history
- Log in to Toolbox and click My Products*, then select your service type;
- For mobile phone services, select Mobile.
- For all other phone services including Home Phone (landline), Netphone (VoIP) and Fibre Phone, select Phone.
*If you're on a mobile device and you don't see this option, click the grey square with three lines to show the navigation menu. - If you have more than one phone number, make sure the right phone number is selected from the Product drop-down menu on the upper right-hand side of the page.
- Select View call history from the Actions menu. If you're on a mobile device and you don't see the Actions menu, click the grey bar labelled Phone actions or Mobile actions to show it.
- By default, this page will show your call records for the current billing period. To search for previous billing periods, click Advanced Search.
- Choose the dates or invoice you’d like to see the call history for, then hit Search.
- Your search results will show the category, date/time, cost and duration of each call/SMS as well as the receiving number (“To”) and the invoice it was billed on.
- You can used the arrow icons at the top of the list to rearrange the results.

- At the bottom of the list of search results, you’ll find a subtotal as well as a Download CSV button which you can use to save your call records as a Comma-separated Value file, which is best opened with Microsoft Excel.

You can check the data usage for your iiNet internet service at any time. If you have a monthly data plan instead of an unlimited data plan, we'll also let you know when you've hit 50%, 85% and 100% of your monthly data.
Data usage isn't available if you have a Liimitless data plan.
Select one of the links below to jump to a query:
Basic usage for the current billing period
- Log in to Toolbox and view the Dashboard.
- Check the Volume usage meter in the panel for the service. This will also tell you whether the data is Peak/Off-Peak or Anytime.
- The text below the usage meter will also advise you when your usage resets, e.g. "Your usage resets in 5 days".
- If you’re not seeing a panel for one of your services, make sure it is turned ON after clicking Customise Dashboard Panels at the bottom of the page.

How to view detailed usage and peak/off-peak quota times
Toolbox also allows you to view your broadband usage in more detail, including:
- Peak and off-peak downloads, or anytime downloads (depending on your plan)
- Uploads
- Hourly/daily usage
- Freezone usage (eligible plans)
- Log in to Toolbox and select My Products*, then select the tab for your service type;
- For mobile data that's part of a mobile voice plan, select Mobile.
- For all other internet services, select Broadband.
*If you're on a mobile device and you don't see this option, click the grey square with three lines to show the navigation menu. - If you have more than one internet or mobile service, make sure the right username or mobile number is selected from the Product drop-down menu.
- Select View volume/data usage from the Actions menu. If you're on a mobile device and you don't see the Actions menu, click the grey bar labelled Broadband actions to show it.
- If you want to check usage from a previous month, you’ll need to select the month from the See usage from drop-down menu.
- If you're on a desktop or laptop, you’ll see your volume usage for the selected billing period as a daily graph (example below). Please note that no graph will be displayed on mobile devices.
If your plan has Peak/Offpeak usage, you'll find the timeframes for each period above the peak and off-peak usage bars located below the graph as shown below.

Tip: "Stacked" view shows by default, but you can select the “Grouped” option above the graph for a clearer distinction between Peak/Offpeak usage or Anytime/Freezone usage (depending on your plan).
- If you scroll further down the page, you’ll also find list of your daily usage. Click on the date to see hourly usage.
- Much like daily usage, hourly usage will be shown as a graph (desktops/laptops only - mobile devices will display a table instead) with a list further down the page. You can use the Daily button to return to daily view.
Note: Provided that the time zone in Toolbox > My Account > Set my timezone is set to "Automatically detect my time zone", all times given for hourly usage are in local time depending on your current location.

You can change your internet plan at any time in Toolbox.
Note: If you downgrade your plan while your data usage is greater than the total quota of your new plan, your internet speed will be shaped. It's best to wait until your next billing period when your quota has reset.
- Log in to Toolbox and select My Products, then Broadband. If you're on a mobile device and you don't see this option, click the grey square with three lines to show it.
Never logged into Toolbox before? Check out An Introduction to Toolbox. - If you have more than one broadband service, select the right username from the Product drop-down menu.
- Select Change plan. If you're on a mobile device and you don't see this option, click the grey bar labelled Broadband actions to show it.
- You’ll see a list of available plans for your service type, along with your current plan.

- To browse plan details, simply click on them in the list. This will change the plan summary in the panel below the list.
- The plan summary will show you some important information about the plan including it’s monthly cost and quota. Please note that graphs will not be visible on mobile devices. Once you’ve decided on a plan, click Switch to this plan.
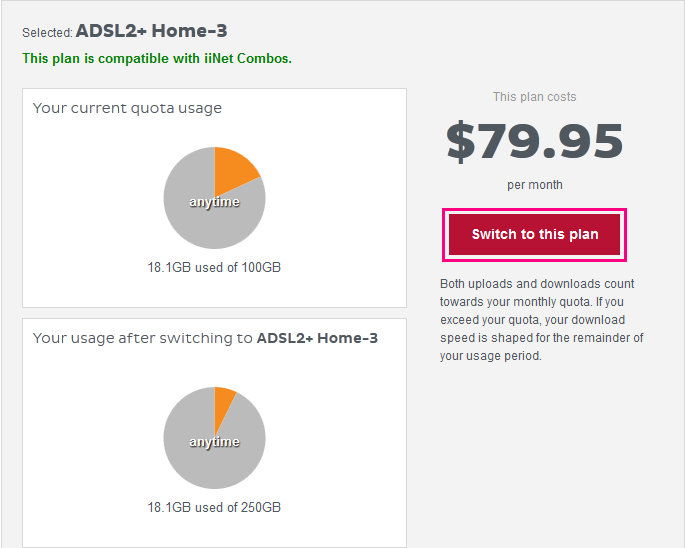
- You’ll be shown a final summary of the changes to your plan. Click Confirm to finish. Your plan change should process within 30 minutes.

To cancel or close an account, please call us on 13 22 58.
If you're overseas, you can cancel or close your account by calling +61 8 9214 2222.
Select one of the links below to jump to a query:
- Cancelling your mobile or phone service
- More information
- How much will it cost to close my account?
- How will I be charged on my final invoice?
- How do I request a refund if my final invoice is in credit?
- Once my account is closed, will I be able to access my invoice?
- Once my account is closed, will I be able to access Toolbox?
- Once my account is closed, will I be able to access my iiNet voice mail?
- Can I close an account if I’m not the account holder?
Cancelling your mobile or phone service
Before cancelling your mobile or phone service, please call us on 13 22 58. We can help check if there's a better plan for your needs, resolve any service issues, and confirm if any costs or credits apply to a cancellation.
Important: If you want to move your phone number to another provider, you must contact your new provider and organise the transfer before you cancel because a cancelled number can't be transferred. You can only do this if the account holder of the phone service with iiNet and your new provider are the same person.
Need your iiNet account number? You'll find it on your iiNet invoice or in Toolbox.
More information
How much will it cost to close my account?
If you cancel your service or change providers before your service contract is complete, you may incur a contract break fee. These fees are set out in the Pricing Schedule within our Customer Relationship Agreement.
How will I be charged on my final invoice?
After your service is disconnected, your final invoice will be emailed to the account holder shortly before the end of your billing period, around the same time each month as all of your previous iiNet invoices. If you don’t get your final invoice, give us a call on 13 22 58.
iiNet services are billed in advance. When you cancel a service, any unused amount you paid in advance will be credited back to your iiNet account, calculated from your cancellation date onwards.
If any charges are due on your final invoice, such as a contract break fee, they can be paid in the same way you usually pay your iiNet invoices.
How do I request a refund if my final invoice is in credit?
If any credit remains on your account after your final invoice has been settled, it can be refunded to your nominated bank account or credit card. Please call us on 13 22 58 to request a refund.
Once my account is closed, will I be able to access my invoice?
You won’t be able to get your invoices through Toolbox after your iiNet account is cancelled. You can download your iiNet invoice from the email sent to the account holder for up to 90 days after the email was sent.
Once my account is closed, will I be able to access Toolbox?
No. You won’t be able to access Toolbox.
Once my account is closed, will I be able to access my iiNet voice mail?
No. You won’t be able to access the voice mail for any iiNet phone or mobile services, including saved voice mail.
Can I close an account if I’m not the account holder?
Only the account holder may close an account, unless you have Power of Attorney and want to act on behalf of the account holder. Learn more.
Your feedback is important to us. We’d love to hear from you if you had an exemplary experience with us or if we didn’t quite live up to your expectations.
Select one of the links below to jump to a query:
- How can we help?
- What are your complaints handling processes?
- What do I do if my complaint is unresolved after going through the iiNet process?
How can we help?
You can contact us using the following contact methods to make a complaint, lodge a service outage report and enquire about a network outage.
| Contact | Tech Support for help with your iiNet services | Customer Service for help with your iiNet account and billing | If you have a hearing or speech impairment |
|---|---|---|---|
| Phone: | 13 22 58 (24/7) | 13 22 58 (8am - 10pm AET) | You can contact us by using the National Relay Service: https://www.accesshub.gov.au |
If your complaint isn’t resolved by Tech Support or Customer Service, you can ask to be referred to Customer Relations or email them directly.
| Customer Relations |
|---|
|
Email: customer-relations@iinet.net.au |
What are your complaints handling processes?
You can download our Complaint Handling Process.
For Network Outage Complaints, please download our Network Outage Complaints Handling Process.
To view PDF files, install Adobe Reader on your computer, tablet or phone.
What do I do if my complaint is unresolved after going through the iiNet process?
If you’re unhappy with the management of your concerns, you can request that we escalate your complaint.
If we’re unable to agree on a resolution, you can contact an external organisation for support and advice, including the:
- Telecommunications Industry Ombudsman (TIO): General complaints
- Office of the Australian Information Commissioner (OAIC): Privacy complaints
- Australian Competition and Consumer Commission (ScamWatch): Scam complaints
- Australian Financial Complaints Authority (AFCA): Sold debt payment and insurance disputes
- Australian Communications and Media Authority (ACMA): Broadcast complaints
Toolbox lets you manage your iiNet account and services online, so you can take care of a lot of stuff without needing to call us.
This guide will show you how to log in to Toolbox and what do can do in it.
Select one of the links below to jump to a query:
How to log in to Toolbox
- Go to Toolbox at: https://toolbox3.iinet.net.au/ - or just hit the Toolbox button on the iiNet website.
- Log in with the username and password for your iiNet account. You'll find your username on emails from us about your iiNet order, or your iiNet invoice.
Forgotten your iiNet password? You can reset it at: https://iinet.net.au/password - A one-time passcode will be sent to the mobile number listed in your account’s contact details - just enter this passcode to finish logging in.
If you can't log in or get your one-time passcode, please contact us. We can help you access your iiNet account after an ID check.
Toolbox Main menu

The main menu in Toolbox has the following items:
- Dashboard - Your central hub for managing your account. By default, you’ll see a panel for each of your iiNet services, which will show your basic service details and usage history at a glance. You can customise the dashboard if you want.
- My Products - This is where you go to manage any of your iiNet internet, mobile or VoIP services. You can check your usage or change your plan.
- My Account - Manage all of your account details, such as your contact information.
- Bills & Payments - This section has all of your invoice and payment information. You can update your payment details here.
- Add Products - See available iiNet products and submit an order online.
- Help & Support - This section links to our iiHelp website for handy setup and troubleshooting guides.
There are also some handy buttons in the top right corner, including the Logout button. It's important that you log out once you're done if you're using a public computer, like the ones at libraries, or any device that you share with another person.
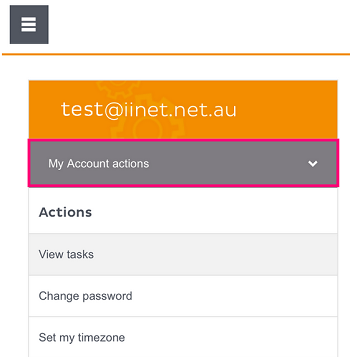
Note for Mobile devices (smartphones and tablets): To see the main menu, tap the grey icon with three lines.

Toolbox Actions menu
Each section of Toolbox has its own actions menu that shows what you can do on that page. The actions menu varies depending on which page you're viewing (or which product you're looking at in My Products) so why not have a dig around to get familiar with your account?
Note for Mobile devices (smartphones and tablets): To see the actions menu, you'll need to tap the grey box at the top of the screen, e.g. "My Account actions":
How to customise your Dashboard
You can control which panels display on your Dashboard, and even rearrange them to suit your tastes.
- To rearrange your panels, just click and hold the grid icon in the top left corner of the panel. Drag the panel to the desired position and release.

- If you’d rather not see a panel on your Dashboard, just hit the X in the top right corner and then click remove this panel? to confirm.

- To get a panel back, click Customise Dashboard Panels at the bottom of the Dashboard.

- Next, toggle each panel as desired using the ON/OFF switches and then click I’m done here, Show me the panels to finish.

You can update your existing contact details at any time in Toolbox.
Important: If you're updating your address because you're moving home, please contact us ASAP so we can help you move your iiNet services. Check out our Moving Home page for everything you need to know.
Select one of the links below to jump to a query:
- How to update existing contact details
- How to delete an existing contact
- How to change your contact preferences
How to update existing contact details
- Log in to Toolbox and select My Account. If you're on a mobile device and you don't see this option, click the grey square with three lines to show it.
Never logged into Toolbox before? Check out An Introduction to Toolbox. - Select Update contact details. If you're on a mobile device and you don't see this option, click the grey bar labelled My Account actions to show it.
- You’ll see a list of existing contacts on your account with the contact name and contact type:
- Billing contact: An account holder with the authority to add/change/relocate/cancel/troubleshoot and lodge service faults for any non-telephony services on the account, add/remove contacts, access invoices and other billing information, change payment details, request to link accounts that have the same account holder (full name and date of birth must match).
- Phone contact: Also known as a “legal lessee”, they have the authority to change/relocate/cancel/troubleshoot and lodge service faults for any telephony services on the account. If the Phone and Billing contacts are two different people, authorisation from both is required to add/change a telephony service in a way that will increase the plan fee or incur a one-off charge.
- Technical contact: Has the authority to troubleshoot services on the account with our Support team. They can also lodge a service fault for a non-telephony service, provided the Billing contact has accepted responsibility for a possible Incorrect Callout Fee.
- User contact: Only has the authority to troubleshoot services on the account with our Support team.

- To make any changes to an existing contact, click Edit next to the contact.

- You’ll see a form which will allow you to make changes to the contact details. Any field that has an asterisk next to it (e.g. Street *) is mandatory and must be filled in.
- If you’re editing a Billing contact, you’ll also see an option for this contact to opt in or out of receiving paper invoices at a cost of $1.49 per invoice.
- Once you’re done making changes, hit Update to finish.
How to delete an existing contact
- At least one Billing contact must remain on your account at all times. However, some accounts may have multiple Billing contacts or “User” contacts, which may be deleted.
- To delete a contact, log in to Toolbox and select My Account . If you're on a mobile device and you don't see this option, click the grey square with three lines to show it.
- Select Update contact details. If you're on a mobile device and you don't see this option, click the grey bar labelled My Account actions to show it.
- Before deleting any contact, you should check the full contact details by clicking Edit. Some accounts have multiple contacts set up under the same name but with different contact information (e.g. email addresses, mobile numbers).

- Once you’re sure which contact to delete, scroll down to the bottom of the page and click Delete this contact? You’ll then need to click Confirm.

- Alternatively, if you’re already sure which contact to delete, you can click Delete next to the contact name on the Update contact details page.
How to change your contact preferences
- Log in to Toolbox and select My Account from the navigation bar. If you're on a mobile device and you don't see this option, click the grey square with three lines to show the navigation menu.
- Select Edit contact preferences from the Actions menu. If you're on a mobile device and you don't see the Actions menu, click the grey bar labelled My Account actions to show it.
- You’ll see a table of options with the different ways you may be contacted (Email, phone, SMS, messages in Toolbox etc.) and the different types of notifications such as feedback surveys.

- Simply check or uncheck the boxes in each column to adjust your preferences. There is a “Check all” and “Uncheck all” option at the bottom the page to make large changes a little easier.
- Once you’re done, click Save preferences to finish.