At iiNet, we're continuing to make significant investments to protect our customers and their personal information.
The challenging reality is that all Australian companies face cyberthreats on a daily basis. iiNet takes cybersecurity and the protection of our customer’s personal information seriously. In light of recent events, we have been working closely with our cyber security partners and relevant government agencies to increase checks and monitoring of our systems.
For more information on iiNet’s data security policies and practices, view our relevant support articles:
- Security Information
- Privacy Statement
- Fraud Assistance
- Scams and Hoaxes
- Multi-Factor Authentication
Select one of the links below to jump to a query:
- Protecting yourself and your personal information
- Tips to help keep your information secure
- What is Phishing?
- How to tell whether a call you’ve received is legitimate
- Frequently asked questions
- What is iiNet doing to ensure the safety of my personal information and data?
- What information of mine do you have in your system?
- Who can see my personal information and data?
- I am no longer an iiNet customer, can you delete my personal information and data?
- What can I do to protect myself against fraud?
- I transfered my Optus mobile number to iiNet and now want to change my number. Will this affect my credit file?
- Can I make my service non-transferable and ban SIM swaps?
- Can you make sure that no additional services or connections are created in my name?
- How do I know if it’s safe to send my photo ID through to iiNet?
Protecting yourself and your personal information
iiNet is continuing to take important measures to protect your information, but there are also tactics you can use to protect yourself and reduce your risk of becoming a victim by understanding how to spot a suspicious email, call or SMS.
Tips to help keep your information secure
- Do not provide your password, or one-time passcodes to someone who called you.
- Don’t hesitate to question the legitimacy of a caller. If you ever receive a call claiming to be iiNet and you are unsure of the legitimacy, hang up and call us on 13 22 58.
- Double check the sender of an email before responding or clicking on any links.
- Please ensure all of the details in an order confirmation SMS are correct before responding. Decline even if there is a slight discrepancy.
- When chatting to us on social media, always look out for the blue tick.
- While on our website, you may receive a pop up asking you to chat with us, please ensure you are always using the official iiNet website.
What is Phishing?
Phishing is a method used by criminals to obtain your sensitive information such as your mobile number, date of birth, passwords, and security codes.
Different methods include:
- SMS and emails posing as having come from legitimate companies asking you to click on links & fill out your security, personal or payment details.
- Scammers may call you posing as your telecommunications provider offering a free phone or a sizeable discount on a device. They will phish for your personal details such as your PIN, your password, or your one-time passcodes. This enables the scammers to impersonate you or gain access to your online accounts to phish for additional private information or to process orders on your behalf. If successful, the scammer may call you again posing as iiNet requesting your credit card details to provide a refund or compensation for the fraud.
- Online browser pop up scams that entice customers with the possibility of winning a prize.
- Calls pretending to be from various reputable organisations like a government agency, bank, or energy company, that either threaten action against you or offer heavily discounted or free products to scare or entice customers into voluntarily disclosing their security, personal or payment details.
How to tell whether a call you’ve received is legitimate
- When we call you, we will not ask for a one-time passcode sent to your mobile or email, to verify you.
- We will never call you and ask for your credit card details for refunds, reimbursements, or compensation.
- Any refunds or reimbursements will only be provisioned through your original method of payment.
- We will never call you from a private number.
- If you order a device over the phone or online, we will send you a confirmation SMS with the details of your order including your preferred delivery address.
- We will never proactively reach out to you on social media, we will only ever respond to you, if you contact us.
Frequently asked questions
What is iiNet doing to ensure the safety of my personal information and data?
We take cybersecurity extremely seriously at iiNet and continue to make significant investments to help protect our customers and their personal information. Our Cyber Defence and Response Centre provides around-the-clock event monitoring, threat protection and intelligence, to help protect customer’s data and our services against online security threats.
iiNet has processes and procedures in place to manage the security of its customer data and help protect it from unauthorised use, access, modification or disclosure. These include a range of physical and electronic security measures. We also use multi-factor authentication for complex and more involved customer service transactions which you can read about in our support article.
What information of mine do you have in your system?
There are requirements under the Privacy Act, and other legislation, about what information we are required to keep. You can see more information regarding our Privacy Statement on our Privacy Statement page. If you wish to request a copy of your information listed with us, you can complete the Personal Information Request form via the above link.
Who can see my personal information and data?
Our customer’s privacy is extremely important to us. Customer personal information can only be seen and used by staff who need it to do their jobs and provide services to you.
I am no longer an iiNet customer, can you delete my personal information and data?
If we no longer need personal information for the purpose for which it was collected, and if Australian law does not require us to retain that personal information, we are required to destroy or de-identify the information in line with the Privacy Act.
We have strict measures in place to ensure that your personal information can only be seen and used by staff who need it to do their jobs. You can see more information regarding our Privacy Statement on our Privacy Statement page.
What can I do to protect myself against fraud?
Watch out for suspicious calls, SMS and emails asking for your personal information. It is always best to contact the legitimate company if you’re unsure. If you suspect you’ve been a victim of fraud, you should immediately contact your financial service provider. We also have tips on how to keep your personal details safe in our Security Information article.
You can also find valuable information on how to protect yourself from fraud at the websites for the Office of the Australian Privacy Commissioner and Scamwatch.
I transfered my Optus mobile number to iiNet and now want to change my number. Will this affect my credit file?
We can assist you with changing your mobile number. Simply changing your mobile number will not affect your credit file. However, we will need to place an enquiry on your credit file if you have requested a new service and a credit check is applicable. To change your number, please contact us on 13 22 58.
Can I make my service non-transferable and ban SIM swaps?
All service providers have obligations before accepting a transfer request. If someone requests your number to be transferred to us, a 2-way SMS is sent to the number that is being transferred. The transfer will only proceed if the SMS is responded to with the correct code. If you receive a message to transfer your service to another provider that you did not request, please do not respond to the message, and contact your provider as soon as possible. If you receive a message from another provider and you’re with us, contact the provider to request the transfer request is cancelled and let us know.
Keep in mind we are held to industry regulations which don’t allow us to stop numbers being transferred away from us. We are required to give customers freedom of choice for their mobile provider and are not permitted to stop a request to transfer a number out from our network.
SIM swaps can only be processed either through a secure link sent directly to your mobile number. If you receive a link to log in to Toolbox that you didn’t request, please let us know. It’s important be on the look-out for calls or messages requesting information, if this happens, please do not provide your personal information or any links.
Can you make sure that no additional services or connections are created in my name?
We have multi-factor-authentication (MFA) in place for the more involved or complex service requests, to protect your account and information. Before you can add an additional service to your account, we will send you a one-time code before allowing the transaction to proceed. You can read more about MFA in our article.
How do I know if it’s safe to send my photo ID through to iiNet?
Sometimes if we’re unable to verify you and you can’t visit a store, or you’re activating a new service, we may need you to provide documentation so that we can verify you to assist with account queries. We have strict requirements about the use and protection of your details. We have strict measures in place to ensure that your personal information can only be seen and used by those who need it to do their jobs.
Important information about emergency calls to Triple Zero (000)
To keep you safe phones must support Triple Zero (000) calling over 4G (using VoLTE) in the event of an emergency. This is a legal requirement for all phones sold in Australia. Older 3G handsets, as well as some newer 4G/5G handsets (including those purchased overseas or from a retailer selling imported phones), do not meet these standards.
From 28 October 2024, if you have a device that is not able to make Triple Zero (000) calls, iiNet is legally required to stop these mobile phones from accessing the iiNet mobile network. This means you will not be able to make or receive calls/texts or use data on the iiNet mobile network from this date.
If you have received an SMS and/or email with instructions to update your device’s software or replace it immediately to be able to access emergency 000 calls, see this information.
Note: If you have a Samsung device, you may need to update it several times until your device says 'Your software is up to date' to ensure you can call emergency services.
We are here to help you change to a compatible device to stay connected. Call us on 13 22 58 to discuss your options.
Select one of the links below to jump to a query:
- Important information about emergency calls to Triple Zero (000)
- We have switched off our 3G network
- Frequently asked questions
We have switched off our 3G network
iiNet switched off its 3G network on 15 December 2023 to focus on our 4G network that now covers more than 24 million Australians and our state-of-the-art 5G network that is stronger than ever.
Starting end of October 2024, 3G network users may not be able to make an emergency call to Triple Zero (000). You may opt for an upgrade to a 4G and 5G compatible device or check if your current device will be affected by this change.
Some devices may not be able to make emergency calls to Triple Zero (000) once all 3G networks in Australia close (expected to be October 2024). Depending on the device, you may need to upgrade your device to a compatible 4G or 5G approved device or update your device software.
For more information about this industry-wide change, The Australian Mobile Telecommunications Association (AMTA) has launched www.3Gclosure.com.au to provide Australians with the key facts and information they need to prepare for the upcoming 3G network closures.
Frequently asked questions
What do I need to do?
The vast majority of our customers do not have to do anything at all and will continue accessing our 4G and 5G networks as they do today.
A very small number of our customers have 3G-only handsets, tablets and connected devices and they will need to upgrade those devices before December 2023.
Some 4G handsets may also need settings changes to be able to continue to make and receive voice calls using our 4G network.
Why did the 3G network close?
Mobile carriers around the world are closing down their 3G networks as more advanced 4G and 5G network services become widespread. Our 4G and 5G networks are more efficient at delivering greater speed and capacity, which means better service and experience for customers.
Similar shutdowns have happened before. All Australian mobile networks switched off their 2G networks a few years ago when they upgraded to 4G.
iiNet's licence to access the 3G spectrum (the invisible electromagnetic frequencies that transmit mobile data) is set to expire in mid-2024. Although most customers rarely need to access 3G, we want to make sure customers have the appropriate notice and offer support to those who need assistance.
What devices are affected by the 3G closure?
All phones, tablets and mobile broadband devices must be 4G/5G compatible and have VoLTE turned on in the settings to continue using our service after the 3G shutdown.
Some older 4G phones that don’t have a feature called “VoLTE” won’t be able to make and receive voice calls after the 3G shutdown.
Will 4G/5G network coverage differ from 3G coverage?
Our 4G coverage is similar in size and reach to our 3G coverage and our 5G coverage is growing every day. Check our 4G and 5G coverage maps.
Does this only affect phones?
No. Other devices like tablets, mobile broadband modems, smart watches, some home security systems, and other connected devices might also be using 3G services.
Please contact your device manufacturer if you are unsure of your device’s specific capabilities.
What is VoLTE and how do I switch it on?
Voice over LTE (VoLTE) is a feature that allows you to make voice calls using our 4G network.
You might need to turn the VoLTE setting ON. Please check your device manufacturer’s support website if you are unsure of your device’s specific capabilities.
Android devices
If you have a Samsung device, Voice over LTE should automatically be enabled. If you’ve previously disabled VoLTE and want to re-enable it, or would like to check if it’s enabled on your Android device, please go to your Settings > Mobile Networks.
Apple devices
If you have an Apple device iPhone 6 or later, Voice over LTE should be automatically enabled. To check this or manually enable it, please go to the settings in your iPhone – Settings > Mobile > Mobile Data options > Voice and Data.
What should I do with my old 3G device?
The best way to recycle your old device is with Mobile Muster, the Australian mobile industry's official recycling scheme. Alternatively, please consider eWaste recycling facilities which may be offered by your local council.
You may have been contacted recently about changes to your iiNet nbn plan.
These updates are occurring due to a number of factors, including upcoming wholesale nbn® pricing changes, improvements to the nbn® network, and changes to the speed tiers and plans we offer. As a result, we’re updating the pricing and structure of some plans.
Select one of the links below to jump to a query:
- When will my nbn® plan change?
- How will my nbn® plan change?
- Speed changes
- Modem Compatibility
- Can I change my nbn® plan?
- What are my options if I’m experiencing financial hardship?
- More Information
When will my nbn® plan change?
If you signed up for your nbn plan before 29 April 2026 and your plan is affected, we’ll send you a notice at least 30 days before the change happens. These changes will happen automatically in the month advised in your initial notice.
Note: If you have multiple iiNet services affected by this change, you’ll get one notice per service.
How will my nbn® plan change?
- The monthly price of your plan may increase, decrease, or stay the same (after any applicable discounts).
- Your internet speed may change. Any other plan inclusions such as nbn Phone value will stay the same.
- Your plan name will change to the name of your new plan.
Any existing add-ons, and promotional discounts will stay the same, unless we notify you otherwise.
Speed changes
Some customers may see changes to their Typical Evening speeds due to:
- updates to the available speed tiers,
- changes to available plans,
- improvements to the nbn® network, or
- us moving you to a higher speed tier.
Your notice will explain any speed changes that apply to your service.
For nbn® FTTN, FTTB or FTTC: Once your plan change is complete, if testing determines your maximum attainable speed can’t support the speed tier of your new plan, we’ll let you know and provide alternative options.
For nbn® Wireless: Once your plan change is complete, we recommend you run a speed test as soon as possible. This speed test should be done during the day (i.e. not after 7 pm). If you’re concerned about your speed test results or if you feel your service cannot attain speeds during the day, please call us to discuss your options.
The maximum speed you can achieve depends on the line characteristics at your premises. Learn more.
Modem Compatibility
Some older modems may not support the speeds available on newer plans.
If you're bringing your own modem (BYO), we may not be able to confirm whether it can achieve the full speeds of your new plan. If we previously supplied you with a modem, some older models may not support the higher speed tier.
If we believe you may have a modem compatibility issue, we will let you know. You can find our high-speed nbn® modem requirements here.
Can I change my nbn® plan?
You can change your plan at any time in Toolbox.
Important: If you change your plan, your scheduled plan change will not happen.
Your nbn® plan will continue to be month-to-month. If you wish to cancel, we won’t charge a cancellation fee. If you’d like to cancel, please refer to our contact details below.
What are my options if I’m experiencing financial hardship?
We know that life can take unexpected turns, so if you’re experiencing financial hardship, we’re here to help. See our Financial Hardship policy to find out more about your options.
More Information
If you have any questions about this change, please call us on 13 22 58 and we’ll be happy to help.
For full Terms & Conditions, see your plan’s Service Description at: https://www.iinet.net.au/about-us/legal/cra.
When you contact us or log in to Toolbox, you may be prompted to provide a One-Time Passcode in addition to the usual ID check or login details.
This is part of a security process called Multi-Factor Authentication and has been implemented to help keep your iiNet information secure.
Select one of the links below to jump to a query:
How it works
Multi-factor authentication uses two or more security measures to help confirm your proof of identity. At iiNet, we use a combination of account or personal information, followed by a one-time passcode sent via SMS to the mobile number of the account holder or an authorised representative.
At iiNet, multi-factor authentication is used when a customer contacts us to access or change personal or account information. This is to help ensure someone isn’t trying to access your information or make changes to your account without your permission.
While there’s never any guarantee of complete protection from scams, using MFA is the best way to help keep your account information secure.
When do we require MFA
When calling us to change personal or account information
-
In addition to our standard ID check, we will ask to confirm a one-time passcode sent via SMS to the mobile number of the account holder or an authorised representative.
When logging in to Toolbox
- After logging into Toolbox, customers will be required to enter a one-time passcode sent via SMS to the mobile number of the account holder or an authorised representative.
Important
At iiNet, we only ever use One-Time Passcodes when you have contacted us. If you receive a phone call, SMS or email from anyone claiming to be from iiNet and they are asking you to authenticate your account or provide a One-Time Passcode, never give it to them.
If you suspect you’ve been a victim of fraud, contact your financial institution immediately.
If you ever have any concerns about the security of your iiNet account, please do not hesitate to contact us.
This article will provide advice and resources for parents who wish to restrict the content accessed by children online. As the digital world continues to evolve, the challenges for parents evolve with it. To help keep your children safe, we’ve created this guide to highlight some of the challenges your children may face online.
For more information about keeping your child safe online, please visit eSafety.gov.au.
Select one of the links below to jump to a query:
- Accessing age-appropriate material
- Parental Control features in modems (and why they're no longer recommended)
- Unwanted contact from strangers
- Maintaining privacy
- Cyberbullying
- In-app charges
- Computer viruses
Accessing age-appropriate material
Making sure your child only has access to age-appropriate material online can be a difficult task. It’s a good idea to chat with your children and encourage them to come to you if they see imagery or content that worries or upsets them.
If you have children of different ages, it’s best to remind older children that certain websites and apps may not be suitable for their younger siblings.
You might consider using online parental controls, monitoring apps and family friendly filters. There are apps that track the websites that your child visits and they can also block dedicated sites that you consider inappropriate. The Communications Alliance has great advice for family friendly filters.
If any apps or filters require the MAC Address of your child's device, these guides will help you find it:
- Find MAC Address on Windows
- Find MAC Address on macOS
- Find MAC Address on Android OS
- Find MAC Address on iPhone or iPad: Turn off Private Wi-Fi (if applicable), then open Settings and go to General > Settings > About. The "Wi-Fi address" is the MAC address.
Parental Control features in modems (and why they're no longer recommended)
In the past, parents may have used Parental Control features in their modem settings to block access to certain websites and/or keywords. This approach is no longer recommended as it's ineffective due to these reasons:
- Parental Controls will not work if the child's device is not accessing the internet directly through your modem via Ethernet or Wi-Fi. This includes mobile data, mesh Wi-Fi networks and public Wi-Fi.
- Parental Controls may not work as expected if the child's device which use a VPN encrypted connection or other security software, or if the child's device already has content from the blacklisted websites in its browsing cache.
- Parental Controls are not effective on websites using HTTPS, a type of encryption that is now used by most websites.
Unwanted contact from strangers
Social media apps can provide the ability for your children to network and to keep in touch with their peers. But they also attract unwanted contact from strangers.
If your child is contacted by a stranger, encourage them to come to you immediately. They shouldn’t respond to the stranger no matter how tempting it might appear.
Maintaining privacy
Sharing of private information online can be necessary but it’s important that your children are aware of when to share and when not to share private information.
It’s a good idea to chat with your children to explain the importance of keeping personal information off the internet. Set boundaries and rules, especially for younger children as their online reputation can follow them through life.
Cyberbullying
No longer is bullying confined to the playground. With the advent of the internet, a child could be bullied from whenever they have access to the internet. Cyberbullies may act anonymously and can inflict significant emotional trauma on a child in their bedroom – a place that should be the safest of all.
It’s important to talk to your children about cyberbullying and to make them aware of how to identify cyberbullying when it occurs. Tell your child that they should never respond to a cyberbully. Encourage your child to come to you immediately if they feel that they’ve been targeted.
In-app charges
Many apps, particularly free online games, generate revenue through what’s known as in-app purchases. Sometimes you may not even know that a particular action in a game involves money.
It’s best to ensure that your debit/credit card details aren’t saved on the device so that you aren’t charged if your child inadvertently makes an in-app purchase.
Computer viruses
Computer viruses and malware can be spread through what it seems like an innocent email or attachment.
Teach your children to be wary of emails that are unfamiliar or that they’re not expecting. Some emails use popular logos and brand names – be cautious of opening and downloading anything that doesn’t seem completely legitimate.
Always use virus protection software on all devices connected to your home network.
Here's what the status lights mean on your VX220-G2V Modem.

| Light | States and meaning |
|---|---|
| Power | Off = No power. Blue = Your modem has power. |
| DSL | Off = Your modem doesn't have a DSL connection. There may be an outage if your internet uses DSL. Blue = Your modem has a DSL connection. This light flashes during initial connection. |
| Internet | Off = Your modem is offline. There may be a problem with the modem settings or its username and password. Blue = Your modem is online. |
| 2.4GHz & 5GHz | Off = 2.4GHz/5GHz Wi-Fi is turned off. Blue = 2.4GHz/5GHz Wi-Fi is turned on. |
| WAN | Off = Nothing is plugged into the WAN port. Blue = A device is plugged into the WAN port. |
| LAN 1-4 | Off = Nothing is plugged into the LAN ports. Blue = At least one device is plugged into the LAN ports. |
| Phone | Off = You don't have an iiNet VoIP phone service. Blue = Your iiNet VoIP phone is online. |
| WPS | Off = Wi-Fi Protected Setup (WPS) isn't currently being used. Blue = This light flashes when a Wi-Fi device is trying to connect via WPS, and will stay on for about 5 minutes after a successful connection. |
| USB | Off = Nothing is plugged into the USB port. Blue = A device is plugged into the USB port. This light flashes when a new USB device is connected, and when data is being transferred. |
From time to time, iiNet may contact you for marketing or servicing reasons. iiNet will never call you and ask for your passcode or password.
As part of our security measures to help keep your data and account information safe, iiNet uses Multi-Factor Authentication (MFA) such as one-time passcodes to confirm your proof of identity. It’s best to make sure that your mobile number and other contact information is up to date in Toolbox.
Unless you are communicating with an agent in one of our designated departments, we will only ever contact you via these methods:
- We will only call you from selected phone numbers.
- SMS from a designated iiNet portal that will appear as iiNet or one of our selected phone numbers.
- Email with offers, notifications or your bill from an iiNet email.
If we send you an email, we will never ask you to click on a link to fill out your security information such as your passcode, password, date of birth or your personally identifiable information such as your address or payment details. Be mindful of scammers using clickbait or phishing emails to obtain this information.
Select one of the links below to jump to a query:
- What to do if you receive a suspicious call, text or email that appears to be from iiNet
- Social Media
- Email & SMS
- Phone calls
- Live chat
What to do if you receive a suspicious call, text or email that appears to be from iiNet
If you have received a call, text message or an email that claims to be from iiNet but you suspect is not, or the caller is claiming to be from iiNet but is asking you to provide security information or personally identifiable information, please report it to us.
Simply email abuse@iinet.net.au and include (where applicable):
- a screenshot of the text message and the sender’s phone number;
- the phone number that contacted you claiming to be from iiNet and the date and time of the call;
- a copy (or forward) of the alleged email.
Social Media
You can communicate with iiNet through Social Media channels such as Twitter, Instagram and Facebook. To ensure you are protecting yourself, please stay vigilant when online and keep these tips in mind:
- Never provide personal information in a public environment (including any Social Media platforms, or public review forums such as Apple Store, Google Play Store, Product Review or Trust Pilot).
- iiNet Social Media Teams will respond to customers who make contact with us via our social channels but will never proactively reach out to you. If you are contacted on Social Media by anyone claiming to be iiNet, do not provide any information and contact our official Social Media messaging channels on Facebook or Twitter.
- Don’t provide any personal information (including your passcode) in a message thread. We will only ever ask for this using our secure verification forms.
If you have suspicions about any communication via Social Media, please report it to us by emailing abuse@iinet.net.au.
Email & SMS
From time to time, you will receive SMS messages and emails from iiNet.
Often these emails or SMS include links to support pages, payment tools or Toolbox.
- Never open links in an SMS or email that isn’t from an official iiNet number.
- All links that assist customers in making payments will first require you to log into your official Toolbox account.
- If you receive an email or SMS with a one-time passcode that you did not request, ensure you do not provide the code to anyone.
- We will only send a one-time passcode to validate your identity if you are contacting us. iiNet will never contact customers and ask them to verify themselves by providing a one-time passcode.
Phone calls
You may receive a phone call from iiNet, this may be for a promotion or in response to a call back request.
- iiNet will never call you from a private number.
- iiNet will never contact you and ask you to provide personal information unless you opt to complete a specific transaction with us that requires us to gather this information.
- If you receive a call from someone from iiNet and you are suspicious of the legitimacy, end the call and call us back on 13 22 58.
Live chat
While on our website, you may receive a pop up asking you to chat with us. Please be aware that:
- When chatting, ensure you are using the official iiNet website iinet.net.au
- If you get a pop-up from someone claiming to be iiNet inviting you to chat while you are not on the iiNet website, please close the window and contact us on 13 22 58.
We know that sometimes, when you’re at home or work, walls or nearby buildings can interfere with your mobile coverage. If you have a mobile service with us - with Wi-Fi Calling (also known as Voice over Wi-Fi (VoWifi), you can make and receive calls, SMS, and MMS from a compatible device, if it’s operating on the latest software, you’re connected to a Wi-Fi network and you have the Wi-Fi calling feature turned on.
Wi-Fi Calling feature changes
Important iPhone safety update: You must update your software to the latest version as soon as possible and by no later than 20 December 2026 to be able to access the iiNet Wi-Fi Calling feature, which includes Emergency 000 Wi-Fi calls.
To update your software go to your device settings under General > Software Update or go to our update on calling emergency services page for more information.
Need help with the update or experiencing financial hardship? Call us on 13 22 58.
Select one of the links below to jump to a query:
- What you need for Wi-Fi Calling
- How to enable Wi-Fi Calling on a Samsung phone
- How to enable Wi-Fi Calling on an iPhone
- Devices compatible with Wi-Fi Calling
- Can I use Wi-Fi Calling to make Emergency calls?
- How to use Wi-Fi Calling
- Additional information
- Troubleshooting
- Terms and Conditions
What you need for Wi-Fi Calling
To make calls over Wi-Fi, iiNet Mobile customers need:
- To make sure your phone is running the latest software;
- 4G Voice & Data (VoLTE) turned on in your phone settings;
- Wi-Fi Calling turned on in your phone settings;
- Wi-Fi turned on in your phone settings; and
- To be connected to a Wi-Fi network.
Note: Public Wi-Fi networks may not work with Wi-Fi Calling as they may have firewalls that restrict access to Wi-Fi Calling.
When you’re on a Wi-Fi call, you'll see a Wi-Fi call icon next to the Wi-Fi signal bar on your phone screen.
Not sure how to update your phone settings? We've got guides for iPhones and Samsung phones below. If you use a different phone, please check the manufacturer's website for a guide.
How to enable Wi-Fi Calling on a Samsung phone
Note: You may need to update your Samsung device several times until it says 'Your software is up to date' to ensure you can call emergency services.
How to enable Wi-Fi Calling on an iPhone
Devices compatible with Wi-Fi Calling
We may update our list of compatible devices when new devices become available or when older devices no longer receive software updates.
Please keep your device’s software version updated so you can enjoy all our features, including Wi-Fi Calling.
Alcatel
- 1 2019 4G
- 1B 2020 4G
- 1V 2020 4G
- 3L 2020 4G
- 1S 2021 4G
Apple
- iPhone 11/iPhone 11 Pro/iPhone 11 Pro Max
- iPhone 12/iPhone 12 mini/iPhone 12 Pro/iPhone 12 Pro Max
- iPhone 13/iPhone 13 mini/iPhone 13 Pro/iPhone 13 Pro Max
- iPhone 14/iPhone 14 Plus/iPhone 14 Pro/iPhone 14 Pro Max
- iPhone 15/iPhone 15 Plus/iPhone 15 Pro/iPhone 15 Pro Max
- iPhone 16/iPhone 16 Plus/iPhone 16 Pro/iPhone 16 Pro Max/iPhone 16e
- iPhone 17/iPhone 17 Pro/iPhone 17 Pro Max/iPhone 17e
- iPhone 8/iPhone 8 Plus
- iPhone Air
- iPhone SE 2020/iPhone SE 2022
- iPhone X/iPhone XR/iPhone XS/iPhone XS Max
- iPad Air 11" (M4)/iPad Air 13" (M4)
- Watch SE/Watch SE (2nd gen) (GPS + Cellular)
- Watch Series 3/4/5/6/7/8/9/10 (GPS + Cellular)
- Watch Ultra/Ultra 2 (GPS + Cellular)
- Pixel 3a/Pixel 3/Pixel 3 XL
- Pixel 4a/Pixel 4/Pixel 4 XL
- Pixel 5
- Pixel 6a/Pixel 6/Pixel 6 Pro
- Pixel 7/Pixel 7 Pro
- Pixel 8/Pixel 8 Pro
- Pixel 9a/Pixel 9/Pixel 9 Pro/Pixel 9 Pro XL/Pixel 9 Pro Fold
- Pixel 10 Pro XL
HMD
- Pulse+ 4G
- Pulse Pro 4G
Huawei
- P30 4G
- P30 Pro 4G
LG
- K42 4G
- Velvet 5G
Motorola
- Moto e7 4G/Moto e7 Power 4G
- Moto e13 4G
- Moto e14 4G
- Moto e22i 4G
- Moto edge20 fusion 5G
- Moto edge30 5G/Moto edge30 pro 5G
- Motorola edge 50 fusion
- Moto g 5G Plus
- Moto g06 4G
- Moto g8 4G
- Moto g10 4G
- Moto g14 4G
- Moto g34 5G
- Moto g35 5G
- Moto g50 5G
- Moto g56 5G
- Moto g62 5G
- Moto g67 5G
- Signature 5G
Nokia
- 1 Plus 4G
- C01 Plus 4G
- C02 4G
- G21 4G
- XR20 5G
OPPO
- A16s 4G
- A38 4G
- A57 4G
- A60 5G
- A60x 5G
- A91 4G
- AX5 4G
- Find N6 5G
- Find X2 Lite 5G
- Find X5 5G/Find X5 Lite 5G/Find X5 Pro 5G
- R15 Pro 4G
- R17 Pro 4G
- Reno Z 4G
- Reno8 5G
Samsung
- Galaxy A05s 4G
- Galaxy A8 4G
- Galaxy A11 4G
- Galaxy A12 4G
- Galaxy A13 4G/Galaxy A13 5G
- Galaxy A14 4G/Galaxy A14 5G
- Galaxy A16 4G/Galaxy A16 5G
- Galaxy A17 4G/Galaxy A17 5G
- Galaxy A20 4G
- Galaxy A22 5G
- Galaxy A30 4G
- Galaxy A32 5G
- Galaxy A33 5G
- Galaxy A34 5G
- Galaxy A35 5G
- Galaxy A36 5G
- Galaxy A37 5G
- Galaxy A51 4G
- Galaxy A52 5G/Galaxy A52s 5G
- Galaxy A53 5G
- Galaxy A55 5G
- Galaxy A56 5G
- Galaxy A57 5G
- Galaxy A70 4G
- Galaxy A71 5G
- Galaxy A73 5G
- Galaxy Note8 4G
- Galaxy Note9 4G
- Galaxy Note10 4G/Galaxy Note10+ 4G
- Galaxy Note20 4G/Galaxy Note20 5G/Galaxy Note20 Ultra 5G
- Galaxy S8 4G/Galaxy S8+ 4G
- Galaxy S9 4G/Galaxy S9+ 4G
- Galaxy S10 4G/Galaxy S10+ 4G/Galaxy S10e 4G
- Galaxy S20 4G/Galaxy S20 5G/Galaxy S20 FE 4G/Galaxy S20 FE 5G/Galaxy S20 Ultra 5G/Galaxy S20+ 4G/Galaxy S20+ 5G
- Galaxy S21 5G/Galaxy S21 FE 5G/Galaxy S21 Ultra 5G/Galaxy S21+ 5G
- Galaxy S22 5G/Galaxy S22 Ultra 5G/Galaxy S22+ 5G
- Galaxy S23 5G/Galaxy S23 Ultra 5G/Galaxy S23+ 5G/Galaxy S23 FE 5G
- Galaxy S24/Galaxy S24 Ultra/Galaxy S24+/Galaxy S24 FE 5G
- Galaxy S25/Galaxy S25 Ultra/Galaxy S25+/Galaxy S25 Edge/Samsung Galaxy S25 FE
- Galaxy S26/Galaxy S26 Ultra/Galaxy S26+
- Galaxy Tab A 8.0 2017 4G/Galaxy Tab A 10.1 4G/Galaxy Tab A 10.5 4G
- Galaxy Tab A7 2020 10.4 4G
- Galaxy Tab A8 10.5 4G
- Galaxy Tab A9+ 5G
- Galaxy Tab A11+ 5G
- Galaxy Tab S4 4G
- Galaxy Tab S5e 10.5 4G
- Galaxy Tab S6 10.5 4G
- Galaxy Tab S7 11.0 4G/Galaxy Tab S7+ 12.4 5G
- Galaxy Tab S8 11.0 5G/Galaxy Tab S8+ 12.4 5G/Galaxy Tab S8 Ultra 14.6 5G
- Galaxy Tab S9 11.0 5G/Galaxy Tab S9+ 12.4 5G/Galaxy Tab S9 Ultra 14.6 5G
- Galaxy Tab S10 FE 10.9 5G/Galaxy Tab S10 FE+ 13.1 5G/Galaxy Tab S10+ 12.4 5G/Galaxy Tab S10 Ultra 14.6 5G
- Galaxy Tab S11 Ultra
- Galaxy Z Flip 4G/Galaxy Z Flip3 5G/Galaxy Z Flip4 5G/Galaxy Z Flip5 5G/Galaxy Z Flip6/Galaxy Z Flip7/Galaxy Z Flip7 FE
- Galaxy Z Fold2 5G/Galaxy Z Fold3 5G/Galaxy Z Fold4 5G/Galaxy Z Fold5 5G/Galaxy Z Fold6/Galaxy Z Fold7
TCL
- 20 Pro 5G/20 R 5G
- 305 4G
Vodafone
- Smart E9 4G
- Smart N10 4G
- V Lite 4G
- V Lite 2 4G
- V Lite 3 4G
- V Pro 4G
- V Pro 2 4G
- V Pro 3 4G
- V Smart 4G
- V Smart 2 4G
Can I make Wi-Fi Calls if my device isn't listed?
If your device isn't on our compatible device list, you may not be able to make Wi-Fi calls. Check with your device manufacturer.
If Wi-Fi Calling is a feature you’d like to use, we recommend switching to a compatible device and make sure it has the latest software.
Can I use Wi-Fi Calling to make Emergency calls?
Yes, you can use Wi-Fi Calling to make emergency calls if there's no mobile network coverage. Here’s what you need to know:
- Mobile Network First: Your phone will try to use the iiNet mobile network first. If that doesn’t work, it will look for other mobile carrier networks and are connected to a Wi-Fi network.
- Wi-Fi Calling as Backup: If no mobile carrier networks are available, your phone will use Wi-Fi Calling, if you have a compatible device with the latest software.
- Check Compatibility: Make sure your device supports emergency calls over Wi-Fi and you have Wi-Fi Calling turned on in your settings. iiNet updates the list of compatible devices from time to time.
- Keep device software updated: If you have received an SMS and/or email from us to update your device’s software or replace it immediately in order to make emergency 000 calls, see this information.
- Download Emergency+ App: This free app helps provide your location to emergency services using GPS.
- Provide Your Location: When using Wi-Fi Calling, your location might not be automatically shared, so be ready to tell emergency services where you are.
- Limitations: Wi-Fi Calling can’t receive National Emergency Warning System (NEWS) SMS warnings.
While you can make calls to emergency services (000) using Wi-Fi Calling if there is no mobile coverage available, we recommend using the mobile network if possible. This will provide a more accurate location to emergency services.
How to use Wi-Fi Calling
Where can I make Wi-Fi Calls from?
As long as Wi-Fi Calling is turned on in your phone settings and your phone is connected to Wi-Fi, Wi-Fi Calling will be used automatically whenever your phone has limited iiNet Mobile coverage.
I'm in an area with iiNet Mobile coverage. Will I be able to make a Wi-Fi Call?
If you're in an area with iiNet Mobile coverage and want to use Wi-Fi Calling, simply turn on Airplane Mode and connect to Wi-Fi. This will force Wi-Fi Calling to be used instead.
Is there any change to the way I make or receive calls on my phone using Wi-Fi Calling?
There's no change to the way you make calls over Wi-Fi Calling to another mobile phone. However, when calling a landline, you’ll need to enter the area code e.g. "02 9000 1234" instead of just "9000 1234"), even if you’re in the same state or territory.
What happens to calls when I leave Wi-Fi coverage?
If you are on an iiNet call and you are entering a known Wi-Fi coverage area (but there is no iiNet mobile coverage), the call will automatically handover to Wi-Fi calling, if the Wi-Fi calling feature is enabled. Conversely, if you are on a Wi-Fi Call and you are leaving the Wi-Fi coverage, the call will automatically handover to 4G or 5G (if you are entering an iiNet mobile coverage area).
Can I use Wi-Fi calling while International Roaming?
No, Wi-Fi Calling is not available outside Australia.
What internet speed is needed for Wi-Fi Calling to work?
Wi-Fi Calling only needs a speed of 100-120kbps. However, internet services with high latency (i.e. delays sending data from one point to another), such as Satellite broadband, may reduce your call quality.
Can I use Wi-Fi Calling on a VPN?
Yes. Virtual Private Networks (VPNs) will work as long as they don’t have a firewall that restricts access to Wi-Fi Calling.
Additional information
Are there extra charges for Wi-Fi Calling?
There are no additional fees for Wi-Fi Calling. All calls and SMS/MMS are charged at the standard rates for your iiNet mobile plan.
Does Wi-Fi Calling use data?
Yes, Wi-Fi Calling uses data over the Wi-Fi connection, which will affect the data allowance for that internet service (if applicable) or be charged based on the agreement with the internet service provider for the Wi-Fi network.
Wi-Fi Calling does not affect your iiNet mobile data allowance.
Is Wi-Fi Calling secure?
Yes. Wi-Fi Calling uses the same authentication as a call over our mobile network. Our current supported devices enable a secured connection that will ensure all calls and text messages are encrypted.
Can I differentiate between Wi-Fi calls and standard calls on my bill?
Yes. The call record on your bill will state ‘Over Wi-Fi’. Calls made over Wi-Fi may default to AEST/AEDT.
Troubleshooting
Why Wi-Fi Calling Might Not Work on Public Networks
Sometimes, Wi-Fi Calling may not work when you're connected to a public or business Wi-Fi network. This can happen for a few reasons:
- The network’s Internet Service Provider (ISP) might not support Wi-Fi Calling.
- There could be firewall settings or other network configurations that block the service.
If you're having trouble, we recommend reaching out to the network provider or ISP to check if Wi-Fi Calling is supported on their network.
Why Can't I see the Wi-Fi Calling icon at the top of my screen?
If the Wi-Fi Calling icon isn’t showing at the top of your screen, it usually means the feature isn’t currently active.
Here are a few common reasons why:
- Wi-Fi Calling is turned off in your phone’s settings.
- Your Wi-Fi network doesn’t support Wi-Fi Calling, or it’s blocking the connection.
- Your device software may need an update to support or improve Wi-Fi Calling.
- Signal strength or network quality might be too low for the feature to activate.
Why Can’t I Use Wi-Fi Calling for All My Calls?
Wi-Fi Calling is designed to help you make and receive calls when mobile coverage is weak or unavailable—like when you're indoors or in areas with poor signal.
However, your phone will always try to use the strongest available connection. So, if there’s good 4G or 5G coverage, your calls will go through the mobile network instead of Wi-Fi.
You’ll only use Wi-Fi Calling when:
- You’re connected to a Wi-Fi network, and
- Your mobile signal is too weak to make a regular call.
This switch happens automatically, so you don’t need to do anything—your phone chooses the best option for a clear and reliable call.
Why Can’t I Change Some Call Settings While Using Wi-Fi Calling?
When you're using Wi-Fi Calling, certain call settings—like call forwarding—can’t be changed. This is because those settings are managed through the mobile network, not over Wi-Fi.
While you're connected to Wi-Fi Calling:
- Your existing call forwarding settings will still work.
- You won’t be able to update or change them until you're back on the iiNet mobile network.
To make changes, simply turn off Wi-Fi Calling or move to an area with mobile coverage.
Why Doesn’t My Wi-Fi Call Connect Sometimes?
In most cases, Wi-Fi Calling works smoothly. However, there are times when certain calls, especially to special numbers like 000, 112, 1300, or 1800, might not connect. This is because these numbers often rely on your location to route the call correctly.
When using Wi-Fi Calling, iiNet uses the best available information to help locate your device. But sometimes, your exact location can’t be determined over Wi-Fi, which may prevent the call from going through.
What to do:
If you're having trouble calling one of these numbers, try the following:
- Turn off Wi-Fi Calling in your phone’s settings.
- Reconnect to the iiNet//Internode mobile network.
- Dial the number again.
This ensures your call is routed correctly based on your mobile network location.
Terms and Conditions
Requirements
To use Wi-Fi Calling, you need;
- An active iiNet prepaid mobile plan
- A compatible mobile phone
- 4G voice calls (VoLTE) enabled
- Wi-Fi Calling settings turned on
- Access to a Wi-Fi connection
You can turn off Wi-Fi Calling through your mobile phone settings.
There are no additional fees to use Wi-Fi Calling. However, you will be charged your normal plan rates for calls and messages (SMS or MMS) made using Wi-Fi Calling, just as you would on the mobile network. Your use of Wi-Fi will count towards your internet usage, so you may incur charges from your internet service provider. Calls or TXTs using Wi-Fi Calling will appear on your usage history as “Over Wi-Fi” and the time may default to AEST/AEDT.
Limitations:
- Wi-Fi Calling can’t be used while roaming overseas.
- It may not work on some public or corporate Wi-Fi networks.
- You may not receive National Emergency Warning System (NEWS) TXT warnings when you are using Wi-Fi Calling.
Here's what the status lights mean on your VX420-G2V modem.

| Light | States and meaning |
|---|---|
| Power | Off = No power. Green = Your modem has power. |
| DSL | Off = Your modem doesn't have a DSL connection. There may be an outage if your internet uses DSL. Green = Your modem has a DSL connection. This light flashes during initial connection. |
| Internet | Off = Your modem is offline. There may be a problem with the modem settings or its username and password. Green = Your modem is online. |
| 2.4GHz & 5GHz | Off = 2.4GHz/5GHz Wi-Fi is turned off. Green = 2.4GHz/5GHz Wi-Fi is turned on. |
| WAN | Off = Nothing is plugged into the WAN port. Green = A device is plugged into the WAN port. |
| LAN 1-4 | Off = Nothing is plugged into the LAN ports. Green = At least one device is plugged into the LAN ports. |
| Phone | Off = You don't have an iiNet VoIP phone service. Green = Your iiNet VoIP phone is online. |
| WPS | Off = Wi-Fi Protected Setup (WPS) isn't currently being used. Green = This light flashes when a Wi-Fi device is trying to connect via WPS, and will stay on for about 5 minutes after a successful connection. |
| USB | Off = Nothing is plugged into the USB port. Green = A device is plugged into the USB port. This light flashes when a new USB device is connected, and when data is being transferred. |
Choose your device's operating system to connect to Wi-Fi.
Select one of the links below to jump to a query:
- Connect to Wi-Fi on Windows 11
- Connect to Wi-Fi on Windows 10
- Connect to Wi-Fi on Windows 7
- Connect to Wi-Fi on macOS
- Connect to Wi-Fi on iPhone or iPad
- Connect to Wi-Fi on Android OS
Connect to Wi-Fi on Windows 11
- On your desktop or laptop, click the Network icon in bottom right-hand corner of your screen to bring up the menu.

- Click the arrow next to the Network icon to bring up the list of available Wi-Fi networks.
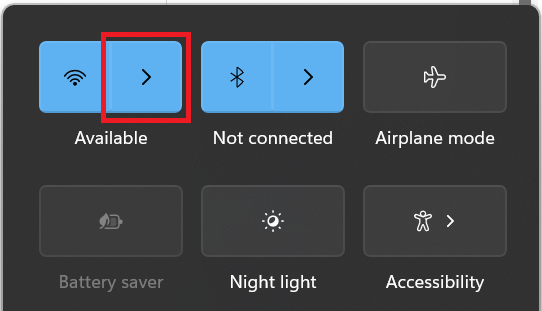
- Find and click your Wi-Fi network name. If you're using your modem's default Wi-Fi settings, please note that the Wi-Fi network name may also be called a "SSID".
Not seeing your Wi-Fi network? Follow our basic Wi-Fi settings guide for iiNet modems. If your modem isn't from iiNet, you should be able to find help on the manufacturer's website. - If you want to stay connected to the Wi-Fi whenever you're in range, click the Connect Automatically box. Otherwise, just click Connect.
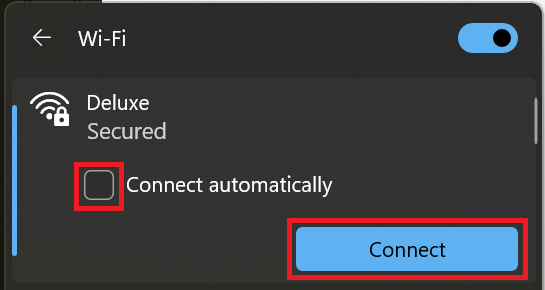
- Enter your Wi-Fi password and click Next to connect to the Wi-Fi. Your computer will remember your password for next time.
Connect to Wi-Fi on Windows 10
- On your desktop, click the Network icon in bottom right-hand corner of your screen to bring up a list of available connections.

- Find and click your Wi-Fi network name. If you're using the default Wi-Fi settings on your modem's barcode sticker, please note that the Wi-Fi network name may also be called a "SSID".
Not seeing your Wi-Fi network? Follow our basic Wi-Fi settings guide for iiNet modems. If your modem isn't from iiNet, you should be able to find help on the manufacturer's website. -
If you want to stay connected to the Wi-Fi whenever you're in range, tick the Connect Automatically box. Otherwise, just click Connect.
-
Enter your Wi-Fi password and click OK to connect to the Wi-Fi. Your computer will remember your password for next time.
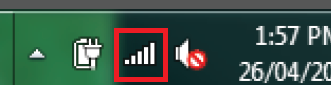
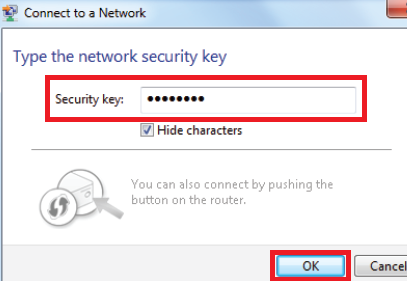
Connect to Wi-Fi on Windows 7
- On your desktop or laptop, click the Network icon in bottom right-hand corner of your screen.
- Find and click your Wi-Fi network name. If you're using the default Wi-Fi settings on your modem's barcode sticker, please note that the Wi-Fi network name may also be called a "SSID".
Not seeing your Wi-Fi network? Follow our basic Wi-Fi settings guide for iiNet modems. If your modem isn't from iiNet, you should be able to find help on the manufacturer's website. - If you want to stay connected to the Wi-Fi whenever you're in range, tick the Connect Automatically box. Otherwise, just click Connect.
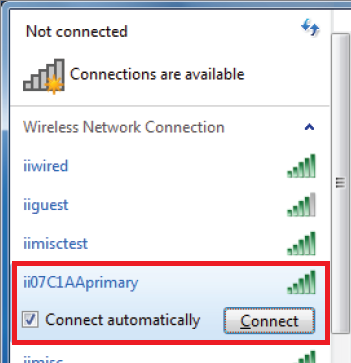
- Enter your Wi-Fi password in the Security key box and click OK to connect to the Wi-Fi. Your computer will remember your password for next time.
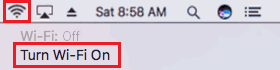
Connect to Wi-Fi on macOS
- Click the Wi-Fi icon in the top right-hand corner of your screen and hit Turn Wi-Fi On.
- Click the Wi-Fi icon again, then find and click your Wi-Fi network name. If you're using the default Wi-Fi settings on your modem's barcode sticker, please note that the Wi-Fi network name may also be called a "SSID".
Not seeing your Wi-Fi network? Follow our basic Wi-Fi settings guide for iiNet modems. If your modem isn't from iiNet, you should be able to find help on the manufacturer's website.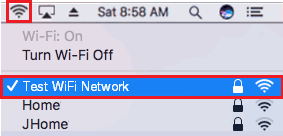
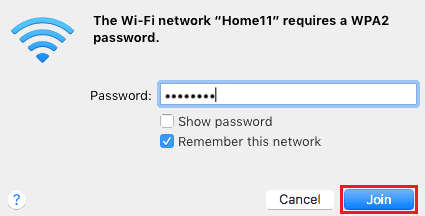
- Enter your Wi-Fi password and tick Remember this network, then click Join to connect to the Wi-Fi. Your Mac will remember your password for next time.
Connect to Wi-Fi on iPhone or iPad
- Open the Settings app and tap Wi-Fi.
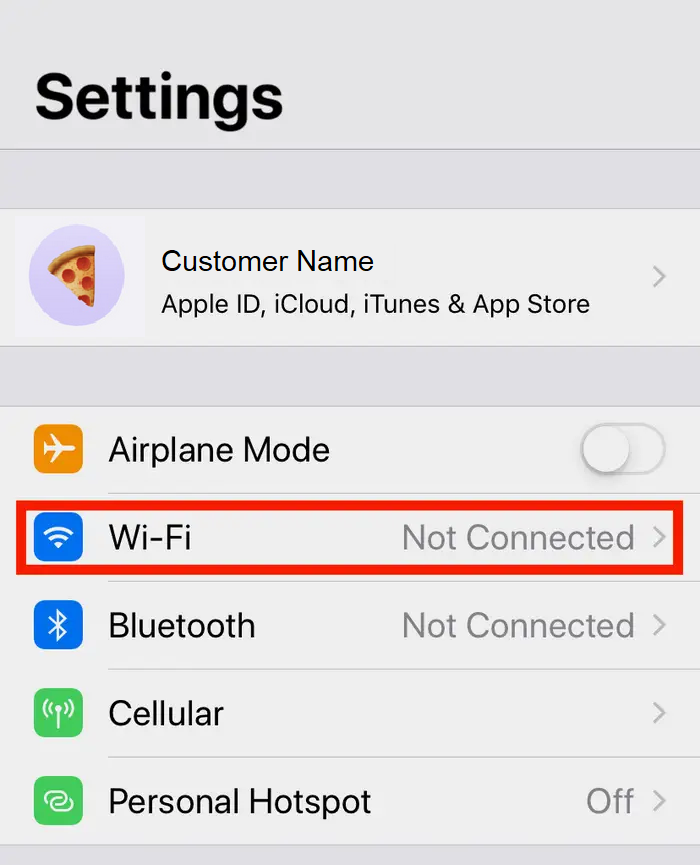
- Find and tap your Wi-Fi network name. If you're using the default Wi-Fi settings on your modem's barcode sticker, please note that the Wi-Fi network name may also be called a "SSID".
Not seeing your Wi-Fi network? Follow our basic Wi-Fi settings guide for iiNet modems. If your modem isn't from iiNet, you should be able to find help on the manufacturer's website.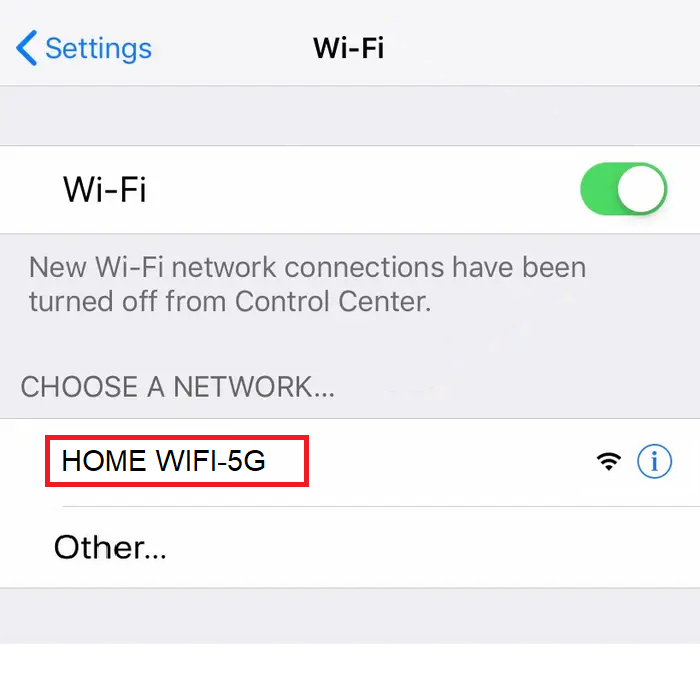
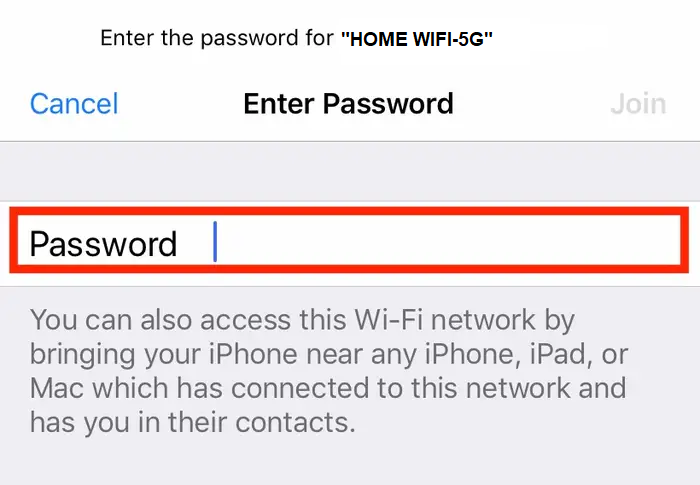
- Enter your Wi-Fi password and tap Join to connect to the Wi-Fi. Your phone or tablet will remember your password for next time.
Connect to Wi-Fi on Android OS
Android OS looks different depending on your software version. If this guide doesn't work for you, please check your phone manufacturer's website for help.
- Open the Settings app.
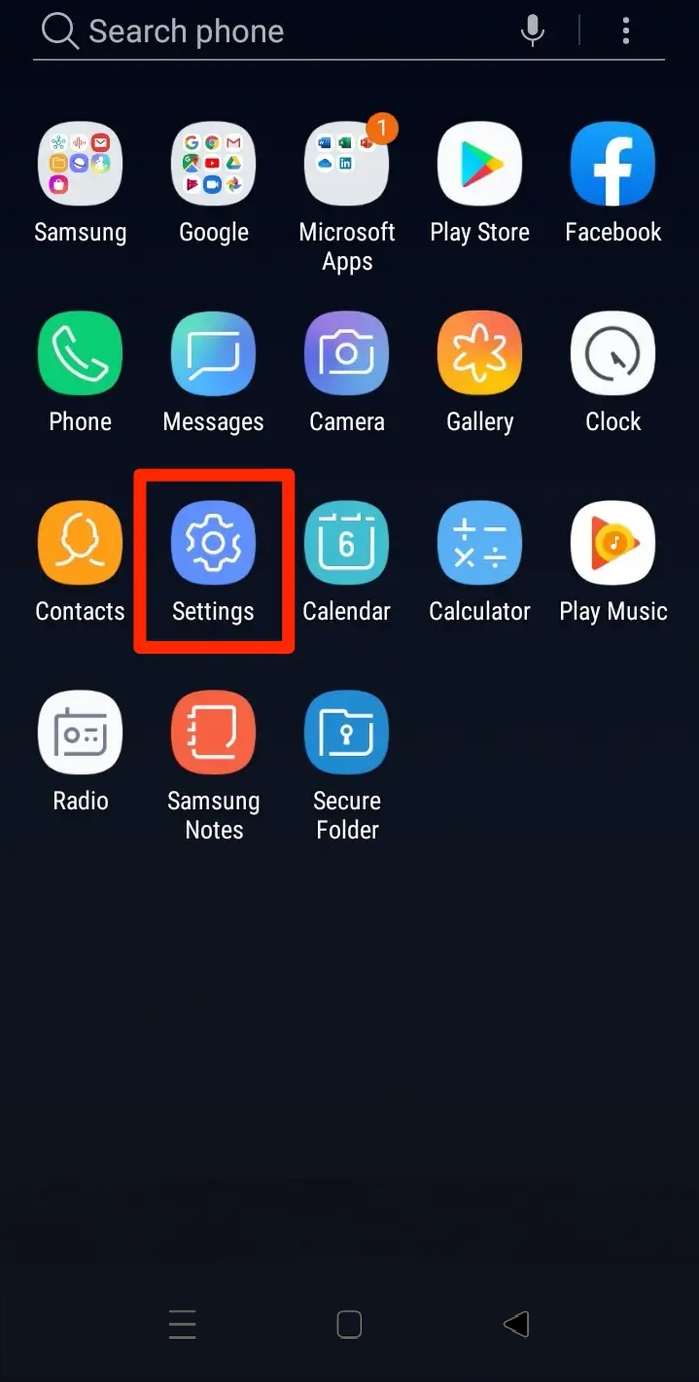
- Tap Wi-Fi or Wireless & Networks and make sure Wi-Fi is turned on.
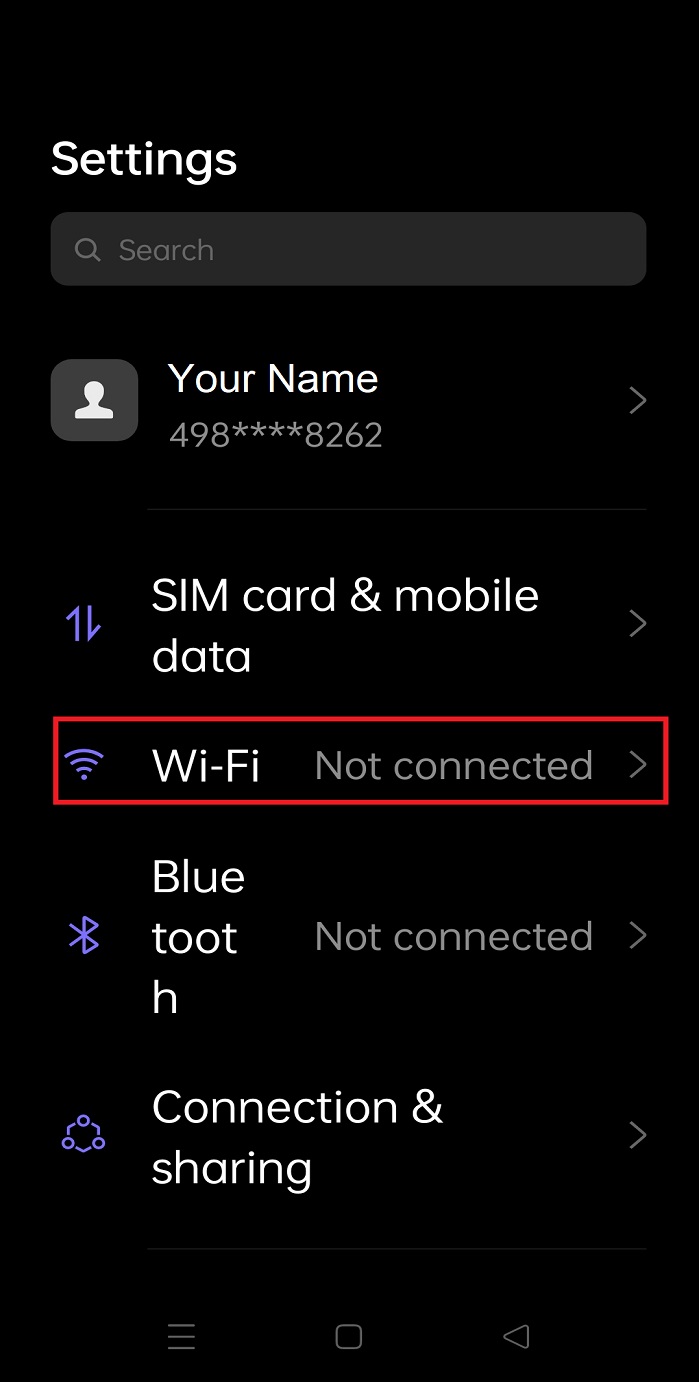
- Find and tap your Wi-Fi network name. If you're using the default Wi-Fi settings on your modem's barcode sticker, please note that the Wi-Fi network name may also be called a "SSID".
Not seeing your Wi-Fi network? Follow our basic Wi-Fi settings guide for iiNet modems. If your modem isn't from iiNet, you should be able to find help on the manufacturer's website.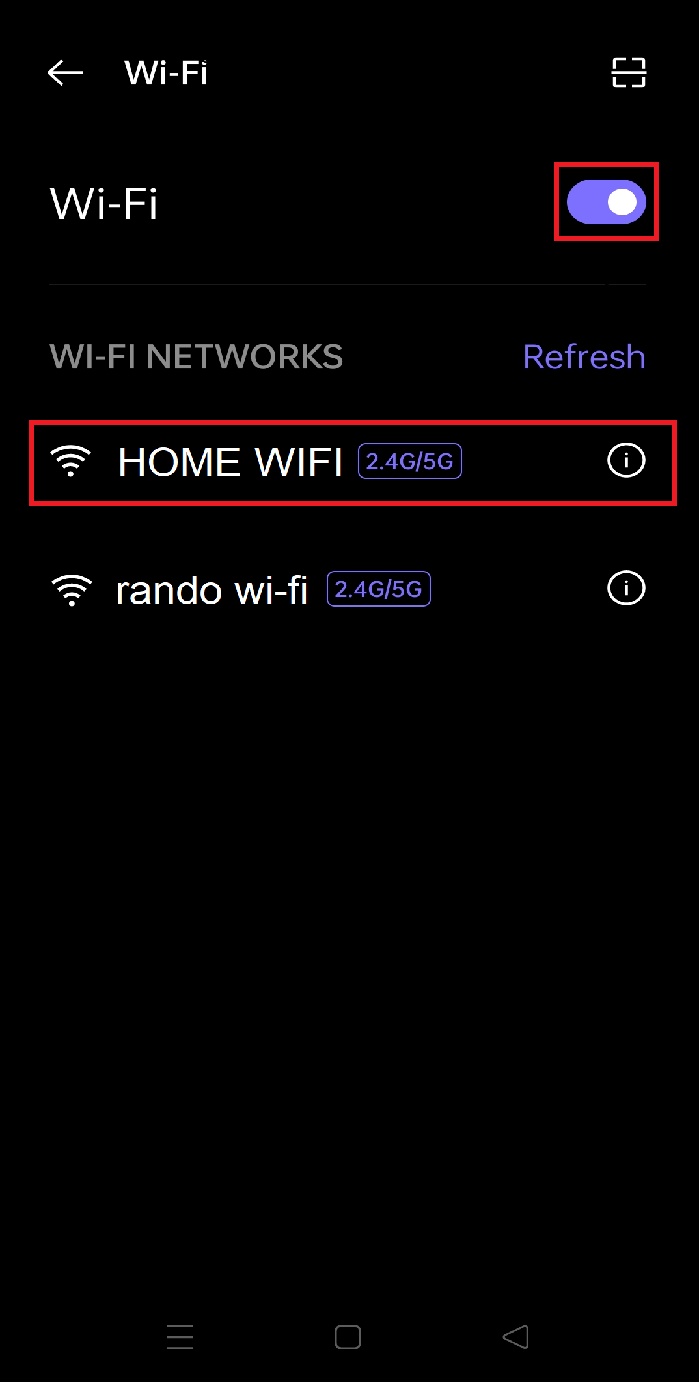
- Enter your Wi-Fi password and tap the tick icon to connect to the Wi-Fi. Your phone will remember your password for next time.