Here's what the status lights mean on your Smart Modem Gateway (VX420-G2H).

| Light | States and meaning |
|---|---|
| Power | Off = No power. Green = Your modem has power. |
| DSL | Off = Your modem doesn't have a DSL connection. There may be an outage if your internet uses DSL. Green = Your modem has a DSL connection. This light flashes during initial connection. |
| 4G | Off = No connection to the 4G network. Green = Your modem is connected to 4G with a strong signal. Orange = Your modem is connected to 4G with an OK signal. Red = Your modem is connected to 4G a weak signal. |
| Internet | Off = Your modem is offline. There may be a problem with the modem settings or its username and password. Green = Your modem is online. |
| 2.4GHz & 5GHz | Off = 2.4GHz/5GHz Wi-Fi is turned off. Green = 2.4GHz/5GHz Wi-Fi is turned on. |
| WAN | Off = Nothing is plugged into the WAN port. Green = A device is plugged into the WAN port. |
| LAN 1-4 | Off = Nothing is plugged into the LAN ports. Green = At least one device is plugged into the LAN ports. |
| Phone | Off = You don't have an iiNet VoIP phone service. Green = Your iiNet VoIP phone is online. This light flashes when the phone is ringing, and blinks slowly when a voicemail is waiting. |
| WPS | Off = Wi-Fi Protected Setup (WPS) isn't currently being used. Green = This light flashes when a Wi-Fi device is trying to connect via WPS, and will stay on for about 5 minutes after a successful connection. |
| USB | Off = Nothing is plugged into the USB port. Green = A device is plugged into the USB port. This light flashes when a new USB device is connected, and when data is being transferred. |
Note for nbn services with 4G Backup: Whenever your modem’s 4G light is lit, that means your modem has automatically connected to the 4G Backup service because your nbn service is unavailable, such as during initial setup or network maintenance. Your nbn Phone will not work while 4G Backup is in use.
Once you're connected to nbn, if you notice the 4G Backup service has turned back on for an extended period of time:
- Restart your modem.
- Make sure your modem is plugged in correctly for nbn.
- Contact us if the issue persists as we may need to investigate.

Checking the status lights may be useful during setup and troubleshooting.

| Light | States and meaning |
|---|---|
| Power | Off = Modem has no power. Green = Modem has power. |
| DS | Off = Not connected to the Cable network or modem has no power. Green = Modem is online. Flashes during initial search for a downstream channel or when a firmware upgrade is in progress. |
| US | Off = Not connected to the Cable network or modem has no power. Green = Modem is online. Flashes during initial search for an upstream channel or when a firmware upgrade is in progress. |
| Online | Off = Modem is not registered/online on the Cable network or modem has no power. Green = Modem is registered to the Cable network and fully operational. Flashes when modem is booting up. |
| WiFi 2.4G/5G | Off = 2.4GHz or 5GHz WiFi disabled or modem has no power. Green = 2.4Ghz or 5GHz WiFi enabled. Flashes during WiFi network activity. |
| ETH 1-4 | Off = Nothing connected to Ethernet port or modem has no power. Green = Device connected to Ethernet port. Flashes during network activity. |
| TEL1/TEL2 | Off = VoIP phone disabled or modem has no power. Green = VoIP phone enabled. Flashes during calls. |
Note: There is a WPS button under the lights. Press this to enable WPS search mode.
Here's everything you need to know about iiNet 4G Home Wireless Broadband.
Select one of the links below to jump to a query:
- What is Home Wireless Broadband?
- Where is Home Wireless Broadband available?
- How long does it take to get connected to Home Wireless Broadband?
- How fast is Home Wireless Broadband?
- What hardware do I need for Home Wireless Broadband?
- Can I use Home Wireless Broadband for online gaming?
- What is CG-NAT and how does it affect Home Wireless Broadband services?
- How does the 7-day trial for existing iiNet customers work?
- Does Home Wireless Broadband include a phone service?
- How does Virtual Phone for existing iiNet customers work?
What is Home Wireless Broadband?
Home Wireless Broadband is a Fixed Wireless broadband service powered by our 4G mobile network. It's a great alternative to fixed line broadband services such as nbn®.
Where is Home Wireless Broadband available?
Home Wireless Broadband is available within our 4G coverage area. You can check your address on our website.
Important: Home Wireless Broadband is only for use within Australia at the address nominated on your order. If you need to move house, please contact us so we can check coverage at your new address.
How long does it take to get connected to Home Wireless Broadband?
Not long - you can get online as soon as you have your iiNet modem. Delivery takes 2-5 business days.
How fast is Home Wireless Broadband?
There's a few different factors that affect the speeds you'll get. Check out Factors affecting Fixed Wireless broadband speed for everything you need to know.
What hardware do I need for Home Wireless Broadband?
We'll send you a modem when you order iiNet Home Wireless Broadband - you'll need to use it, because other modems won't work. You can connect your own WiFi router to your iiNet modem if you'd like.
Note: Some connections may need to use the extra antennae that comes with their iiNet modem. Please don't attach these antennae unless we tell you to, as using the antennae unnecessarily can actually worsen performance.
Can I use Home Wireless Broadband for online gaming?
Home Wireless Broadband may not be suitable for online gaming due to its higher connection latency, which is the amount of time it takes for data packets to go from one place to another on an internet connection. Low latency is important for ultra-time-sensitive stuff like multiplayer shooting games or battle MMORPGs.
What is CG-NAT and how does it affect Home Wireless Broadband services?
Home Wireless Broadband uses Carrier-Grade Network Address Translation (CG-NAT), which assigns each service with a private IP address instead of a dynamic public IP address. Our network will then translate that private address into a public address.
Some things need internal NAT to work properly. CG-NAT means that the following items won't work on Home Wireless Broadband:
- Port forwarding
- Hosting web, email or file servers internally
- Smart Home systems (e.g. accessing security camera footage remotely, home automation and printers)
- Remote Access (i.e. accessing your home computer or devices from another location)
If you have any of these in your home setup, Home Wireless Broadband isn't right for you. Please check your address on our website for another type of iiNet internet.
How does the 7-day trial for existing iiNet customers work?
A 7-day trial is available for iiNet customers with an existing nbn® or Ultra Broadband service.
- Once you’re connected to Home Wireless Broadband, your existing iiNet nbn or Ultra Broadband service will stay connected for 7 days.
- If you’re not happy with Home Wireless Broadband, you can call us to switch back to nbn or Ultra Broadband during the 7-day trial.
- If we haven't heard from you after 7 days, your nbn or Ultra Broadband service will be automatically disconnected.
Note: If you choose to keep your nbn or Ultra Broadband service connected beyond the 7-day trial, the monthly nbn or Ultra Broadband plan fee will apply.
Does Home Wireless Broadband include a phone service?
No, Home Wireless Broadband is a data-only internet service that does not include a phone service.
Virtual Phone is an optional Call Forwarding service for existing nbn or Ultra Broadband customers, but it doesn't allow you to make calls.
How does Virtual Phone for existing iiNet customers work?
If you have an existing iiNet VoIP or landline phone service, you can set up Virtual Phone when you order Home Wireless Broadband.
Virtual Phone lets you:
- Forward all incoming calls to another Standard Australian landline or mobile number; and
- Keep your existing phone number, should you later wish to switch back to nbn or Ultra Broadband, or switch your phone service to another provider.
Virtual Phone can't be used to make calls.
You can change the Call Forwarding number in Toolbox by selecting Virtual Phone.
If your 4G Home Wireless Broadband service is offline, you won’t be able to visit a website, browse, stream, or download. Email and any other services that use the internet will not work. These steps will help you identify the issue.
- Have you moved house recently? You'll need to relocate your service online.
You may need to switch to a different type of internet depending on what's available at your new address. - Find your modem and make sure that your SIM is inside the SIM slot. If the SIM is missing, please call us on 1300 994 533 to order a replacement.
NetComm NL20 Modem - SIM slot on the bottom of the modem
Smart Modem Gateway - SIM slot on the side of the modem
You don't need to check the SIM slot if it's still covered by a black sticker.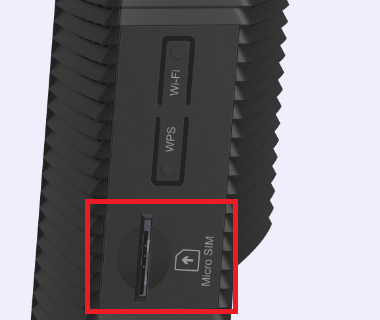
- Make sure that your modem's cables are plugged in securely and not damaged.
You’ll need to replace any broken or chewed cables. - Turn off your modem’s power outlet for at least 10 seconds.
- Turn the outlet back on and wait for your modem’s Internet light to come on, then see if you can visit a website.
NetComm NL20 modem
Smart Modem Gateway
- Check your modem's 4G light. If it's off or red, try moving your modem to a different spot.
Can't get a good signal? Give us a call on 13 22 58 and we'll help you out. - Do you have any devices connected to your modem with an Ethernet cable? If these devices can visit a website but devices on Wi-Fi can’t, switch to troubleshooting Wi-Fi No Connection.
- If you can view websites on some devices but not others, even when they’re both connected the same way, you may need to fix some browser settings. Check out our guide on Browsing issues.
- Still can't get online? Please call us on 13 22 58 and we’ll help you.
If your iiNet Home Wireless Broadband service is running slowly, these steps will help you identify the issue.
- Your service may just be affected by planned maintenance. You can check your address on our Network Status page.
If there is planned maintenance, the results will give you an estimated fix time. - Find your modem and turn off its power outlet for at least 10 seconds.
- Turn the outlet back on and wait 3-5 minutes for your modem to reboot.
- Check the 4G light on your modem. If it's off or red, try moving your modem to a different spot.
Can't get a good signal? Give us a call on 13 22 58 and we'll help you out.
NetComm NL20 modem
Smart Modem Gateway - Do you have any devices connected to your modem with an Ethernet cable? If speeds on these devices are fine but devices on Wi-Fi are slow, switch to Troubleshooting Wi-Fi speed.
- Make sure your modem’s Ethernet cables are in good condition.
You’ll need to replace any broken or chewed cables. - Your speed may temporarily slow down if you’re running more devices or apps than your connection can handle at the same time. For example, if a device is downloading a large file or running a 4K streaming app, your speed should improve when it’s finished.
If you need to run more devices or apps at the same time, a different type of internet may better suit your needs. Please call us on 13 19 17 for support. - Run a scan on your antivirus/anti-malware software. If any infections are detected, make sure they are quarantined and removed.
Contact your software’s Customer Support if you need help. - Still getting slow speeds? Please call us on 13 22 58 and we’ll help you.
Your modem will take care of the hard stuff like internet settings, but we’ll need your help to plug it in. The main cables you need will come in the box, and you can grab extra Ethernet cables from the shops if you need them.
Note: Your iiNet 4G SIM is already inside your modem. Please don't remove it because the SIM won't work in other devices.
Choose your modem to get started:
| Picture | Modem |
|---|---|
 |
NetComm NL20 Modem |
 |
Smart Modem Gateway (VX420-G2H) |
How to plug in your NetComm NL20 Modem for Home Wireless Broadband
- Find a good spot for your modem. It's best to choose a clear, open location on a shelf or table - ideally near a window.
You can try different spots if your first spot isn’t giving you a strong signal. Don't put your modem on the floor or inside a cupboard because this will cause a weak signal. - Use the power cable to plug your modem's Power port into a power outlet and press the ON/OFF button on the side of the modem.

- Check the 4G light on the front your modem. If it's green or orange you’re online and you can start connecting your devices.
- If the 4G light is off or red, try moving your modem to a different spot.
No 4G light or can't get a good signal? Give us a call on 13 22 58 and we'll help you out. - Connect your devices. If you have extra ethernet cables, you can connect 4 devices to your modem’s yellow LAN ports.
If you want to connect your devices via Wi-Fi, you have 3 options:- Use the Wi-Fi Network name and Password on your modem's barcode sticker.
- Scan the QR code on your modem's barcode sticker (Smartphones only).

- Enable Wi-Fi Protected Setup (WPS) in your modem dashboard, then press the WPS button on the side of your modem for 3 seconds.
- Your devices will automatically connect to the best Wi-Fi possible. If your Wi-Fi’s running slow, check out Improving Wi-Fi Signal.
Please note that Home Wireless Broadband is not suitable for 4K streaming or online gaming. Learn more. - Once your devices are connected, you're good to go.
How to plug in your Smart Modem Gateway (VX420-G2H) for Home Wireless Broadband
- Find a good spot for your modem. It's best to choose a clear, open location on a shelf or table - ideally near a window.
You can try different spots if your first spot isn’t giving you a strong signal. Don't put your modem on the floor or inside a cupboard because this will cause a weak signal. - Use the power cable to plug your modem's Power port into a power outlet and press the ON/OFF button.

-
Leave your modem alone for 3-5 minutes while it runs through its automatic setup.
-
Check the 4G light on your modem. If it's green or yellow, you’re online with a good signal and you can start connecting your devices.
-
If the 4G light is off or red, try moving your modem to a different spot.
No 4G light or can't get a good signal? Give us a call on 13 22 58 and we'll help you out. - You'll find the default Wi-Fi name (SSID) and Wireless Password/PIN on your modem's barcode sticker. If you want to change your Wi-Fi name or password, use this guide.

- Your devices will automatically connect to the best Wi-Fi possible. If your Wi-Fi’s running slow, check out Improving Wi-Fi Signal.
- For HD streaming, Ethernet is better than Wi-Fi. If you have extra Ethernet cables, you can connect up to 4 devices to your modem’s yellow LAN ports.
Please note that Home Wireless Broadband is not suitable for 4K streaming or online gaming. Learn more. - Once your devices are connected, you're good to go.
It's important to tell us when you're moving so we can move your iiNet services with you. Some internet services take time to connect, especially if equipment needs to be installed at your new address, so let us know as soon as possible.
A different type of internet may be available at your new address.
Do you only have iiNet Mobile? You don't need to relocate a mobile service, but it's good idea to check your new address on our coverage map.
- You can relocate your nbn service in Toolbox.
Have a different type of iiNet internet? Call us on 1300 541 714 and we'll help you out. - Log in to and select your nbn service.
Never logged into Toolbox before? Check out An Introduction to Toolbox.

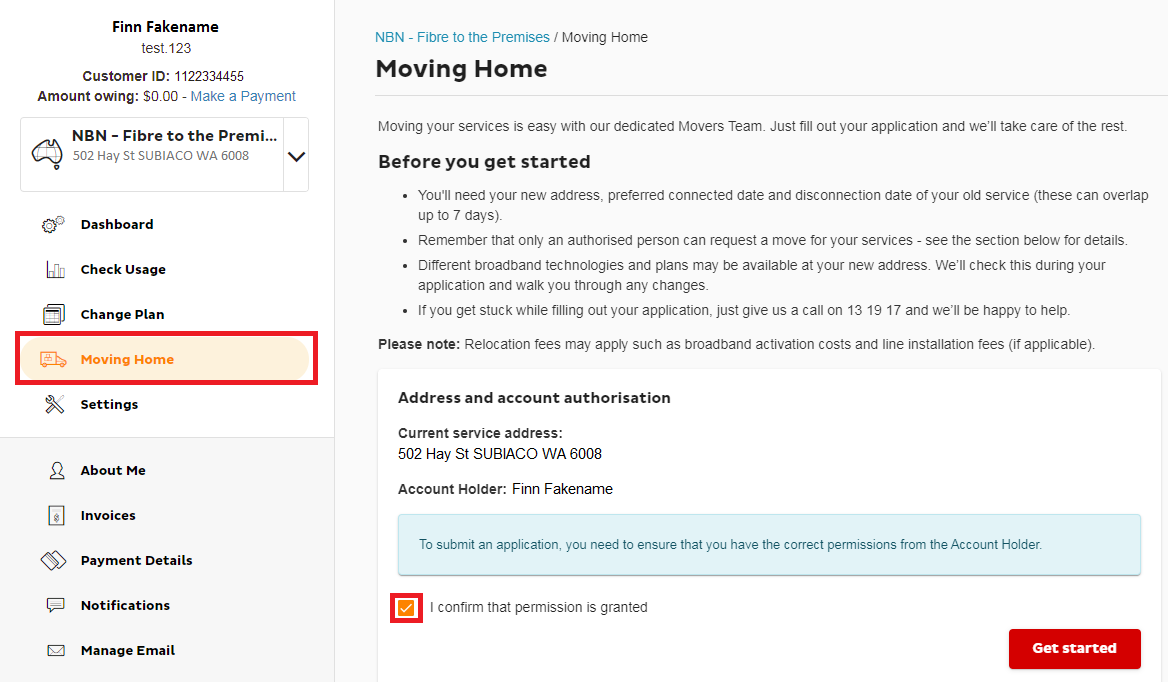
- Hit Moving Home.
- Tick the "I confirm that permission is granted" box to confirm that you're the account holder or have the account holder's permission for the move.
- Enter your New Service Address.
If you don't choose from the list of auto-completed addresses, you'll be asked to confirm your address details.

- Select the internet service you want to relocate.
Note: If you change the selection to "Add a new service", you'll order a new service on a new account. Your existing broadband service will not be relocated or disconnected.

- If you have an existing iiNet modem, we'll check if it's compatible with your new internet service. If it's not compatible or you have a BYO modem, select your desired modem option.
Note: Phone services are not available if you choose to BYO modem. - Choose your desired internet plan and fill out your order details, then hit Sign up now to submit your relocation order.
We'll keep you updated on the progress of your order via email and SMS.
Most Wi-Fi 6 modems can support Wi-Fi speeds of up to 1000Mbps (1Gbps), and at least that speed via Ethernet. Some modems even offer Ethernet ports capable of 2.5Gbps or higher. However, your actual speeds can vary depending on several factors, including your internet plan, your modem's capability, and overall internet traffic. Your internet plan’s Typical Evening Speed will give you a realistic estimate of the speeds you'll experience.
Your choice of modem and how you set it up in your home could stop you from getting the maximum speed of your internet plan. If you choose to bring your own (BYO) modem instead of using an iiNet-supplied modem, it must meet certain technical requirements for optimal performance on our NBN500, nbn Superfast & nbn Ultrafast plans.
Select one of the links below to jump to a query:
High speed nbnⓇ modem requirements
Your modem must support or feature:
- PPPoE connection types
- Gigabit Ethernet ports
- Wi-Fi 6 (802.11ax) or later
- VLAN tagging (if you have nbn Phone or your plan was activated before 1 March 2023)
You should be able to find this information on the manufacturer’s or retailer’s website. Alternatively, you can check the barcode sticker on the modem for the make and model, or search online.
We also recommend:
- Using a modem that features Band Steering so devices will automatically switch between 2.4GHz and 5GHz Wi-Fi for the best performance and connection stability.
- Connecting your devices via Ethernet Cable (CAT5e or higher) instead of Wi-Fi.
- Getting a Mesh network for better Wi-Fi signal in a large property.
Important: If you choose to use an older modem that doesn't have Gigabit Ethernet ports or Wi-Fi 6, your connection may be slower. We recommend connecting devices by Ethernet cable instead of Wi-Fi to get the best possible experience.
Compatible modems on our high speed nbnⓇ plans
The following modems have been tested by our team and can achieve the maximum speed of our NBN500, nbn Superfast and nbn Ultrafast plans, which are delivered over nbn FTTP and nbn HFC.
If your modem isn't listed here, please contact the manufacturer for more info.
Legend
| Icon | Advice |
|---|---|
| ✅ Supported | Maximum speeds are supported via Ethernet & Wi-Fi. |
| ⚠️ Ethernet only | Maximum speeds are supported via Ethernet. Maximum speeds are not supported via Wi-Fi. |
Modems previously supplied by iiNet
| Modem | NBN500 | nbn Superfast | nbn Ultrafast |
|---|---|---|---|
| Technicolor TG-789 Broadband Gateway | ⚠️ Ethernet only | ⚠️ Ethernet only | ⚠️ Ethernet only |
| TP-Link Archer VR1600v | ⚠️ Ethernet only | ⚠️ Ethernet only | ⚠️ Ethernet only |
| TP-Link VX220-G2V | ✅ Supported | ✅ Supported | ✅ Supported |
| TP-Link VX420-G2H (Smart Modem Gateway) | ✅ Supported | ✅ Supported | ✅ Supported |
| TP-Link VX420-G2V | ✅ Supported | ✅ Supported | ✅ Supported |
| Wi-Fi Max | ✅ Supported | ✅ Supported | ✅ Supported |
Modems purchased independently
| Modem | NBN500 | nbn Superfast | nbn Ultrafast |
|---|---|---|---|
| Fritz!Box 7490 | ⚠️ Ethernet only | ⚠️ Ethernet only | ⚠️ Ethernet only |
| NetComm NF20MESH | ✅ Supported | ✅ Supported | ✅ Supported |
| Vodafone Super Wi-Fi | ✅ Supported | ✅ Supported | ✅ Supported |
| Vodafone WiFi Hub 2.0 (Netcomm NL1902) | ✅ Supported | ✅ Supported | ✅ Supported |
| Vodafone WiFi Hub 3.0 (Netcomm NL20) | ✅ Supported | ✅ Supported | ✅ Supported |
You can transfer ownership of your iiNet account to another person if they agree to become the account holder and be responsbile for paying for the iiNet account, including any outstanding charges from the before the date they took ownership.
You and the new account owner are are responsible for settling any amounts you owe each other between yourselves. We won't mediate in any way; we will only send invoices to the new account holder. If you're not comfortable with this, then we recommend that you do not transfer ownership and the other person can order a new service.
- To transfer ownership of your account into someone else’s name, call us on 13 22 58.
- Once you agree to the terms and conditions of the transfer, we’ll place a temporary authorisation on the account and the new owner will have 60 days to complete the transfer.
If the new owner is with you when you call, you can put them on the phone to complete the transfer. - The new owner will need to provide:
- At least two forms of accepted identification;
- Their bank account or credit/debit card details;
- Their iiNet account number, if they have one.
If the new owner doesn’t already have an iiNet account, they’ll need to pass our credit check.
Note: To transfer a number into a company name, the new owner must be an authorised signatory for the company, and they will need to provide the ABN/ACN and their drivers' licence number.
If you want to use any calls, text or data that isn't included in your iiNet mobile plan, you'll need to top up your Prepaid Balance in Toolbox.
- Log in to Toolbox and hit Manage Prepaid Balance.
Never logged into Toolbox before? Check out An Introduction to Toolbox. - Select the amount to top up ($10, $20, $50, $100 or $200) and hit Review order.

- You'll see a summary of your purchase. Use the checkbox to agree to the terms and conditions.

- Next, select your payment method. Use my existing payment method is selected by default. Hit Proceed if you wish to continue and your prepaid balance will be applied after your payment clears.
Note: Payments via direct debit may take up to 3 business days to clear. Payment via credit card is recommended for the fastest top up.
- Alternatively, select Credit Card and enter the Cardholder Name, Credit Card Name, Expiry Date and CVC to make an immediate payment via credit card. Select Make payment and your prepaid balance will be applied after your payment clears.
Note: Credit card payments typically clear within the hour. Any applicable surcharge will be shown on screen. Ticking the "Save details for all future payments" box will overwrite the payment method for your regular iiNet invoices.