Checking the status lights on your nbn Connection Box (NCB) for nbn Wireless can be useful for troubleshooting.
nbn Wireless Connection Box Status lights

| Light | States and meaning | |
|---|---|---|
| Power | Off = No power. Red = Your NCB is using backup battery power (if you have one) and power is low. Green = Your NCB has power. Flashing green = Your NCB is using backup battery power (if you have one). |
|
| Status | Off = No power or an unexpected state. Red = System fault detected. Please call us on 1300 634 515 as we'll need to lodge a ticket with nbn®. Flashing amber = Your NCB is booting up. Green = Your NCB is in test mode. Flashing green = Your NCB is operating normally. |
|
| Outdoor Unit (ODU) | Off = No power or an unexpected state. Red = Your NCB is is offline. Flashing red = Error detected. Please call us on 1300 634 515 as we'll need to lodge a ticket with nbn®. Green = Your NCB is online. This light flashes during data transfer. |
|
| Signal strength | Off = Your NCB is offline. Red = Weak signal. Amber = Medium signal. Green = Strong signal. |
|
If you already know the password for your iiNet account, you can change it at any time in Toolbox.
Forgot your password? Please see How to reset a forgotten password instead.
- Log in to Toolbox and hit About Me.
Never logged into Toolbox before? Check out An Introduction to Toolbox. - Under "Change password", hit Update password.

- Fill out the form with your Current Password and New Password, then enter your new password again in Confirm Password.
Passwords must be 8-15 characters long, have both a lower case and uppercase letter and contain at least one number (0-9).
You can also use any of the following characters: ` ~ ! @ # $ % ^ & * ( ) _ + - = { [ } ] \ | ; , . / : < > ?
Passwords can't be based on your username or contain any spaces.
- Hit Change password to finish, and you're good to go.

iiNet made the decision to stop providing email services across iiNet and all subsidiary brands in 2023 to focus on creating better experiences for our core products: internet and mobile.
Customers who opted-in have now had their iiNet email addresses transferred to another Australian email provider, The Messaging Company.
Who do I contact about my iiNet email address?
Please contact The Messaging Company about support for these email addresses as iiNet will no longer be able to assist.
You can call The Messaging Company on 07 3497 3566 or submit a new request to their Support Centre.
Please note: The opt-in period has now closed, and any email address that was not opted-in has now been deleted and cannot be recovered. It is not possible to create new email addresses that use the “iinet.net.au” domain.
Will I need to pay anything to use my iiNet email address with The Messaging Company?
If your email address was included with your iiNet services: you won't need to pay anything to use your iiNet email address with The Messaging Company until 15 September 2024.
At least 60 days prior to 15 September 2024, The Messaging Company will contact customers with pricing options that will apply if you wish to continue using your iiNet email address with The Messaging Company.
If you paid for an iiNet email address: The Messaging Company will contact you with pricing options that will apply if you wish to continue using your iiNet email address with The Messaging Company.
iiNet is not able to provide any information about The Messaging Company's email pricing.
Terms and Conditions of Email Transfer
By opting-in to transfer your iiNet email service to The Messaging Company email platform, you acknowledge and agree that:
- We may disclose your personal information (i.e. your name, email address and contact number) to The Messaging Company for the purpose of facilitating your email transfer and you consent to this. The Messaging Company's privacy notice is available at: https://themessaging.co/privacy-notice/
- You will need to sign up with The Messaging Company as your email hosting provider and agree to their terms and conditions, and you will become a direct customer of The Messaging Company’s email service.
- Your iiNet email service will be transferred to The Messaging Company email platform, and The Messaging Company will be responsible for providing your email service after the transfer.
- iiNet will pay The Messaging Company email service charge until 15 September 2024. After 15 September 2024, you will be responsible for paying any charges you incur for the email service. The Messaging Company will contact customers with available pricing options at least 60 days prior to commencing charges for the email service.
- iiNet grants you the right to use your current email address, which incorporates one or more domain names owned by iiNet or one of our affiliates (e.g. @iinet.net.au).
- iiNet may withdraw the right for you to use your current email address when you cease acquiring services from iiNet or one of our affiliates.
- iiNet may also revoke the right in (4) above for other reasons, but we will endeavour to give you at least 60 days’ prior notice before that happens.
- Your use of your current email address, which incorporates one or more domain names owned by iiNet or our affiliates, is not transferable to another email service provider.
- When The Messaging Company begins providing your email services, iiNet and its affiliates will not be responsible to you in any way in connection with your email service (e.g. providing setup or troubleshooting support; security; service quality).
- If you contact us regarding your The Messaging Company email service, we may refer your inquiry to The Messaging Company directly, including by disclosing your personal information to The Messaging Company to help facilitate their prompt response to you. You consent to us disclosing your information to The Messaging Company for this purpose. If you have any concerns regarding how we handle your personal information, please email us at privacy@tpgtelecom.com.au or refer to our privacy policy at: https://www.iinet.net.au/about-us/legal/privacy
- The Messaging Company may collect your personal information in accordance with its privacy policy and terms and conditions. You should familiarise yourself with their privacy policy and ensure that you are comfortable with how your personal information will be handled. Neither iiNet or our affiliates will be responsible for any personal information you provide to The Messaging Company or their subsequent handling of such information.
If you can't make your nbn appointment, you can reschedule for a later date online.
- Log in to Toolbox and select your nbn service.
Never logged into Toolbox before? Check out An Introduction to Toolbox.

- If your nbn order is in progress, you'll see the order tracker on the Dashboard. Under "Installation Attendance Required", hit request to reschedule.

- Choose from the list of available appointment times and hit Reschedule Appointment.
We'll send you an SMS and email with your new appointment time.

Here's everything you need to know about the different features available for nbn Fibre Phone, a VoIP phone service exclusive to nbn FTTP that works over the internet.
This product was only available to select nbn FTTP customers as of 23 August 2017. It is no longer sold as of 15 May 2024.
Note: These phone services do not have a voice mail feature.
Select one of the links below to jump to a query:
CLID Blocking
CLID Blocking (Calling Line ID Blocking) blocks your phone number from being displayed to the person you’re calling. It is disabled by default.
- Log in to Toolbox and select the VoIP service under Select service to manage.

- Select Settings.
- CLID Blocking can be enabled by setting its toggle switch to ON. Changes are saved automatically.

- While CLID Blocking is enabled, you can disable it for a single call by dialling *65 before the number you’re calling.
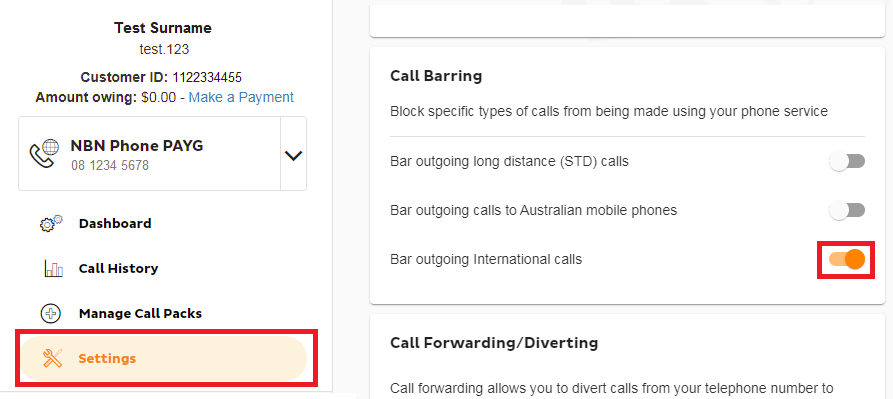
Call Barring
Call Barring blocks specific types of calls from being made using your phone service. It is disabled by default, but the following barring types are available:
- Bar outgoing long-distance (STD) calls
- Bar outgoing calls to Australian mobile phones
- Bar outgoing International calls
- Log in to Toolbox and select the VoIP service under Select service to manage.
- Select Settings.
- Each type of Call Barring can be enabled by setting its toggle switch to ON. Changes are saved automatically.
Call Forwarding/Diverting
Call forwarding allows you to divert calls from your phone number to a different number in the following circumstances:
- Always
- When your number is busy
- When calls to your number aren't answered
Standard call costs apply when any call forwarding features forward a call to a new destination. All call forwarding features are disabled by default.
- Log in to Toolbox and select the VoIP service under Select service to manage.
- Select Settings.
- Each type of Call Forwarding can be enabled by setting its toggle switch to ON, and entering the destination phone number in the text box.
- Select Update to save any changes.

Call Waiting
If someone calls your phone number while you’re on a call, Call Waiting allows you to put someone on hold. Call Waiting is enabled by default and currently, it cannot be disabled in Toolbox. If you’d like to disable Call Waiting, please call us on 13 22 58 and we’ll be happy to help.
- While on a call, you’ll hear a tone when there is another call waiting. To switch back and forth between the two calls, press the CALL button on your handset and then dial 2.
- To hang up on the person you’re currently speaking to and switch to the other caller, press the CALL button on your handset and then dial 1.
Call Return
Please note that dialling *69 is not supported for these services. However, handsets with a built-in call return function will work. Standard call costs apply.
Your iiNet services may be suspended if you have an overdue invoice, or in response to a security incident. Here's how to get unsuspended if that happens.
For more info about suspensions, see Consequences of Restriction, Suspension or Disconnection.
Select one of the links below to jump to a query:
- How to unsuspend your iiNet services (Overdue invoices)
- How to unsuspend your iiNet services (Security incident)
How to unsuspend your iiNet services (Overdue invoices)
- If your iiNet invoice isn't paid, we'll send you an email/SMS telling you the earliest date your services will be suspended. If you pay the invoice before that date, your services won't be suspended.
- If your invoice isn't paid and your iiNet services are suspended, you can Make a payment in Toolbox or call us on 13 22 58.
Having difficulties making a payment? Please see our Financial Hardship Policy.
- Once your payment has cleared, your iiNet services should automatically unsuspend within one business day.
How to unsuspend your iiNet services (Security incident)
- When a security incident happens, we suspend services ASAP to prevent further abuse or unauthorised access. You'll be notified after your services are suspended, and we'll try to call you using the contact number(s) on your iiNet account.
- We'll explain anything you need to do to help secure your account, such as changing account or Wi-Fi passwords, or running antivirus and malware scans.
- Once we've spoken to you to verify your identity and made sure that your iiNet account is secure, your iiNet services may be unsuspended.
For more advice about how to stay safe online, see Scams and hoaxes.
This article provides information about the consequences if we, the iiNet Group (including iiNet, Westnet, Internode, TransACT, and Adam Internet), exercise our right to restrict, suspend or disconnect one or more of your services for credit or debt management reasons.
We will make several attempts to contact you via email and/or SMS regarding any credit or debt management issues for your services. A notice will be sent to you in advance of any restriction, suspension or disconnection occurring.
If you are experiencing difficulties making this payment, then please see our Financial Hardship Policy for information about your options and how to speak to someone about your circumstances.
Select one of the links below to jump to a query:
- What are the consequences if my service is restricted?
- What are the consequences if my service is suspended?
- What are the consequences if my service is disconnected?
- How to make payment
What are the consequences if my service is restricted?
Service restrictions are typically related to spend management tools and may occur when you have used 100% or more of your service inclusions, such as data. Restrictions do not necessarily indicate that your services are at risk of suspension or disconnection.
If one or more of your services are restricted, you will not be able to use select features of the services. For example:
- If you have a Mobile service and have used all of the monthly mobile data included in your plan, the ability to use mobile data will be restricted and you won't be able to access the internet. Other features of the service, such as receiving calls/SMS and making calls/SMS that are part of your plan’s included value, will remain available.
- If you have a Fetch TV service that has exceeded the monthly spend limit for Video on Demand content, you won’t be able to purchase Video on Demand content such as movies or TV shows. Other features of the service, such as viewing TV channels, will remain available.
You will need to wait until your next billing period begins for the restriction to be removed. Alternatively, you may call us on 13 22 58 to increase your monthly spend limits.
For prepaid mobile services, you may choose to top up your Prepaid Balance in Toolbox to purchase a mobile data block.
What are the consequences if my service is suspended?
If one or more of your services are suspended, you will not be able to use those services.
For example, if your suspended service is a fixed or mobile voice service, you won’t be able to make calls (except to emergency 000 services) on your phone or handset or use mobile data. If your suspended service is an internet service, you won’t be able to connect to the internet or use services that require connection to the internet, like VoIP.
You may not purchase additional services while one or more of your services are suspended. While the service is suspended, your ongoing minimum monthly plan charges will still apply (excluding Mobile and 4G/5G Home Broadband services).
How can I get my services unsuspended?
- Mobile and 4G/5G Home Broadband services: You will need to pay the amount to renew your prepaid service before the suspension is removed.
- Other services: You will need to pay all overdue amounts owing before the suspension is removed.
Restoration of your service can take up to 1 business day after the payment has been received.
Failure to pay after services are suspended may lead to your services being disconnected.
What are the consequences if my service is disconnected?
Unlike suspension, disconnection of your service is permanent.
- Disconnection means you won’t be able to use any features of your services, including internet access.
- Phone services won’t be able to make or receive calls, including emergency 000 calls (except mobiles which can call 000 if your phone has power and you’re within the coverage of any Australian mobile network).
- You will need to reapply for new services, which may incur costs. Please note that following disconnection, the plan for your particular service may no longer be available, and your username or phone number may change.
- Any bundled discount entitlements will also be forfeited if the disconnection causes your account to become ineligible for the bundled discount.
- We may also require you to immediately stop using and return to us, or allow us to remove, any equipment or material belonging to us.
- We may delete all of your data from any storage media (you are solely responsible for backing up your data, such as voicemail messages).
- Mobile and 4G/5G Home Broadband services: You will still have to pay any applicable cancellation fees.
- Other services: We will send you a final invoice requesting payment of all outstanding charges incurred before disconnection, including any applicable cancellation fees. Failure to pay may affect your ability to reapply for a new service with us.
How to make payment
You can make a payment by following the instructions on your invoice or using a credit card to pay via Toolbox. Alternatively, you may call us on 13 22 58.
If you wish to discuss your account, please contact our Support team via email or call 13 22 58 (open 24/7) and we’ll be happy to help.
If you use up all your data, purchasing a Data Pack will remove speed shaping until that additional data has also been used up, or the next billing period begins. Data Packs do not roll over to the next billing month if the data isn't used up.
This information is not relevant to Liimitless data plans.
Select one of the links below to jump to a query:
Available Data Packs
- 10GB for $10
- 20GB for $15
- 50GB for $30
- 100GB for $50
- 200GB for $80
How to buy a Data Pack in Toolbox
- Log in to Toolbox and select the broadband service under Select service to manage.
Never logged into Toolbox before? Check out An Introduction to Toolbox.

- In Dashboard view, select Add Data Pack.
This option is also available on the Check Usage page.

- You'll see a list of available Data Packs. Choose the desired Data Pack and hit Select.

- Review the final summary and hit Submit to finish. The charge for your data pack will appear on your next invoice.
Once your data pack has been purchased, your usage should be reduced and your broadband speed should be unshaped within one hour. If you're still experiencing shaped speeds after this time, please try restarting your modem.

We do not offer priority assistance, nor support for medi-alert services and monitored alarm systems. Priority assistance is offered by Telstra for people who may be reliant on a telephone service because of a serious medical condition. If you have a medi-alert or priority assistance service or believe that you are eligible, please consider this before proceeding with your order.
Bandwidth control or Quality of Service (QoS) stops your modem trying to upload faster than the speed of your nbn plan, which can cause data packets to be lost.
iiNet modems handle bandwidth control automatically, but some third-party modems may need changes in their setting to turn on bandwidth control.
Having trouble following this guide for your modem? Please check the manufacturer's website or run a Google search for a more specifc guide.
- On a device that's connected to your modem, open your web browser and go to your modem's default gateway address, which can be found on its barcode sticker (e.g. http://192.168.1.1).
Using a PC or Mac? You can also follow this guide to find your modem's default gateway address. - Log in with the default username and password found on your modem's barcode sticker. If you have custom login details, use those instead.
Some modems don't have a username and just use a password. - If you see any option for Advanced settings, hit it.
- Find the bandwidth control setting. This is most likely called QoS or Bandwidth/Traffic control.
- Ensure that upstream bandwidth/QoS is enabled and set the bandwidth maximum according to your nbn plan:
- If you have an NBN12 plan, enter a maximum of 950kbps
- If you have an NBN25 plan, enter a maximum of 4950kbps
- If you have an NBN50 plan, enter a maximum of 19500kbps
- If you have an NBN100 plan, enter a maximum of 19500kbps*
- If you have an NBN500 plan, enter a maximum of 49500kbps
- If you have an NBN Superfast plan, enter a maximum of 49500kbps
- If you have an NBN Ultrafast plan, enter a maximum of 99000kbps
*Note: Business NBN100 plans and some legacy residential NBN100 plans may need a maximum of 39500kbps instead. - Save your changes to finish. Here's an example for a Netgear modem:
