Here's what you need to know about Voice over LTE (VoLTE), a feature that lets you make calls over the 4G network with a compatible phone. You can continue using 4G mobile data while making and receiving VoLTE calls.
To use VoLTE, you need an approved device that is VoLTE enabled.
Select one of the links below to jump to a query:
- What is Voice over LTE (VoLTE)?
- How to turn on VoLTE on a Samsung phone
- How to turn on VoLTE on an iPhone
- Does it cost extra to use VoLTE?
- How do I know when I'm using VoLTE?
- Can I use VoLTE to call emergency services?
What is Voice over LTE (VoLTE)?
Voice over LTE (VoLTE) is a feature that allows you to call using our 4G network. It allows you to remain connected to the 4G network during calls, which means you can continue using 4G mobile data while making and receiving calls.
To use VoLTE you need a compatible device with VoLTE settings enabled.
How to turn on VoLTE on a Samsung phone
If you have a Samsung device, Voice over LTE should automatically be enabled. To manually enable, go to Settings > Mobile Networks.
How to turn on VoLTE on an iPhone
If you have an Apple device iPhone 6 or later, Voice over LTE should be automatically enabled. To manually enable, go to Settings > Mobile > Mobile Data options > Voice and Data.
Does it cost extra to use VoLTE?
No. Voice over LTE is charged in the same way as all other voice calls and doesn’t use your mobile data allowance.
How do I know when I'm using VoLTE?
If you’re using an iPhone, ‘4G’ will be displayed in the status bar when using Voice over LTE.
If you’re using an Android device, ‘VoLTE’ will be displayed in the status bar beside the 4G icon.
Can I use VoLTE to call emergency services?
To keep you safe phones must support Triple Zero (000) calling over 4G (using VoLTE) in the event of an emergency. This is a legal requirement for all phones sold in Australia. Older 3G handsets, as well as some newer 4G/5G handsets (including those purchased overseas or from a retailer selling imported phones), do not meet these standards.
If your phone is on our list of Approved Devices, you should be able to call emergency services over VoLTE.
From 28 October 2024, if you have a device that is not able to make Triple Zero (000) calls, iiNet is legally required to stop these mobile phones from accessing the iiNet mobile network. This means you will not be able to make or receive calls/texts or use data on the iiNet mobile network from this date.
If you have received an SMS and/or email with instructions to update your device’s software or replace it immediately to be able to access emergency 000 calls, see this information.
Note: If you have a Samsung device, you may need to update it several times until your device says 'Your software is up to date' to ensure you can call emergency services.
This article lists the phone numbers that iiNet gives to customers so they can call us.
Using the Find tool in your web browser can help you find a specific phone number on this page:
- On Windows desktop, use CTRL + F on your keyboard to open the Find tool.
- On Mac desktop, use Command + F on your keyboard to open the Find tool.
- On Android mobile, tap More options (the three dots in the top right) then Find in page.
- On iOS mobile, tap Share (the square icon with the upwards arrow at the bottom of the screen) then Find on page.
Phone numbers for you to call us
The following phone numbers are well known from our Contact us page:
- 13 19 17
- 13 22 58
- 13 86 89
- 1300 378 638
- 1300 634 515
- +61 8 9214 2222
You may receive an email or SMS asking you to call us on a different phone number. These unique numbers help you get through to the right team in our call centre to help you with a specific issue:
- 13 50 96
- 13 56 99
- 1300 002 004
- 1300 066 305
- 1300 093 449
- 1300 094 761
- 1300 130 714
- 1300 281 542
- 1300 301 519
- 1300 304 263
- 1300 305 522
- 1300 307 257
- 1300 308 407
- 1300 362 835
- 1300 367 429
- 1300 368 110
- 1300 368 910
- 1300 369 457
- 1300 395 526
- 1300 477 317
- 1300 499 790
- 1300 521 757
- 1300 530 224
- 1300 541 714
- 1300 553 496
- 1300 554 019
- 1300 554 713
- 1300 554 918
- 1300 558 695
- 1300 634 515
- 1300 634 795
- 1300 701 006
- 1300 704 371
- 1300 704 794
- 1300 704 984
- 1300 712 534
- 1300 712 583
- 1300 712 761
- 1300 712 930
- 1300 718 031
- 1300 718 092
- 1300 718 367
- 1300 784 708
- 1300 795 471
- 1300 796 025
- 1300 796 137
- 1300 796 493
- 1300 849 926
- 1300 858 965
- 1300 860 925
- 1300 861 036
- 1300 880 598
- 1300 992 863
- 1300 993 571
- 1300 993 572
- 1300 993 574
- 1300 993 578
- 1800 506 161
From 18 April 2025, if you want to transfer your nbn service to another provider, you’ll need your nbn AVC ID.
An nbn AVC ID is a unique 15-character ID number that identifies your nbn service, e.g. “AVC123456789000”.
nbn AVC IDs are required by the Australian Consumer and Media Authority (ACMA) to help regulate nbn service transfers, making them more accurate and secure.
You’ll find your nbn service ID in at least one of these places:
- On your invoice/bill
- In your nbn provider’s customer web portal or app
- Through a web chat with your nbn provider
Select one of the links below to jump to a query:
Other nbn® providers
You may find your current provider's instructions for locating your AVC ID on these pages:
- AGL: See "AVC ID and where to find it" on https://www.agl.com.au/help-support/account-setup-management/check-internet-plan-details
- Amaysim: https://www.amaysim.com.au/help/nbn/getting-started/where-can-i-find-my-avcid
- Aussie Broadband: https://www.aussiebroadband.com.au/help-centre/internet/what-is-avc-and-why-does-it-matter/
- Belong: https://www.belong.com.au/support/internet/manage-account/whats-an-avc-id-and-where-do-i-find-it
- Buddy Telco: See "What is an AVC ID?" on https://www.buddytelco.com.au/help/
- Compare Broadband: https://www.comparebroadband.com.au/broadband-articles/nbn-id14/what-is-an-avc-id-id2234/
- Dodo: https://www.dodo.com/support/internet/technical-advice#how-do-i-find-my-avc-id
- Foxtel: See "How do I find my AVC ID?" on https://help.foxtel.com.au/s/article/a7V2P00000001zJUAQ/foxtel-broadband
- iPrimus: https://support.iprimus.com.au/internet/nbntm#how-do-i-find-my-avc-id
- Kogan: https://www.koganinternet.com.au/nbn-avc-id
- Mate: https://www.letsbemates.com.au/mate/faq/what-is-an-avc-id/
- Maxo: https://www.maxo.com.au/support/nbn-services/how-do-i-find-my-avc-id
- More Telecom: Search "AVC ID" at https://more.com.au/help-and-faqs
- Optus: https://www.optus.com.au/support/answer?id=20331
- Origin Energy: https://www.originenergy.com.au/help-support/internet-products-and-services/account-management/what-is-an-avc-id
- Solitary Technology: https://solitarytech.com.au/2024/12/09/what-is-an-avc-id-and-how-can-i-find-it/
- Swoop: https://www.swoop.com.au/blog/what-is-an-nbn-avc-id/
- Tangerine: https://www.tangerine.com.au/help/how-do-i-find-my-avc-id
- Telstra: https://www.telstra.com.au/support/internet-and-home-phone/avc-id
- TPG: https://support.tpg.com.au/nbn-avc-id
iiNet nbn® services
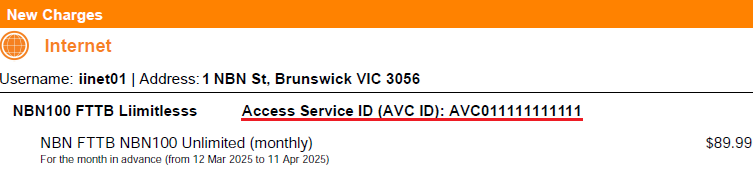
If you have an iiNet service, your nbn AVC ID is on your invoice. You can get a copy of your invoice at any time in Toolbox. Learn more.
In the Internet or Broadband section, look for “Access Service ID (AVC ID)” listed next to your nbn plan:
Example 1
Example 2

Example 3

Still can’t find your nbn AVC ID?
Contact your current nbn provider and they can tell you.
A factory reset is a last resort to fix a problem with your modem settings, or if you can't remember the modem password. You'll lose all your custom settings including any custom Wi-Fi name and password, so be ready to set up your modem again afterwards.
Don't have an iiNet modem? Check the manufacturer's website for a guide.
Choose your modem
| Picture | Modem |
|---|---|
 |
NetComm NL20 Modem |
 |
Wi-Fi Max Modem |
 |
Wi-Fi Max 5G Modem |
 |
Nokia FastMile 3.2 5G Modem |
 |
Smart Modem Gateway (VX420-G2H) |
 |
VX220-G2V Modem |
 |
VX420-G2V Modem |
 |
Sagemcom 5866 5G Modem |
 |
TP-Link VR1600v |
 |
Cable Gateway Pro (CG3000) |
 |
Cable Gateway Pro (CG2200) |
 |
Modem not listed here? Check for a user manual on Older Modem Guides |
NetComm NL20 Modem
Via device settings (Recommended)
- Open your web browser and go to: http://192.168.1.1.
Can't log in? Factory reset with the reset button instead. - Log in with the Username and Password found on the modem's barcode sticker or use your custom password.

- In the left pane, click Advanced.
- Under System, select Configurations for the Settings page to open.

- Select the Factory Reset radio button and click Restore Default Settings.
If you want to keep custom Wi-Fi and Login details, you can click Semi-Reset.
- A confirmation popup will appear, click Yes to restore the factory settings.
- Wait for the factory reset to complete. Your modem will reboot.
- Set up your modem again by following its setup guide.
- We recommend that you restart any computers or Wi-Fi devices before trying to get online.
- This method is not recommended unless you are unable to view or log in to your device settings at 192.168.1.1.
- While your modem is turned on, find the RESET button on the back and use a pen or paperclip to hold it for 10 seconds, then release.

- After about 20 seconds, all the lights except for the power light will turn off.
- Wait for the factory reset to complete. Your modem will reboot.
- Set up your modem again by following its setup guide.
- We recommend that you restart any computers or Wi-Fi devices before trying to get online.
Wi-Fi Max Modem
Via device settings (Recommended)
- Open your web browser and go to: http://192.168.1.1
Can't log in? Factory reset with the reset button instead. - Log in with the Login Password found on the modem's barcode sticker or use your custom password.

- In the left pane, click Administration.
- Select Backup/Restore Setting.
- Under "Restore to Factory Defaults", click Restore to Factory Defaults.

- Wait for the factory reset to complete. Your modem will reboot.
- Set up your modem again by following its setup guide.
- We recommend that you restart any computers or Wi-Fi devices before trying to get online.
- This method is not recommended unless you are unable to view or log in to your device settings at 192.168.1.1.
- While your modem is turned on, find the Reset button on the back and use a pen or paperclip to hold it for at least 10 seconds, then release.
The front LED will start flashing when the factory reset has started.
- Wait for the factory reset to complete. Your modem will reboot.
- Set up your modem again by following its setup guide.
- We recommend that you restart any computers or Wi-Fi devices before trying to get online.
Wi-Fi Max 5G Modem
Via device settings (Recommended)
- Open your web browser and go to: http://192.168.1.1
Can't log in? Factory reset with the reset button instead. - Log in with the Login Password found on the modem's barcode sticker or use your custom password.

- In the left pane, click Administration.
- Select Backup/Restore Settings.
- Under "Restore to Factory Defaults", click Restore to Factory Defaults.

- Wait for the factory reset to complete. Your modem will reboot.
- Set up your modem again by following its setup guide.
- We recommend that you restart any computers or Wi-Fi devices before trying to get online.
- This method is not recommended unless you are unable to view or log in to your device settings at 192.168.1.1.
- While your modem is turned on, find the Reset button on the back and use a pen or paperclip to hold it for at least 10 seconds, then release.
The front LED will start flashing when the factory reset has started.
- Wait for the factory reset to complete. Your modem will reboot.
- Set up your modem again by following its setup guide.
- We recommend that you restart any computers or Wi-Fi devices before trying to get online.
Nokia FastMile 3.2 5G Modem
Via device settings (Recommended)
- Open your web browser and go to 192.168.1.1. If you’re connected to the FastMile 5G modem, the page overview will load.
- In the left-hand column, select System, then General.
- Log in with the Username and Password found on the modem's barcode sticker or use your custom password.
Can't log in? Factory reset with the reset button instead.
- Click Reset. A pop-up will ask you to confirm your decision. Click Yes.

- Wait for the factory reset to complete. Your modem will reboot.
- Set up your modem again by following its setup guide.
- We recommend that you restart any computers or Wi-Fi devices before trying to get online.
- This method is not recommended unless you are unable to view or log in to your device settings at 192.168.1.1.
- While your modem is turned on, find the RESET button on the base and use a pen or paperclip to hold it for 10-12 seconds, then release.

- Wait for the factory reset to complete. Your modem will reboot. The centre modem light will turn white before flashing red.
- Set up your modem again by following its setup guide.
- We recommend that you restart any computers or Wi-Fi devices before trying to get online.
Smart Modem Gateway (VX420-G2H)
Via modem settings (Recommended)
- Open your web browser and go to http://192.168.1.1
- Log in with the default password "admin". If you have changed your password from the default, use your custom password instead.
Can't log in? Factory reset with the reset button instead. - Select Advanced.
- In the left-hand column, select System Tools, then Reboot Schedule.
- Under "Factory Default Restore", click Factory Restore. A pop-up will ask you to confirm your decision. Click Yes.

- Wait for the factory reset to complete. Your modem will reboot.
- Set up your modem again by following the instructions in its setup guide.
- We recommend that you restart any computers or Wi-Fi devices before trying to get online.
- This method is not recommended unless you are unable to view or log in to your modem settings at http://192.168.1.1
- While the modem is turned on, find the RESET button on the back and use a pen or paper clip to hold it down for 5 seconds, then release.

- Wait for the modem to finish rebooting; this may take several minutes.
- Set up your modem again by following the instructions in its setup guide.
- We recommend that you restart any computers or Wi-Fi devices before trying to get online.
VX220-G2V Modem
Via modem settings (Recommended)
- On a device that’s connected to your modem via Ethernet or Wi-Fi, open your web browser and go to http://192.168.1.1
- Log in with the unique Default Password found on your modem's barcode sticker, or use your custom password.
Can't log in? Factory reset with the reset button instead.
- Click Advanced.
- In the left-hand column, select System Tools, then Reboot Schedule.
- Under "Factory Default Restore", click Factory Restore. A pop-up will ask you to confirm your decision. Click Yes.

- Wait for the factory reset to complete. Your modem will reboot.
- Set up your modem again by following its setup guide.
- We recommend that you restart any computers or Wi-Fi devices before trying to get online.
- This method is not recommended unless you are unable to view or log in to your modem settings at http://192.168.1.1.
- While the modem is turned on, find the RESET button on the side and use a pen or paperclip to hold it for 10 seconds, then release.

- Wait for the factory reset to complete. Your modem will reboot.
- Set up your modem again by following its setup guide.
- We recommend that you restart any computers or Wi-Fi devices before trying to get online.
VX420-G2V Modem
Via modem settings (Recommended)
- Open your web browser and go to http://192.168.1.1
- Log in with the default password "admin". If you have changed your password from the default, use your custom password instead.
Can't log in? Factory reset with the reset button instead. - Click Advanced.
- In the left-hand column, select System Tools, then Reboot Schedule.
- Under "Factory Default Restore", click Factory Restore. A pop-up will ask you to confirm your decision. Click Yes.

- Wait for the factory reset to complete. Your modem will reboot.
- Set up your modem again by following its setup guide.
- We recommend that you restart any computers or Wi-Fi devices before trying to get online.
- This method is not recommended unless you are unable to view or log in to your modem settings at http://192.168.1.1.
- While the modem is turned on, find the RESET button on the back and use a pen or paperclip to hold it for 10 seconds, then release.

- Wait for the factory reset to complete. Your modem will reboot.
- Set up your modem again by following its setup guide.
- We recommend that you restart any computers or Wi-Fi devices before trying to get online.
Sagemcom 5866 5G Modem
Via modem settings (Recommended)
- On a device that’s connected to your modem via Ethernet or Wi-Fi, open your web browser and go to http://192.168.1.1
- Log in with the default username “admin” and the default password listed as Web login on your modem's barcode sticker. If you have custom login details, use those instead.
Can't log in? Factory reset with the reset button instead.
- Select My Sagemcom Box.
- Select Maintenance.
- On the "Resets" page, you have two options:
A) Select Semi-reset to reset everything except custom Wi-Fi settings; OR
B) Select Reset for a full factory reset.
- Wait for the factory reset to complete. Your modem will reboot.
- Set up your modem again by following its setup guide.
- If a full factory reset was done, we recommend that you restart any computers or Wi-Fi devices before trying to get online.
- This method is not recommended unless you are unable to view or log in to your modem settings at http://192.168.1.1
- While the modem is turned on, find the RESET button on the back and use a pen or paperclip to hold it for 5-8 seconds, then release.
Note: You may need to unplug any Ethernet cable in the 2.5GLAN port to reach the RESET button.
- Wait for the factory reset to complete. Your modem will reboot.
- Set up your modem again by following its setup guide.
- We recommend that you restart any computers or Wi-Fi devices before trying to get online.
TP-Link VR1600v
Via modem settings (Recommended)
- Open your web browser and go to http://192.168.1.1
- Log in with the default username and password, which are both "admin". If you have changed your username/password from the defaults, use your custom login details instead.
Can't log in? Factory reset with the reset button instead. - Click Advanced.
- In the left-hand column, select System Tools, then Reboot.
- Under "Factory Default Restore", click Factory Restore. A pop-up will ask you to confirm your decision. Click Yes.

- Wait for the factory reset to complete. Your modem will reboot.
- Set up your modem again by following its setup guide.
- We recommend that you restart any computers or Wi-Fi devices before trying to get online.
- This method is not recommended unless you are unable to view or log in to your modem settings at http://192.168.1.1.
- While the modem is turned on, find the Reset button on the back and use a pen or paperclip to hold it for 6-8 seconds, then release.

- Wait for the factory reset to complete. Your modem will reboot.
- Set up your modem again by following its setup guide.
- We recommend that you restart any computers or Wi-Fi devices before trying to get online.
Cable Gateway Pro (CG3000)
Via modem settings (Recommended)
- Open your web browser and go to http://192.168.0.1
- Log in with the username "admin" and the default Password found on your modem's barcode sticker, or use your custom password.
Can't log in? Factory reset with the reset button instead.
- Select Management.
- Select Restore Default Settings, then confirm.

- Wait for the factory reset to complete. Your modem will reboot.
- Set up your modem again by following its setup guide.
- We recommend that you restart any computers or Wi-Fi devices before trying to get online.
- This method is not recommended unless you are unable to view or log in to your modem settings at http://192.168.0.1
- While the modem is turned on, find the RESET button on the back and use a pen or paperclip to hold it for 5-6 seconds, then release.

- Wait for the factory reset to complete. Your modem will reboot.
- Set up your modem again by following its setup guide.
- We recommend that you restart any computers or Wi-Fi devices before trying to get online.
Cable Gateway Pro (CG2200)
Via modem settings (Recommended)
- Open your web browser and go to http://192.168.0.1
- Log in with the default username, "admin" and default password, "admin". If these defaults don't work for you, try leaving both fields blank.
If you have changed the username and/or password from the default, use your custom login details instead.
Can't log in? Factory reset with the reset button instead. - Select Management in the top menu bar.
- Select Security.
- Set Restore Factory Defaults to Yes, then click Apply.

- A popup message will appear; select OK to continue.
- Wait for the factory reset to complete. Your modem will reboot.
- Set up your modem again by following its setup guide.
- We recommend that you restart any computers or Wi-Fi devices before trying to get online.
- This method is not recommended unless you are unable to view or log in to your modem settings at http://192.168.0.1
- While the modem is turned on, find the reset button on the back and use a pen or paperclip to hold it for 6-8 seconds, then release.

- Wait for the factory reset to complete. Your modem will reboot.
- Set up your modem again by following its setup guide.
- We recommend that you restart any computers or Wi-Fi devices before trying to get online.
Your modem login password is used to log in to the modem's default gateway and change your modem settings.
You'll need a strong custom password if you're going to use Remote Access on your modem. It's also useful to stop guests from being able to access your modem settings if you give them your Wi-Fi password.
Important: If you forget a custom modem password, you'll need to factory reset your modem.
Don't have an iiNet modem? Check the manufacturer's website for a guide.
Choose your modem:
NetComm NL20 Modem
- Open your web browser and go to: http://192.168.1.1.
- Log in with the Username and Password found on the modem's barcode sticker or use your custom password.
- In the left pane, click Advanced.
- Under Management, select Passwords.

- Enter the Current Password, then add your desired password into the New Password and Confirm Password field.
- Hit Apply/Save to finish

Wi-Fi Max Modem
You’ll use this password to log in to both the app and the modem dashboard.
From the My Internet Connect App
Don't want to use the app? You can change the Modem password in your web browser.
- Open the My Internet Connect App and tap the settings icon.
- Under Security, select Change Login Password, then Continue.
- Enter your current Login Password found on the modem's barcode sticker or use your custom password, then click Submit.
- Enter your desired new admin password and confirm it by typing it again.
- Hit Save to finish. From now on, you'll need to use your custom password to log in to your modem or the My Internet Connect App.
You can write down your password and keep it somewhere safe for future reference.
Using your web browser
- Open your web browser and go to: https://192.168.1.1
- Log in with the Login Password found on the modem's barcode sticker or use your custom password.
- From the left pane, click Administration.
- Under Password Settings enter your Current Password, then add your desired password into the New Password and Re-Enter Password for Verification fields. You can click the eye icon in the text boxes as you’re typing to show/hide the characters and make sure they match.
- Hit Save settings to finish. From now on, you'll need to use your custom password to log in to your modem or the My Internet Connect App.
You can write down your password and keep it somewhere safe for future reference.
Password Requirements:
- Both username and password can between 1 to 16 characters.
- Characters can be either letters, numerals, and/or special characters.
- Letters are case-sensitive.
Wi-Fi Max 5G Modem
You’ll use this password to log in to both the app and the modem dashboard.
From the My Internet Connect App
Don't want to use the app? You can change the Modem password in your web browser.
- Open the My Internet Connect App and tap the settings icon.
- Under Security, select Change Login Password, then Continue.
- Enter your current Login Password found on the modem's barcode sticker or use your custom password, then click Submit.
- Enter your desired new admin password and confirm it by typing it again.
- Hit Save to finish. From now on, you'll need to use your custom password to log in to your modem or the My Internet Connect App.
You can write down your password and keep it somewhere safe for future reference.
Using your web browser
- Open your web browser and go to: https://192.168.1.1
- Log in with the Login Password found on the modem's barcode sticker or use your custom password.
- From the left pane, click Administration.
- Under Password Settings enter your Current Password, then add your desired password into the New Password and Re-Enter Password for Verification fields. You can click the eye icon in the text boxes as you’re typing to show/hide the characters and make sure they match.
- Hit Save settings to finish. From now on, you'll need to use your custom password to log in to your modem or the My Internet Connect App.
You can write down your password and keep it somewhere safe for future reference.
Nokia FastMile 3.2 5G Modem
- Open your web browser and go to: https://192.168.1.1
- Select System, then General. Log in with the default username “admin”, and the default password printed on your modem's barcode sticker. If you have custom login details, use those instead.
- Click Change Password.

- Enter the Current Password.
- Type your new password in the New Password and Confirm Password boxes.

- Hit Update Password to finish. From now on, you'll need to use your custom password to log in to your modem or Nokia WiFi App.
You can write down your password and keep it somewhere safe for future reference.
Smart Modem Gateway (VX420-G2H)
- Open your web browser and go to: https://192.168.1.1.
- Log in with the default password "admin". If you have a custom password, use that instead.
- Hit Advanced.
- Select System Tools, then Administration.
- Enter the Old Password.
- Type your new password in the New Password and Confirm New Password boxes.
- Save to finish.
- From now on, you'll need to use your custom password to log in to your modem.
You can write down your password and keep it somewhere safe for future reference.
VX220-G2V Modem
- Open your web browser and go to: https://192.168.1.1.
- Log in with the default password on your modem's barcode sticker. If you have a custom password, use that instead.
- Hit Advanced.
- Select System Tools, then Administration.
- Enter the Old Password.
- Type your new password in the New Password and Confirm New Password boxes.
- Click Save to finish.
- From now on, you'll need to use your custom password to log in to your modem.
You can write down your password and keep it somewhere safe for future reference.
VX420-G2V Modem
- Open your web browser and go to: http://192.168.1.1.
- Log in with the default password "admin", or use your custom password.
- Click Advanced.
- In the left-hand column, select System Tools, then Administration.
- Under "Account Mangement", enter the Old Password. You can then enter the desired password into the New Password and Confirm New Password boxes below (passwords must match). You can click the eye icon in the text boxes to hide/show the characters as needed.
- Click the Save button to finish.
- From now on, you'll need to use your custom password to log in to your modem.
You can write down your password and keep it somewhere safe for future reference.
Sagemcom 5866
- Open your web browser and go to: https://192.168.1.1.
- Log in with the default username “admin” and the default password on your modem's barcode sticker. If you have custom login details, use those instead.
- Select Access Control.

- Hit User.
- Enter the Old Password.
- Type your password in the New Password and Confirm New Password boxes.
- Hit Apply to finish
- From now on, you'll need to use your custom password to log in to your modem.
You can write down your password and keep it somewhere safe for future reference.
TP-Link VR1600v
- Open your web browser and go to: https://192.168.1.1.
- Log in with the default username "admin" and defalt password "admin". If you have custom login details, use those instead.
- Hit Advanced.
- Select System Tools, then Administration.

- Enter the Old User Name and Old Password.
- If you want to change the username, enter the New User Name.
- Type your new password in the New Password and Confirm New Password boxes.
- Click Save to finish.
- From now on, you'll need to use your custom password to log in to your modem.
You can write down your password and keep it somewhere safe for future reference.
TG-789 Broadband Gateway
- Open your web browser and go to: http://10.1.1.1
- Log in with the default username "password" and default password “admin”. If you have changed these details from the default, use your custom login details instead.
- Click the Management panel on the dashboard.

- Under Users list, click tht Edit button to the right of the existing Admin entry.
Note: While it is possible to add additional admin users with their own usernames and passwords, we recommend having just one in order to keep track of your home network security more easily.

- Under Change password, enter your desired new password in the first box and then repeat the same password in the second box.

- Click the Apply button to finish.
- From now on, you'll need to use your new custom username and/or password whenever logging in at http://10.1.1.1/. We recommend writing these details down and keeping them somewhere safe for future reference.
Cable Gateway Pro (CG3000)
- Open your web browser and go to: http://192.168.0.1
- Log in with the username "admin" and the unique default password found on your modem's barcode sticker, or use your custom password.
- Select Management, then Access Control.
- For Username, enter "admin". Please note that it is not possible to customise the admin username on this modem.
- Enter the Old Password.
- Enter your desired password in both the New Password and Confirm Password fields, then click Apply/Save to finish.

- From now on, you'll need to use your new custom admin password whenever logging in at http://192.168.0.1/. We recommend writing these login details down and keeping them somewhere safe for future reference.
Cable Gateway Pro (CG2200)
- Open your web browser and go to: http://192.168.0.1
- Log in with the default username "admin" and default password “password”. If you have changed these details from the default, use your custom login details instead.
- Click Management in the top menu bar.
- Select Security.
- Adjust the Current username as desired, then enter and re-enter the New Password and click Apply to finish.

- From now on, you'll need to use your new custom username and/or password whenever logging in at http://192.168.0.1/. We recommend writing these details down and keeping them somewhere safe for future reference.
These guides will help you set up and use your iiNet modem. You can find the name of your modem on its barcode sticker.
Don't have an iiNet modem? Check out our BYO Modem Setup Guides.
iiNet modems are not locked to iiNet as a service provider and can be used with any compatible internet service.
Choose your modem
| Picture | Modem |
|---|---|
|
|
NetComm NL20 Modem |
|
|
Wi-Fi Max Modem (HWG2025) |
|
|
Wi-Fi Max 5G Modem (5FWA2025) |
|
|
VX420-G2V Modem |
|
|
Smart Modem Gateway (VX420-G2H) |
|
|
Nokia FastMile 3.2 5G Modem |
|
|
Sagemcom 5866 5G Modem |
|
|
VX220-G2V Modem |
|
|
Modem not listed here? See Older modems. |
NetComm NL20 Modem
More guides
- Change Wi-Fi password
- Change modem password
- Factory reset modem
- Set up Parental Controls
- Modem status lights
Wi-Fi Max Modem
Choose which type of internet you have - this will be mentioned in emails from us about your order:
- Set up nbn FTTP
- Set up nbn FTTC
- Set up nbn FTTB/N
- Set up nbn HFC
- Set up nbn Wireless
- Set up nbn Satellite
- Set up Ultra FTTB
- Set up Ultra Cable
- Set up Ultra VDSL2
More guides
- Change Wi-Fi password
- Change modem password
- Factory reset modem
- Modem status lights
- Set up the Mobile Backup
- Set up Parental Controls
- Set up URL Blocking
Wi-Fi Max 5G Modem
More guides
- Change Wi-Fi password
- Change modem password
- Factory reset modem
- Modem status lights
- Set up Parental Controls
- Set up URL Blocking
VX420-G2V Modem
Choose which type of internet you have - this will be mentioned in emails from us about your order:
- Set up nbn FTTP
- Set up nbn FTTC
- Set up nbn FTTB/N
- Set up nbn HFC
- Set up nbn Wireless
- Set up nbn Satellite
- Set up Ultra FTTB
- Set up Ultra VDSL2
- Set up Ultra Cable
- Set up FTTH (OptiComm/RedTrain)
More guides
Smart Modem Gateway (VX420-G2H)
Choose which type of internet you have - this will be mentioned in emails from us about your order:
- Set up Home Wireless Broadband
- Set up nbn FTTP
- Set up nbn FTTC
- Set up nbn FTTB/N
- Set up nbn HFC
- Set up nbn Wireless
- Set up nbn Satellite
- Set up Ultra FTTB
- Set up Ultra VDSL2
- Set up FTTH (OptiComm/RedTrain)
More guides
- Change Wi-Fi password
- Change modem password
- Factory reset modem
- Modem status lights
- Set up Parental Controls
- 4G Backup Service
Nokia FastMile 3.2 5G Modem
More guides
Sagemcom 5866 5G Modem
More guides
VX220-G2V Modem
Choose which type of internet you have - this will be mentioned in emails from us about your order:
- Set up nbn FTTP
- Set up nbn FTTC
- Set up nbn FTTB/N
- Set up nbn HFC
- Set up nbn Wireless
- Set up nbn Satellite
- Set up Ultra FTTB
- Set up Ultra VDSL2
- Set up FTTH (OptiComm/RedTrain)
More guides
We may provide an interim Mobile Broadband solution with a Pocket Wi-Fi® 5 when your nbn connection or fault is delayed by more than 3 days.
Set up your Pocket Wi-Fi® 5
For more details, you can download the Pocket Wi-Fi® 5 Quick Start Guide.
- Remove the back cover and insert the Nano SIM.

- Insert the provided battery and replace the back cover.

- You can charge the Pocket Wi-Fi® by connecting the power cable to a computer’s USB port, or to your own 5V/1A USB power adapter.

-
To turn on the Pocket Wi-Fi®, press and hold the Power button until the screen lights up.
-
Press the Menu button until the Device info option is shown, then press the Power button to select this option. The default Wi-Fi name (SSID) and Password will be shown on-screen—you can use these details to connect devices to the Wi-Fi.

-
If you want to change the Wi-Fi name and password, you can download the tpMiFi app from the App Store or Google Play.
Troubleshooting offline internet
- Press the Power button to bring the Pocket Wi-Fi® out of Power Saving mode, which turns off Wi-Fi when no devices are connected after 10 minutes.
- Make sure you’re in an area with mobile coverage. Mobile bars are shown in the top-left corner of the screen.
- Restart the Pocket Wi-Fi®.
Emergency calls should be used to request help from an emergency service organisation in a life threatening and/or time critical event.
If you’re considering making an emergency call, stay focused, stay relevant and pose these questions to yourself.
- Is someone seriously injured or in need of urgent medical help?
- Is your life or property being threatened?
- Have you just witnessed a serious accident or crime?
If yes, then call triple zero (000). Triple zero calls are free.
You’ll be asked whether you want to speak with:
- Police
- Fire
- Ambulance
Stay calm, don't shout, speak slowly and clearly. Tell them exactly where to go — give an address or location.
Select one of the links below to jump to a query:
Other emergency numbers
- Text Emergency Call - 106 text emergency call. You can call from teletypewriters. Tell us which service you need and where to come to.
- Storm and flood assistance – call 132 500
- Fire – other than in an emergency, contact your state or territory service.
- Emergencyplus – Download and read about the emergencyplus application.
- Police – call 131 444 for police other than in an emergency
- Crime Stoppers – call 1800 333 000 to help solve a crime
- Poisons Information Centre – call 13 11 26
There's more information about emergency calls on the federal government's triple zero website.
Advances in technology have improved the range of accessible services for people who are deaf, hard of hearing or have a speech impairment. For more information, check out Access Hub.
If you dial 112 while you're in a coverage area overseas, you'll be connected to the local emergency services. You can also check Smartraveller for details on the destination you are visiting too, as they will have their own Emergency Service Numbers.
Device information
In Australia emergency calls to Triple Zero can be made with or without an active SIM in your phone.
If your phone does not have access to the iiNet network you may still be able to make an emergency call on another mobile network, which is why you may see 'Emergency calls only' or similar on the screen.
Emergency calls can be made wherever your phone can see any mobile telecommunications network, however if you are travelling in a rural or remote area you should not rely upon your mobile phone to make an emergency call as there may be no mobile telecommunications network available, instead you should have other means of communications such as a satellite phone and for emergencies, carry an emergency beacon.
When calling an emergency call number, information such as your number, name and service location (where available) will be disclosed to the emergency call person (the operator) and the emergency service organisations, regardless of your caller ID settings.
Using a device other than an approved device with the latest software may impact your ability to call emergency services.
If you have received an SMS and/or email with instructions to update your device’s software or replace it immediately to be able to access emergency 000 calls, see this information.
Note: If you have a Samsung device, you may need to update it several times until your device says 'Your software is up to date' to ensure you can call emergency services.
Location information
Location information is critical in providing emergency services to provide the necessary service. In particular, the ability to provide enhanced location information is important where the caller may be unable to identify their location.
In the event of making an emergency call we will supply relevant location information to the emergency call person and the relevant emergency service organisation (police, fire or ambulance) to enable them to corroborate your location. We use a range of technical solutions to do this and they are constantly being reviewed and improved. These include:
- Push Mobile Location Information (MoLI). MoLI is the location of the cell site from which a mobile call to Triple Zero is made. This is supplied to emergency services for all emergency calls.
- Advanced Mobile Location (AML). AML is technology that allows mobile devices to send a location estimate when a call is made to Triple Zero. This improved outcomes for mobile callers in Australia and has the potential to save lives, as it is doing in the locations in which it has already been deployed.
For more information about AML, head to the federal government's triple zero website.
What it costs
There is no charge for calls made to emergency services regardless of whether your service is active or inactive.
This article will explain the status lights found on the Nokia FastMile 3.2 5G Modem. The circular LED panel is located on the top of the modem.

| Light | State and meaning |
|---|---|
| Centre | Off = No power. Green = Your modem has detected a 4G signal. If the 5G light isn't on, then your modem is connected to the 4G network. Flashing yellow = Your modem is searching for a network. Steady red = No 4G signal. Try putting your modem in a different spot and call us on 13 22 58 if the issue persists. Slow flashing red = Your TPG SIM is not detected or may have an error. Call us on 13 22 58 if the SIM is missing from the SIM slot. Quick flashing red = A factory reset is in progress. Flashing white = A device is connecting to the WiFi by WiFi Protected Setup (WPS). This light will blink 3 times if the connection is successful. If the connection fails, the light will flash slowly for 1-2 minutes then go back to showing the 4G signal. |
| 5G | Off = No 5G signal. Try putting your modem in a different spot and call us on 13 22 58 if the issue persists.This light also turns off if the modem is inactive for a while, but using your 5G service should turn it back on again. White = Your modem is connected to the 5G network. |
| Signal A row of 3 lights above the 5G light |
Off = No power or no 5G signal. White = 3 lights means a strong signal, 2 lights means a medium signal, and 1 light means a weak signal. |
iiNet's Remote ID Validation Tool helps to protect you from a transaction being made using your identity without your permission.
How does it work?
We will SMS you a link to the iiNet Remote ID Validation Tool. From there, you will be guided through each step. You will be asked to:
- Take and upload a photograph of your identification document (Australian driver’s licence, Passport of any country or Proof of Age Card)
- Confirm that the written information collected from your ID is correct.
- Take a selfie to establish that you are the owner of the identification provided.
To participate in this remote validation process, you will need to expressly consent to us collecting and using your personal information (including any sensitive information) for this purpose. Check out our Privacy Statement for details on how we handle your personal information.
How do we use the data?
The iiNet Remote ID Validation Tool uses biometric measurements from your photo and compares it to your ID to validate a match. It also completes a number of checks on the security features of your ID document to ensure it is legitimate.
Check out our Privacy Statement for details on how we handle your personal information.