How to set up Netgear Nighthawk D7000 for nbn FTTB/N
Please follow the steps below to set up your Netgear Nighthawk D7000.
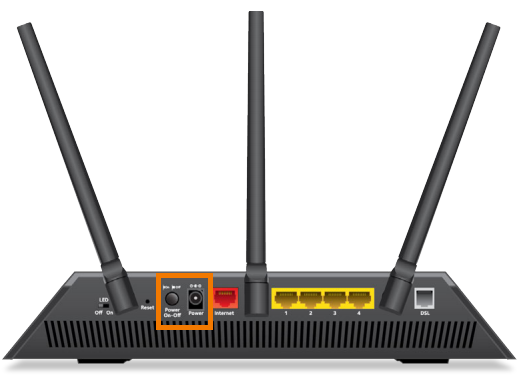
- Plug a phone cable from your nbn wall socket into the grey DSL port on your Nighthawk.

- Plug in the power cable and turn your Nighthawk on using the Power On-Off button.
- Connect a device to your Nighthawk via WiFi or Ethernet cable and go to http://www.routerlogin.net in your browser.
- Log in with your Netgear username and password. By default these are:
Username: admin
Password: password - On the home screen, click Basic.
- Click Internet.
- Select Australia from the Country drop down.
- Select Other from the ISP drop down.
- Select VDSL (PTM) from the Transfer Mode drop down.
- Select VDSL2 from the DSL Mode drop down.
- Tick the checkbox next to Enable This Interface.
- If your nbn plan was activated before 1 March 2023 or you have nbn Phone included in your service, more settings are needed:
- Tick the checkbox next to Use VLANID.
- Enter 2 in the text box next to Use VLANID.
- Enter 0 (zero) in the Priority text box. - Click Yes under Does your Internet connection require a login?
- Select PPPoE (PPP over Ethernet) from the Encapsulation drop down.
- Enter your iiNet username and password.
- Leave the other settings as they are and click Apply.
Your Netgear Nighthawk should now be online. If you're still having issues, please see Improving WiFi Signal or call us on 13 22 58 for further assistance.