Wireless Bridge Setup and Manual Pairing
Please note that iiNet Wireless Bridges are no longer sold as of 16 August 2017.
Before you get started
- Both units must be placed upright.
- Ideally, both units should be placed at least 1 to 2 metres above the ground, away from major obstacles and large metal items and with as few walls as possible between them.
- Do not place the units on a metal surface or in an enclosure (e.g. cupboards) as this will cause interference with the WiFi signal.
- Do not connect both units to the same router at the same time. There is no reason to do this, but if it is done, you'll need to restart all of your equipment.
Set up Wireless Bridge
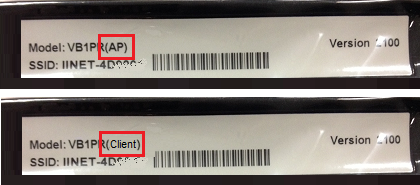
- Check the stickers on the bottom of your Wireless Bridge units. One will say AP, and the other will say Client.
- The AP Wireless Bridge must connect to your modem. The Client Wireless Bridge must connect to your device (e.g. set top box).
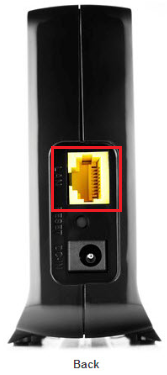
- Plug one end of an Ethernet cable into the LAN port on the back of the AP Wireless Bridge.
- Plug the other end into an available LAN port on your modem.
- Plug the AP Wireless Bridge unit into an electrical outlet using one of the supplied power cables.
- Plug one end of an Ethernet cable into the LAN port on the back of the Client Wireless Bridge.
- Plug the other end into the Ethernet port on the back the device. If you’re not sure which port this is, please consult the device’s user manual.
- Plug the Client Wireless Bridge unit into an electrical outlet using one of the supplied power cables.
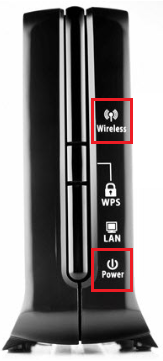
- When both Wireless Bridges have power and a connection between them, the Power and Wireless lights will be lit on both units.
- If the Wireless light is not lit, you may need to pair your bridges by following the instructions below.
Manually Pairing Wireless Bridges
- Check the stickers on the bottom of your Wireless Bridge units. One will say AP, and the other will say Client.
- Plug one end of an Ethernet cable into the LAN port on the back of the AP Wireless Bridge.
- Plug the other end into an available LAN port on your modem.
- Connect the AP Wireless Bridge to an electrical outlet using one of the supplied power cables.
- Connect the Client Wireless Bridge to an electrical outlet using one of the supplied power cables and place it within 1 metre of the AP unit.
- When both Wireless Bridges have power, the Power light will illuminate.
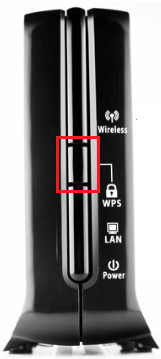
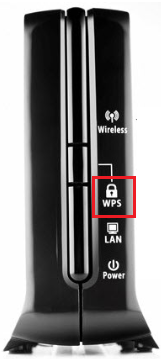
- Press and hold the WPS Button on the front of the AP Wireless Bridge for 5 seconds.
- The WPS light will blink. This means that the unit is in Search Mode. Search Mode lasts for 2 minutes.
- Press and hold the WPS Button on the front of the Client Wireless Bridge for 5 seconds.
- The WPS light will blink. When both units have blinking WPS lights, they will search for each other and attempt to make a connection.
- When both Wireless Bridges are connected to each other, the Wireless lights will be lit on both units.
