Update your contact details in Toolbox
You can update your existing contact details at any time in Toolbox.
Important: If you're updating your address because you're moving home, please contact us ASAP so we can help you move your iiNet services. Check out our Moving Home page for everything you need to know.
Select one of the links below to jump to a query:
- How to update existing contact details
- How to delete an existing contact
- How to change your contact preferences
How to update existing contact details
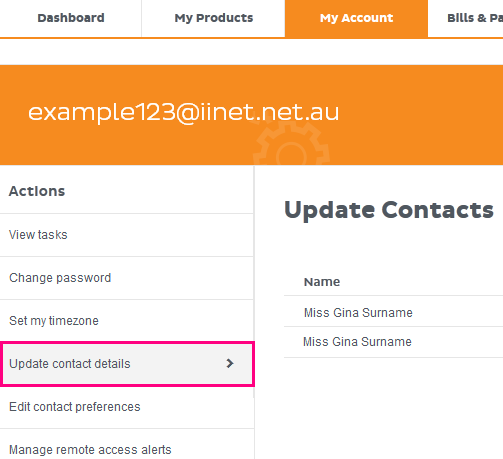
- Log in to Toolbox and select My Account. If you're on a mobile device and you don't see this option, click the grey square with three lines to show it.
Never logged into Toolbox before? Check out An Introduction to Toolbox. - Select Update contact details. If you're on a mobile device and you don't see this option, click the grey bar labelled My Account actions to show it.
- You’ll see a list of existing contacts on your account with the contact name and contact type:
- Billing contact: An account holder with the authority to add/change/relocate/cancel/troubleshoot and lodge service faults for any non-telephony services on the account, add/remove contacts, access invoices and other billing information, change payment details, request to link accounts that have the same account holder (full name and date of birth must match).
- Phone contact: Also known as a “legal lessee”, they have the authority to change/relocate/cancel/troubleshoot and lodge service faults for any telephony services on the account. If the Phone and Billing contacts are two different people, authorisation from both is required to add/change a telephony service in a way that will increase the plan fee or incur a one-off charge.
- Technical contact: Has the authority to troubleshoot services on the account with our Support team. They can also lodge a service fault for a non-telephony service, provided the Billing contact has accepted responsibility for a possible Incorrect Callout Fee.
- User contact: Only has the authority to troubleshoot services on the account with our Support team.
- To make any changes to an existing contact, click Edit next to the contact.
- You’ll see a form which will allow you to make changes to the contact details. Any field that has an asterisk next to it (e.g. Street *) is mandatory and must be filled in.
- If you’re editing a Billing contact, you’ll also see an option for this contact to opt in or out of receiving paper invoices at a cost of $1.49 per invoice.
- Once you’re done making changes, hit Update to finish.
How to delete an existing contact
- At least one Billing contact must remain on your account at all times. However, some accounts may have multiple Billing contacts or “User” contacts, which may be deleted.
- To delete a contact, log in to Toolbox and select My Account . If you're on a mobile device and you don't see this option, click the grey square with three lines to show it.
- Select Update contact details. If you're on a mobile device and you don't see this option, click the grey bar labelled My Account actions to show it.
- Before deleting any contact, you should check the full contact details by clicking Edit. Some accounts have multiple contacts set up under the same name but with different contact information (e.g. email addresses, mobile numbers).
- Once you’re sure which contact to delete, scroll down to the bottom of the page and click Delete this contact? You’ll then need to click Confirm.
- Alternatively, if you’re already sure which contact to delete, you can click Delete next to the contact name on the Update contact details page.
How to change your contact preferences
- Log in to Toolbox and select My Account from the navigation bar. If you're on a mobile device and you don't see this option, click the grey square with three lines to show the navigation menu.
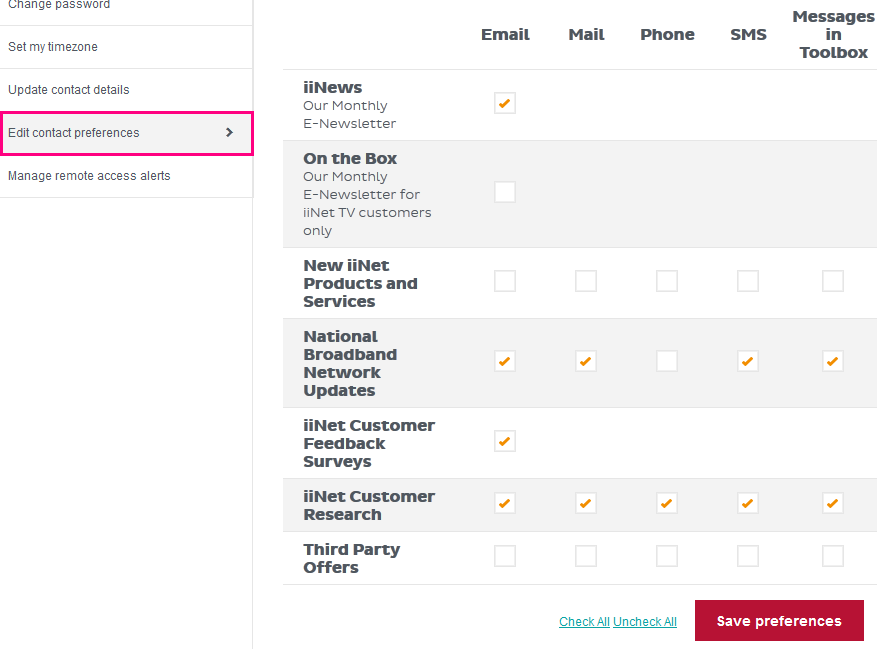
- Select Edit contact preferences from the Actions menu. If you're on a mobile device and you don't see the Actions menu, click the grey bar labelled My Account actions to show it.
- You’ll see a table of options with the different ways you may be contacted (Email, phone, SMS, messages in Toolbox etc.) and the different types of notifications such as feedback surveys.
- Simply check or uncheck the boxes in each column to adjust your preferences. There is a “Check all” and “Uncheck all” option at the bottom the page to make large changes a little easier.
- Once you’re done, click Save preferences to finish.


