Set up Fetch Set Top Box
As of 22 January 2025, Fetch services are no longer available from iiNet. Learn more.
You can watch the Fetch Mini - Wi-Fi and Ethernet Setup video here.
These instructions apply to all versions of the Mini & Mighty Fetch boxes.
Select one of the links below to jump to a query:
Getting started
- Remove the back cover from your Fetch remote and insert the 2 x AAA batteries supplied. Replace the back cover.
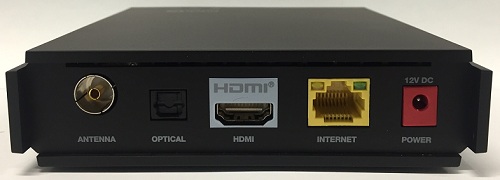
- Using the power cable supplied, connect your set top box to an available electrical outlet and turn it on.
- Using the HDMI cable supplied, connect your set top box to an available HDMI port on your TV.
- To view Free to Air channels through your set top box, disconnect your TV antenna cable from your TV but not from the wall. Instead, connect the free end of the antenna cable to the back of your set top box.
Please note that if you do not have a TV aerial or you skip this step, you will not be able to access Free to Air channels through your set top box. - Next, you'll need to connect your set top box to your broadband modem. These are three ways to do this - select your connection method from the list below to jump to the right instructions:
- Ethernet cable
- Power Line Adapter (additional networking hardware purchased separately)
- Wi-Fi
Mini set top box (any version)
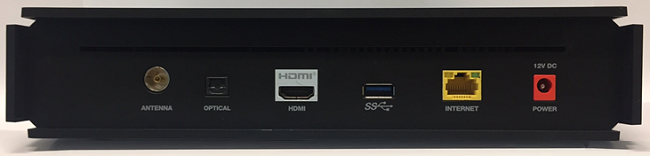
Mighty set top box
Connecting via Ethernet cable
- Using the Ethernet cable supplied, connect your set top box's INTERNET port to an available Ethernet (LAN) port on your modem.
- On your TV, switch to viewing the source channel that corresponds with the HDMI port you used to connect your set top box (typically HMDI 1 or HDMI 2) and then proceed with the instructions for the set top box setup wizard.
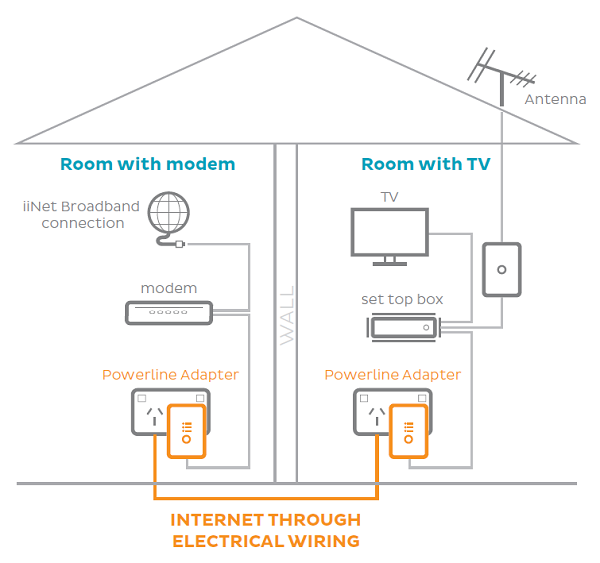
Connecting via Power Line Adapter
You'll need the Power Line Adapter units you purchased separately. If the Power Line Adapter didn't come with an Ethernet cable, you'll need another Ethernet cable in addition to the one that was supplied with your set top box.
Important: If you are using a double adaptor or power board (not recommended) it must have surge protection and/or noise filtering to function correctly.
- Use the Ethernet cable supplied to connect one Power Line Adapter (PLA) unit to an available Ethernet (LAN) port on your modem.
- Plug the PLA unit into a nearby electrical outlet.
- Use another Ethernet cable to connect the other PLA unit to the INTERNET port on the back of your set top box.
- Plug the other PLA unit into a nearby electrical outlet. Both electrical outlets must be on the same electrical grid in order for the PLA units to establish a connection with each other.
- On your TV, switch to viewing the source channel that corresponds with the HDMI port you used to connect your set top box (typically HMDI 1 or HDMI 2) and then proceed with the instructions for the set top box setup wizard.
Connecting via Wi-Fi
- When you first turn on your set top box and TV, you'll probably see a Connection Problem page because a connection hasn't been set up yet. Use the Fetch remote to select Network settings, then Wi-Fi connection.
- Select your Wi-Fi network name from the list of available Wi-Fi connections.
- Use the on-screen keyboard to enter your Wi-Fi password. You can switch between UPPER CASE/lower case by selecting the ABC/abc key to the left of the delete key. Using the on-screen keyboard takes longer than a regular keyboard, but don't worry - your set top box will remember your Wi-Fi password for future connections.
- Once your Wi-Fi password has been entered, select Next to connect.
- Once your set top box is successfully connected via Wi-Fi, hit the Menu key on your remote and then proceed with the instructions for the set top box setup wizard.
The set top box setup wizard
- Your set top box may need to download and install system updates once it has an internet connection. This can take a few minutes - make sure the set top box is not turned off or disconnected during this process. After the update is complete, the set top box will automatically restart.
- Once your set top box has rebooted, you'll see the welcome page with the list of 8 steps the setup wizard will run through - Introduction, Activation, Fetch Box Name, Set Up Remote, Audio Settings, Parental PIN, Channel Scan and Diagnostics.
- You'll be using the arrow keys and the paw button on your Fetch remote to move the cursor around on your TV screen and select different options. Select Continue to get started.
- Use the on-screen keyboard to enter your Fetch activation code - you can switch between UPPER CASE/lower case by selecting the ABC/abc key to the left of the delete key. You'll find your activation code in the email that was sent to the email address you supplied on your application. It can also be found in your Toolbox in My Products > Fetch > Activate your Fetch. If you have multiple set top boxes, be sure to check the set top box's serial number barcode sticker as each activation code is unique.
- Once your activation code has been entered, select Activate, then Continue.
- If you'd like, you can set a new name for your set top box. This name is how the set top box will be listed if you check which devices are connected to your network in your modem settings, and it's also useful to distinguish different set top boxes if you purchased additional set top boxes for Multiroom viewing.
After renaming your box or leaving it as is, select Continue. - If you'd like to use your Fetch remote to control your TV as well as your set top box, select Set up remote now. If not, select Set up later then skip to the next step in these instructions.
If you chose to set up your remote, select the make of your TV from the list of popular brands or select Can’t find TV type? to open Universal Remote Set-up. Follow the on-screen instructions to get your Fetch remote working with your TV and then select Yes, got it working to finish. - Select your desired audio option and then click Continue.
- The default parental PIN is 0000 - you change it now by pressing the green button on your Fetch remote. Hit the 123… button on your remote to bring up the numbers on your remote keypad and use them to enter the new parental PIN twice before selecting Continue.
- Your set top box will automatically scan for all available Free to Air channels. Please note that the channel scan will not be successful if you did not connect a Free to Air aerial to the back of your set top box. Once the scan has been completed, select Continue.
- Your set top box will automatically run through some diagnostic tests. Once the tests are complete, select Finish.
- Your set top box will reboot with your new configuration. After rebooting, you'll then see the Fetch menu and you can start enjoying your new service.
If you have any trouble getting set up with your Fetch service, please give us a call on 1300 701 006 and we'll be happy to help.