You can plug in a USB file drive into the TG-789's USB 2.0 port so any computers and other devices connected to your home network via Ethernet or WiFi can access the files on the drive. The following file systems are supported:
- NTFS
- FAT32
- FAT16
- HFS+
- EXT2/3/4
Please note that this USB port cannot support 3G/4G mobile broadband dongles.
It's possible to connect up to 5 separate USB drives if you have a USB hub adaptor.
How to set up file sharing on a TG-789 Broadband Gateway
- Plug in a USB 2.0 file drive with one of the support file systems (see above) into the USB port on the side of your modem.
- On a computer, tablet or smartphone that's connected to your modem, open your web browser and go to http://10.1.1.1
- Log in with the default username admin and default password - this is a unique password printed on the sticker on the base of the modem next to "Password".
If you have changed your password from the default, use you custom password instead.
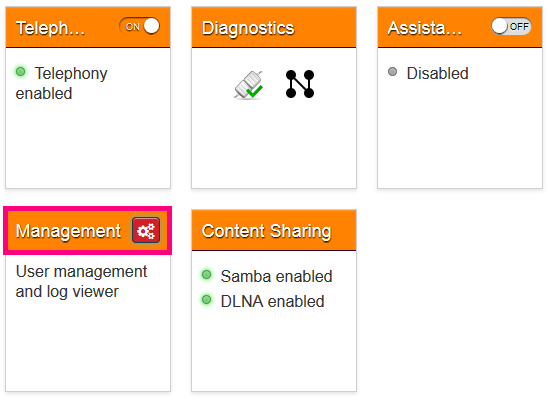
- You'll see the dashboard. Select the Content Sharing panel.
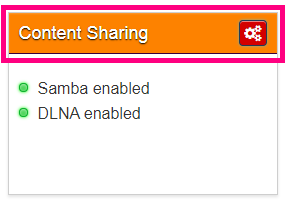
- There are 2 different kinds of file servers which behave in different ways. Both are enabled by default. Refer to the information below if these settings have been changed:
File server DLNA server How to enable Tick File Server Enabled Tick DLNA Enabled Function Store and access you data on your local network. Make media files available for DLNA-capable devices like Media players on your local network. Access Read and write Read only Type of content shared All files Only media files i.e. video, music, images 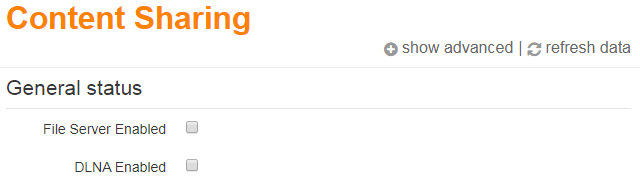
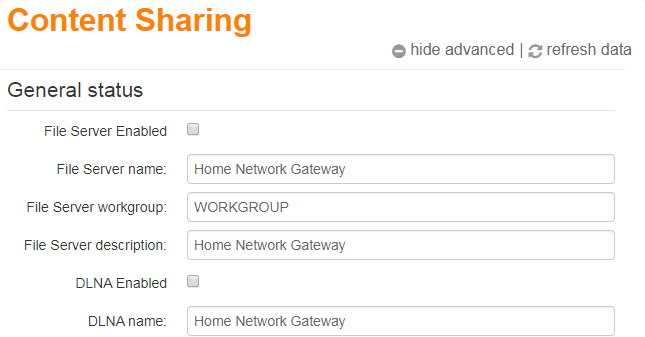
- Click show advanced to display the advanced options. This will allow you to designate specific names to your file server or DLNA servers. After making any changes, click Save.
Accessing a server
- On a device that's connected to your TG-789 modem via Ethernet or WiFi, open the file directory. On Windows devices, this is known as File Explorer and on Mac OSX, this is known as Finder. If you have another type of device, please refer to the manufacturer's website for support information about accessing the file directory.
- Go to your Network/Shared files. On Windows devices, you'll need to select Network. On Mac OSX, you'll need to check under Shared.
- You'll need to locate the name of your File server or DLNA server. By default, these are both "Home Network Gateway", or you may have set custom names when setting up the file server.
Please keep the following in mind:
- You can only edit, add or remove files on a File server, not a DLNA server. DLNA servers are read-only for viewing media files.
- You won't see any non-media files i.e. video, music, images when viewing your DLNA server.
- The DLNA server cannot be accessed on devices that are not DLNA compatible and connected to your home network.
- You won't be able to access the file server on devices that aren't connected to your home network, such as devices connected to a mobile network instead of your TG-789's WiFi network.
- Remote or password-protected access is not available. If you have concerns about guests accessing your files, we recommend you set up Guest WiFi.
Guest WiFi allows you to share your internet access with friends and family who visit without giving them your main WiFi password.
- Guests can connect to your WiFi and use your monthly broadband data, so still only share the guest password with people you trust.
- Guests can't access your modem's default gateway to log into the modem settings.
- Guests can't access other computers or devices on your network, including any Network Attached Storage devices.
Set up Guest WiFi
- On a computer, tablet or smartphone that's connected to your modem, open your web browser and go to http://10.1.1.1
- Log in with the default username admin and default password - on the TG-1, this is “admin”. On the TG-789, this is a unique password printed on the sticker on the base of the modem next to "Password".
If you have changed your password from the default, use you custom password instead.
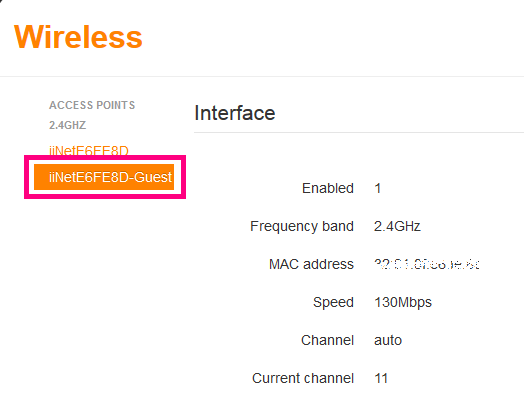
- You'll see the dashboard. Select the Wireless panel.
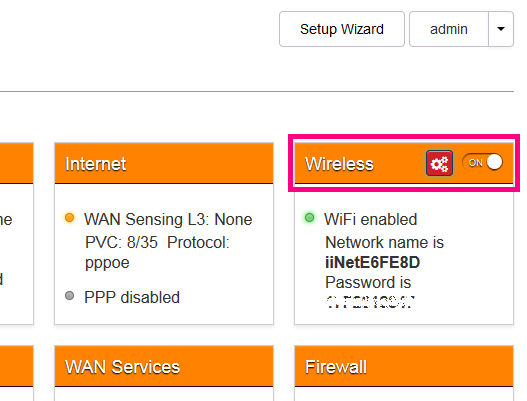
- This will bring up the Wireless settings. In the left-hand column, you'll see an option that's your default WiFi network name with "-Guest" at the end. Select it.
Note that the TG-789 will have a Guest network for both the 2.4GHz B/G/N WiFi network and the 5GHz AC WiFi network. If you're not sure that your guests will have devices which are compatible with the newer 5GHz AC WiFi network, set up the 2.4GHz network instead.
- Scroll down slightly. Underneath Access Point, make sure the Enable switch is set to ON.
- Enter the following details. We recommend that you write down your Guest WiFi name and password and keep it somewhere safe for future reference.
SSID: Enter the desired network name for your Guest WiFi. We recommend keeping "guest" in the name so you can easily tell which one your guests should be connecting to.
Security mode: WPA2 PSK
Password: Enter the desired password for your Guest WiFi. Anyone on your Guest WiFi can still use your internet quota, so you should always set a password and only share it with people you trust.
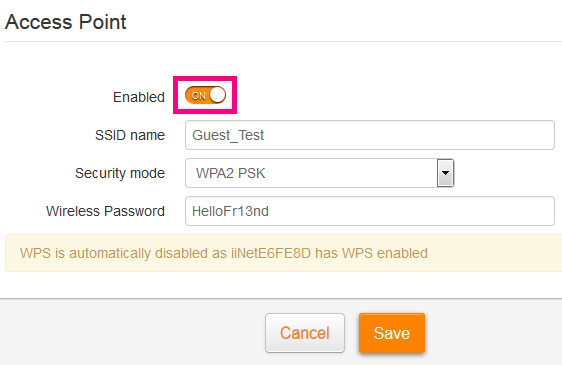
- Click Save to finish. Your guests should now be able to see your Guest WiFi as an available network and connect using your Guest WiFi password.
Note: If you'd like guests to be able to connect to the Guest WiFi via WPS, you'll need to disable WPS on your main WiFi network before the settings will allow you to enable WPS on your Guest WiFi.
If your modem was purchased elsewhere, please check its user manual or visit the manufacturer's website for support information on how to perform a factory reset.
Important: A factory reset will remove all custom settings from a modem, including your internet service configuration, Netphone (VoIP) settings and any custom WiFi network names and passwords. You'll need to set up your modem again by following the instructions in its setup guide.
Select your modem


Note: If your modem is not listed here, please refer to our Legacy Resources page.
Nokia FastMile 3.2 5G Modem
Via device settings (Recommended)
- Open your web browser and go to 192.168.1.1. If you’re connected to the FastMile 5G modem, the page overview will load.
- In the left-hand column, select System, then General. You will be promoted to login with your “admin” username & password.
Note: If the password has not been changed, you can find it on the barcode sticker at the bottom of your modem.
- Click Reset. A pop-up will ask you to confirm your decision. Click Yes.

- Wait for the factory reset to complete. After the factory reset, your FastMile 3.2 5G modem will reboot.
- Set up your Nokia FastMile 5G Gateway again by following its setup guide.
- We recommend that you restart any computers or WiFi devices before attempting to get online.
Using the RESET button
- This method is not recommended unless you are unable to view or log in to your device settings at 192.168.1.1.
- While the Nokia FastMile 3.2 5G modem is turned on, find the RESET button on the bottom of the modem.

- Using a pen or paperclip, hold the RESET button for 10-12 seconds then release the button.
Note: The centre LED will turn white before flashing red and then the modem will reboot with factory default settings. - Wait for the Nokia FastMile 3.2 5G modem to finish rebooting; this may take several minutes.
- Set up your Nokia FastMile 5G modem again by following its setup guide.
- We recommend that you restart any computers or WiFi devices before attempting to get online.
Smart Modem Gateway (VX420-G2H)
Via modem settings (Recommended)
- Open your web browser and go to http://192.168.1.1
- Log in with the default password "admin". If you have changed your password from the default, use your custom password instead.
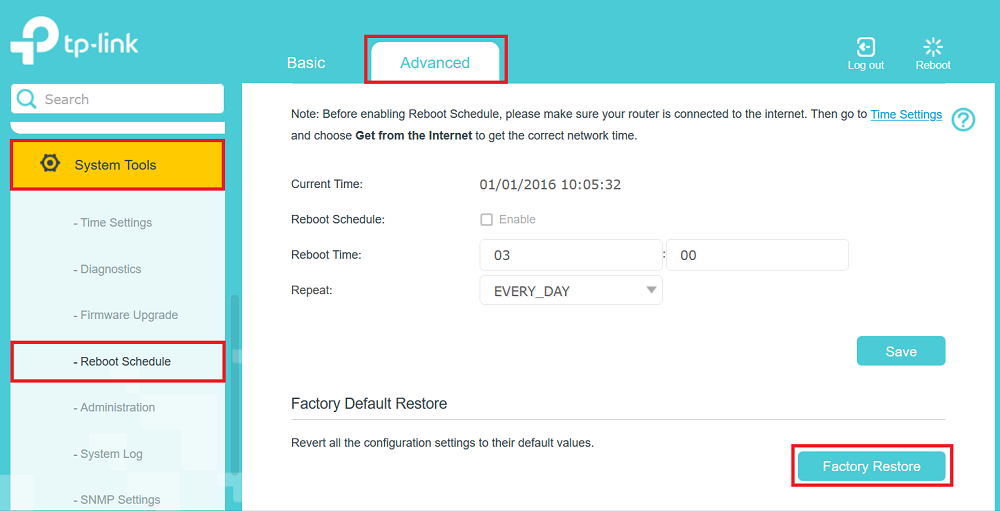
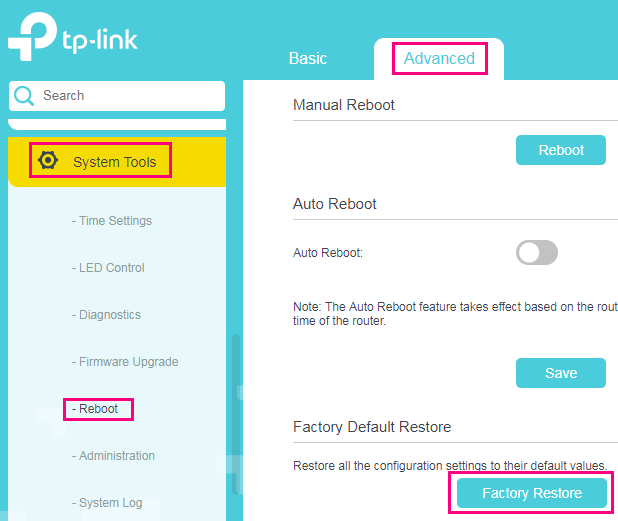
- Select Advanced.
- In the left-hand column, select System Tools, then Reboot Schedule.
- Under "Factory Default Restore", click Factory Restore. A pop-up will ask you to confirm your decision. Click Yes.
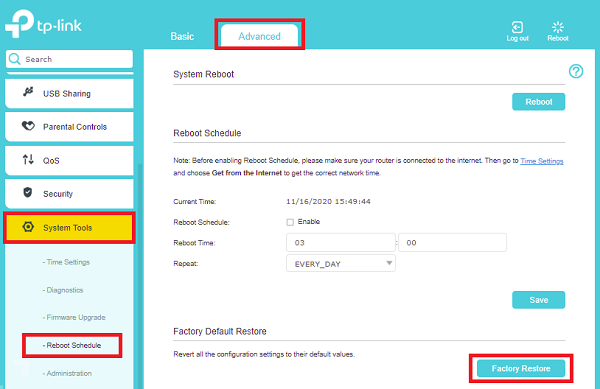
- Wait for the factory reset to complete. After the factory reset, your modem will reboot.
- Set up your modem again by following the instructions in its setup guide.
- We recommend that you restart any computers or WiFi devices before attempting to get online.
- This method is not recommended unless you are unable to view or log in to your modem settings at http://192.168.1.1
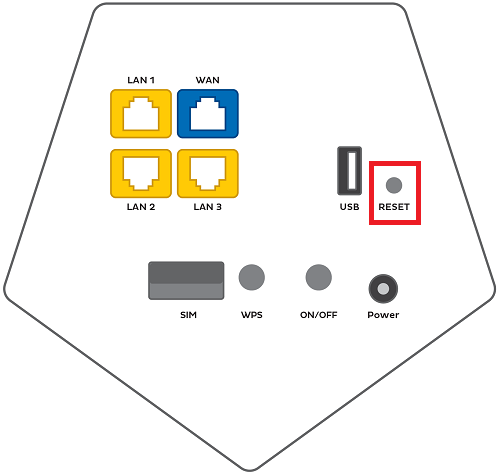
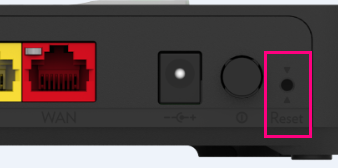
- While the modem is turned on, find the RESET button on the back of your modem.

- Using a pen or paper clip, hold down the reset button for 5 seconds ONLY then release the button. All lights will flash once and then the modem will reboot with factory default settings.
- Wait for the modem to finish rebooting; this may take several minutes.
- Set up your modem again by following the instructions in its setup guide.
- We recommend that you restart any computers or WiFi devices before attempting to get online.
VX220-G2V Modem
Via modem settings (Recommended)
- On a device that’s connected to your modem via Ethernet or WiFi, open your web browser and go to http://192.168.1.1
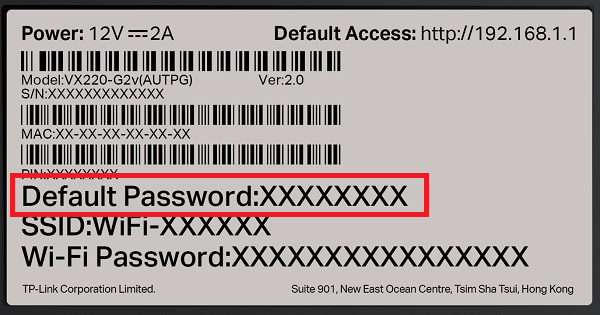
- Log in with the unique default password found on your modem's barcode sticker, or use your custom password.
- Click Advanced.
- In the left-hand column, select System Tools, then Reboot Schedule.
- Under "Factory Default Restore", click Factory Restore. A pop-up will ask you to confirm your decision. Click Yes.
- Wait for the factory reset to complete. After the factory reset, your modem will reboot.
- Set up your modem again by following its setup guide.
- We recommend that you restart any computers or WiFi devices before attempting to get online.
Using the RESET button
- This method is not recommended unless you are unable to view or log in to your modem settings at http://192.168.1.1.
- While the modem is turned on, find the RESET button on the side of your modem.
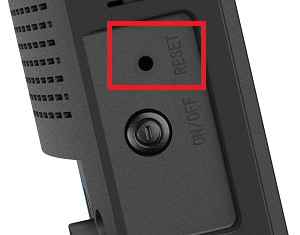
- Using a pen or paperclip, hold the RESET button for 10 seconds then release the button. All lights will flash once and then the modem will reboot with factory default settings.
- Wait for the modem to finish rebooting; this may take several minutes.
- Set up your modem again by following its setup guide.
- We recommend that you restart any computers or WiFi devices before attempting to get online.
VX420-G2V Modem
Via modem settings (Recommended)
- Open your web browser and go to http://192.168.1.1
- Log in with the default password "admin". If you have changed your password from the default, use your custom password instead.
- Click Advanced.
- In the left-hand column, select System Tools, then Reboot Schedule.
- Under "Factory Default Restore", click Factory Restore. A pop-up will ask you to confirm your decision. Click Yes.

- Wait for the factory reset to complete. After the factory reset, your modem will reboot.
- Set up your modem again by following its setup guide.
- We recommend that you restart any computers or WiFi devices before attempting to get online.
Using the RESET button
- This method is not recommended unless you are unable to view or log in to your modem settings at http://192.168.1.1.
- While the modem is turned on, find the RESET button on the back of your modem.

- Using a pen or paperclip, hold the RESET button for 10 seconds then release the button. All lights will flash once and then the modem will reboot with factory default settings.
- Wait for the modem to finish rebooting; this may take several minutes.
- Set up your modem again by following its setup guide.
- We recommend that you restart any computers or WiFi devices before attempting to get online.
Sagemcom 5866 5G Modem
Via modem settings (Recommended)
- On a device that’s connected to your modem via Ethernet or WiFi, open your web browser and go to http://192.168.1.1
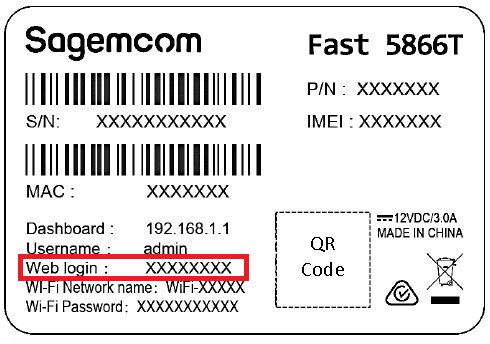
- Log in with the default username “admin” and the unique default password on your modem's barcode sticker, or use your custom credentials.
- Select My Sagemcom Box.
- Select Maintenance.
- On the "Resets" page, you have two options:
A) Select Semi-reset to reset everything except custom WiFi settings; OR
B) Select Reset for a full factory reset.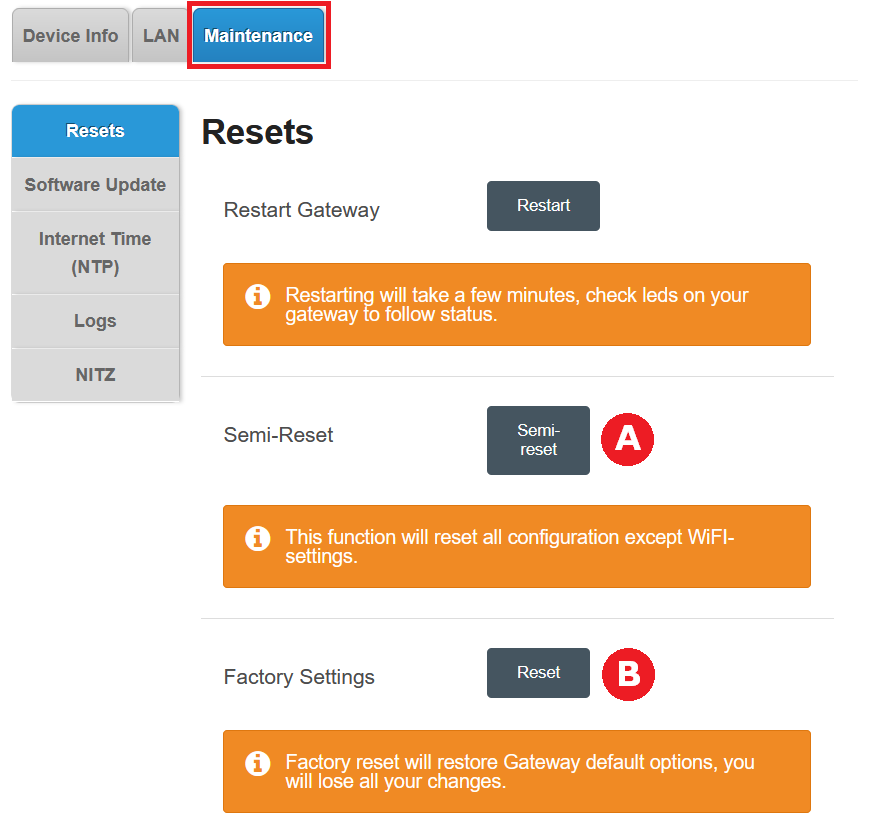
- Wait for the factory reset to complete. After the factory reset, your modem will reboot.
- Set up your modem again by following its setup guide.
- If a full factory reset was done, we recommend that you restart any computers or WiFi devices before attempting to get online.
Using the RESET button
- This method is not recommended unless you are unable to view or log in to your modem settings at http://192.168.1.1.
- While the modem is turned on, find the RESET button on the back of your modem. You may need to unplug any Ethernet cable in the 2.5GLAN port to reach the RESET button.
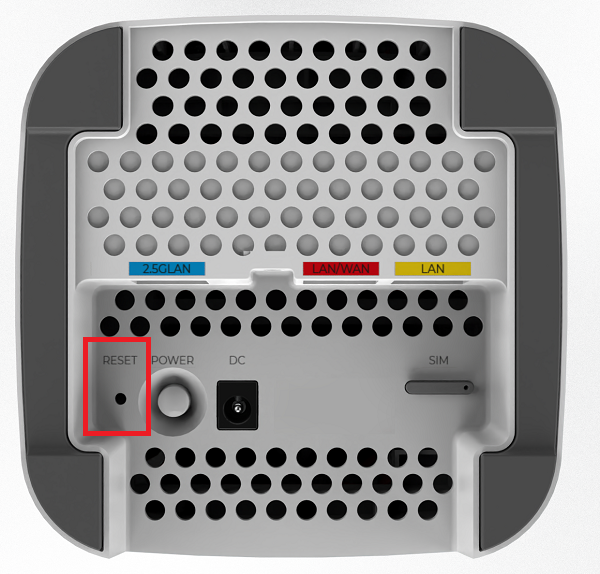
- Using a pen or paperclip, hold the RESET button for 5-8 seconds then release the button. All lights will turn off and then the modem will reboot with factory default settings.
- Wait for the modem to finish rebooting; this may take several minutes.
- Set up your modem again by following its setup guide.
- We recommend that you restart any computers or WiFi devices before attempting to get online.
Nokia FastMile 5G Modem
Via modem settings (Recommended)
- Open your web browser and go to http://192.168.1.254
- Log in with the default username “userAdmin” and the unique default password on your modem's barcode sticker, or use your custom password.

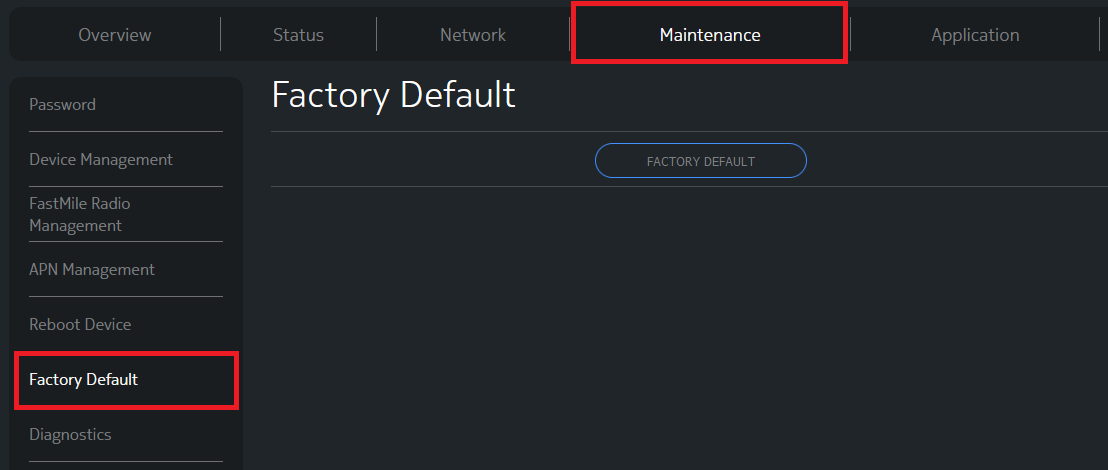
- Select Maintenance.
- Select Factory Default, then hit the FACTORY DEFAULT button.
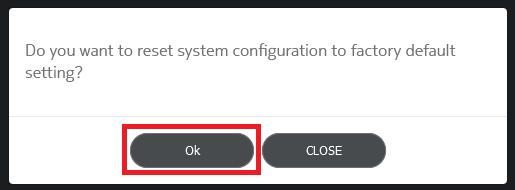
- Select Ok to confirm.
- Wait for the factory reset to complete. After the factory reset, your modem will reboot.
- Set up your modem again by following its setup guide.
- If a full factory reset was done, we recommend that you restart any computers or WiFi devices before attempting to get online.
Using the RESET button
- This method is not recommended unless you are unable to view or log in to your modem settings at http://192.168.1.254.
- While the modem is turned on, find the RESET button on the back of your modem.
- Using a pen or paperclip, hold the RESET button for 10-12 seconds then release the button. The centre LED will flash red and then the modem will reboot with factory default settings.
- Wait for the modem to finish rebooting; this may take several minutes.
- Set up your modem again by following its setup guide.
- We recommend that you restart any computers or WiFi devices before attempting to get online.
TP-Link VR1600v
Via modem settings (Recommended)
- Open your web browser and go to http://192.168.1.1
- Log in with the default username and password, which are both "admin". If you have changed your username/password from the defaults, use your custom login details instead.
- Click Advanced.
- In the left-hand column, select System Tools, then Reboot.
- Under "Factory Default Restore", click Factory Restore. A pop-up will ask you to confirm your decision. Click Yes.
- Wait for the factory reset to complete; you'll see a progress meter on-screen. After the factory reset, your modem will reboot.
- Set up your modem again by following its setup guide.
- We recommend that you restart any computers or WiFi devices before attempting to get online.
Using the RESET button
- This method is not recommended unless you are unable to view or log in to your modem settings at http://192.168.1.1.
- While the modem is turned on, find the reset button on the back of your modem. It's located above the power button.
- Using a pen or paperclip, hold the reset button for 6 to 8 seconds ONLY then release the button. All lights will briefly illuminate and then the modem will reboot with factory default settings.
- Wait for the modem to finish rebooting; this may take several minutes.
- Set up your modem again by following its setup guide.
- We recommend that you restart any computers or WiFi devices before attempting to get online.
TG-789 Broadband Gateway
Via modem settings (Recommended)
- Open your web browser and go to http://10.1.1.1
- Log in with the default password - on the TG-1, this is “admin”. On the TG-789, this is a unique password printed on the sticker on the base of the modem next to "Password".
If you have changed the password from the default, use your custom password instead. - Click the Gateway panel on the dashboard.
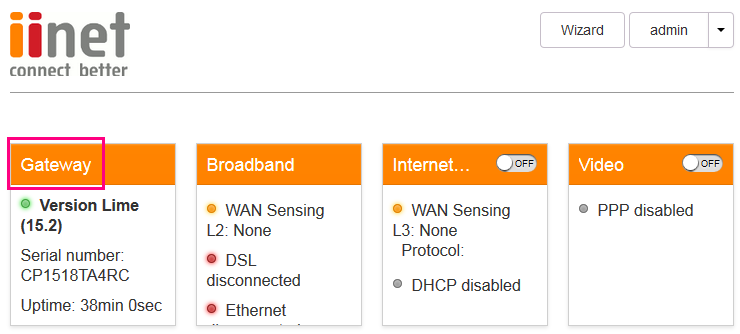
- Scroll down slightly. Next to Factory Defaults, click the Reset button.

- Wait for the factory reset to complete; this usually takes 2-7 minutes. After the factory reset, your modem will reboot.
- After the reboot, refresh your web browser and log back in to your modem settings with the default password “admin”. If you had a custom password, the factory reset would have returned it to the default "admin".
- Set up your modem again by following the instructions in its setup guide.
- We recommend that you restart any computers or WiFi devices before attempting to get online.
- This method is not recommended unless you are unable to view or log in to your modem settings at http://10.1.1.1
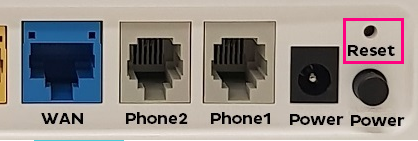
- While the modem is turned on, find the reset button on the back of your modem.
- Using a pen or paper clip, hold down the reset button for 6-8 seconds only.
Warning: If you hold the button for 30 seconds or longer, the modem will become unresponsive as this has put it in "bootp" mode for a firmware upgrade. Turn your modem off and then on again to exit bootp mode and then try again, holding the button for only 6-8 seconds.
- Wait for the factory reset to complete; this usually takes 2-7 minutes. After the factory reset, your modem will reboot.
- Set up your modem again by following the instructions in its setup guide.
- We recommend that you restart any computers or WiFi devices before attempting to get online.
Cable Gateway Pro (CG3000)
Via modem settings (Recommended)
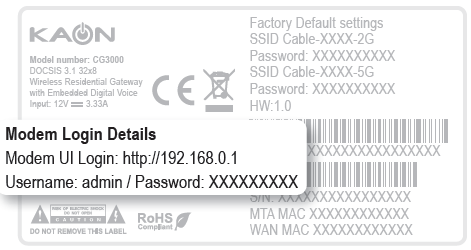
- Open your web browser and go to http://192.168.0.1
- Log in with the username "admin" and the unique default password found on your modem's barcode sticker, or use your custom password.
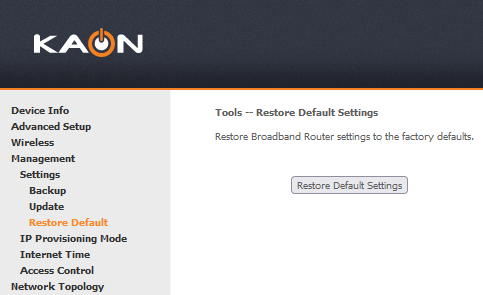
- Select Management.
- Select Restore Default Settings, then confirm.
- Wait for the factory reset to complete; this may take several minutes. After the factory reset, the device will reboot.
- Set up your modem again by following the instructions in its setup guide.
- We recommend that you restart any computers or WiFi devices before attempting to get online.
Using the RESET button
- This method is not recommended unless you are unable to view or log in to your modem settings at http://192.168.0.1
- While the modem is turned on, find the reset button on the back of your modem.
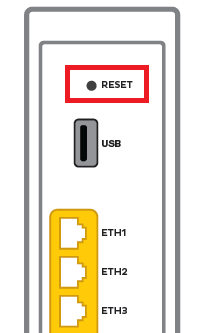
- Using a pen or paper clip, hold down the RESET button for 5-6 seconds only.
- The US, DS and ONLINE lights will flash and your modem will factory reset, then reboot. The entire process may take several minutes.
- Set up your modem again by following the instructions in its setup guide.
- We recommend that you restart any computers or WiFi devices before attempting to get online.
Cable Gateway Pro (CG2200)
Via modem settings (Recommended)
- Open your web browser and go to http://192.168.0.1
- Log in with the default username, "admin" and default password, "admin". If these defaults don't work for you, try leaving both fields blank.
If you have changed the username and/or password from the default, use your custom login details instead.
- Select Management in the top menu bar.
- Select Security.
- Set Restore Factory Defaults to Yes, then click Apply.
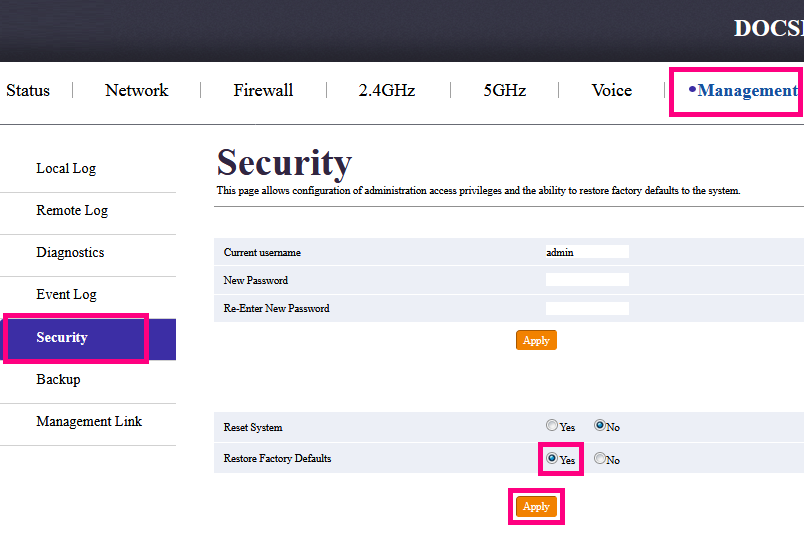
- A popup message will appear; select OK to continue.
- Wait for the factory reset to complete; this may take several minutes. After the factory reset, the device will reboot
- Log back in to your modem settings with the default username, "admin" and default password, “admin”. If you had custom login details, the factory reset would have returned them to the defaults.
- Set up your modem again by following the instructions in its setup guide.
- We recommend that you restart any computers or WiFi devices before attempting to get online.
Using the RESET button
- This method is not recommended unless you are unable to view or log in to your modem settings at http://192.168.0.1
- While the modem is turned on, find the reset button on the back of your modem.
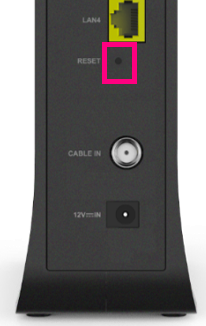
- Using a pen or paper clip, hold down the reset button for 6-8 seconds only.
- Most lights will flash and then your modem will factory reset, then reboot. The entire process may take several minutes.
- Set up your modem again by following the instructions in its setup guide.
- We recommend that you restart any computers or WiFi devices before attempting to get online.
Cable Gateway Pro (EPC3940L)
Via modem settings (Recommended)
- Open your web browser and go to http://192.168.0.1
- Log in with the default username, "admin" and default password, "password". If these defaults don't work for you, try leaving both fields blank.
If you have changed the username and/or password from the default, use your custom login details instead. - Select Advanced from the top menu bar.

- Select Administration > Backup/Restore Settings.
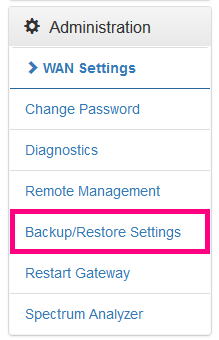
- Select Erase Settings. A popup message will appear; select Erase Settings again to continue.

- Wait for the factory reset to complete; this may take several minutes. After the factory reset, you'll see a message saying "The device has been reset...RELOAD". Click RELOAD to return to the modem login stream.
- Log back in to your modem settings with the default username, "admin" and default password, “password”. If you had custom login details, the factory reset would have returned them to the defaults.
- Set up your modem again by following the instructions in its setup guide.
- We recommend that you restart any computers or WiFi devices before attempting to get online.
- This method is not recommended unless you are unable to view or log in to your modem settings at http://192.168.0.1
- While the modem is turned on, find the reset button on the back of your modem.
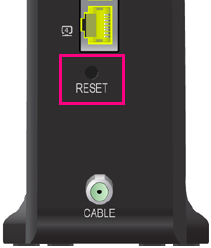
- Using a pen or paper clip, hold down the reset button for 6-8 seconds only.
- Most lights will flash and then your modem will factory reset, then reboot. The entire process may take several minutes.
- Set up your modem again by following the instructions in its setup guide.
- We recommend that you restart any computers or WiFi devices before attempting to get online.
If your modem was purchased elsewhere, please consult your modem's user manual for instructions on how to do this.
What is the modem login password and why should I change it?
Your modem login password is used to log in to the modem's default gateway where you can change your modem settings.
If you share a house or you give your WiFi password to guests, changing your modem password from the default can prevent people connected to your home network from accessing or changing your modem settings.
IMPORTANT: If you use Remote Management on your modem (if available) changing your modem login password is vital to maintain the security of your home network and services.
Forgotten custom modem login passwords
If you've forgotten a custom modem login password, you can factory reset your modem to return it to the default. Please note that a factory reset will remove all custom settings from a modem, including your internet service configuration, Netphone (VoIP) settings and any custom WiFi network names and passwords. You'll need to set up your modem again by following the instructions in its setup guide.
Select your modem:
Nokia FastMile 3.2 5G Modem
- On a device that's connected to your modem, open your web browser and go to 192.168.1.1. The service overview page will load.
- In the left-hand panel, select System, then General. You will be prompted to login with your username & password.
Note: If the username & password have not been changed, you can find them on the barcode sticker at the bottom of your modem. - Click Change Password. A pop-up will ask you to enter the Original Password and New Password.

- Enter the desired password in the New Password and Confirm Password boxes (these passwords must match).

- Click Update Password to finish.
- From now on, you'll need to use your new custom password whenever logging in at 192.168.1.1 or the Nokia WiFi App. We recommend writing this down and keeping it somewhere safe for future reference.
Smart Modem Gateway (VX420-G2H)
- Open your web browser and go to http://192.168.1.1
- Log in with the default password "admin", or use your custom password.
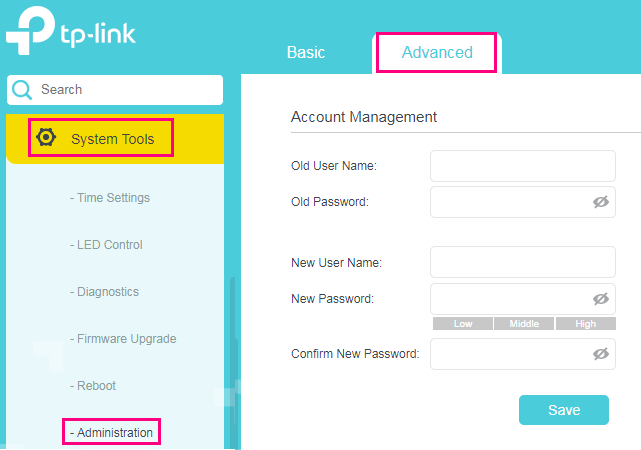
- Click Advanced.
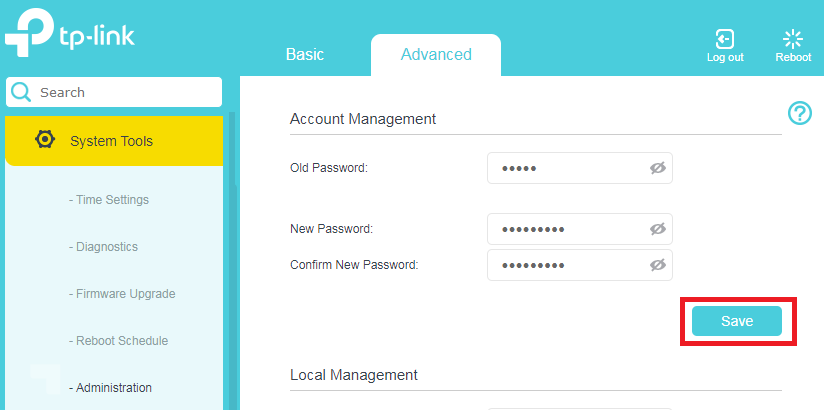
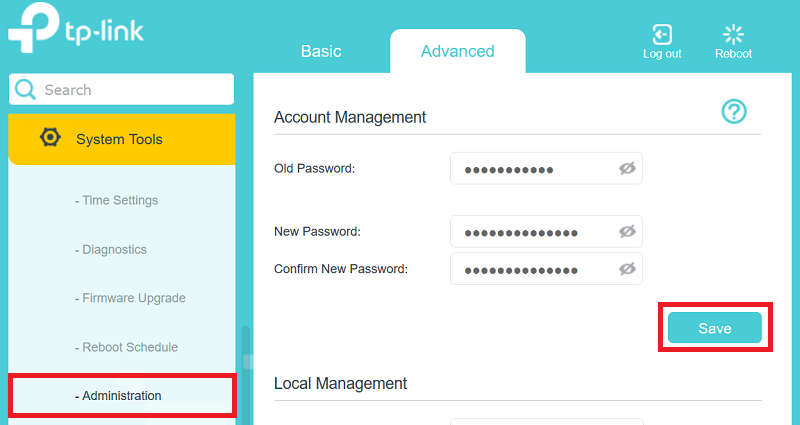
- In the left-hand column, select System Tools, then Administration.
- Under "Account Mangement", enter the Old Password. You can then enter the desired password into the New Password and Confirm New Password boxes below (passwords must match). You can click the eye icon in the text boxes to hide/show the characters as needed.
- Click the Save button to finish.
- From now on, you'll need to use your new custom username and/or password whenever logging in at http://192.168.1.1/. We recommend writing these details down and keeping them somewhere safe for future reference.
VX220-G2V Modem
- On a device that’s connected to your modem via Ethernet or WiFi, open your web browser and go to http://192.168.1.1
- Log in with the unique default password found on your modem's barcode sticker, or use your custom password.
- Click Advanced.
- In the left-hand column, select System Tools, then Administration.
- Under "Account Mangement", enter the Old Password. You can then enter the desired password into the New Password and Confirm New Password boxes below (passwords must match). You can click the eye icon in the text boxes to hide/show the characters as needed.
- Click the Save button to finish.
- From now on, you'll need to use your new custom username and/or password whenever logging in at http://192.168.1.1/. We recommend writing these details down and keeping them somewhere safe for future reference.
VX420-G2V Modem
- Open your web browser and go to http://192.168.1.1
- Log in with the default password "admin", or use your custom password.
- Click Advanced.
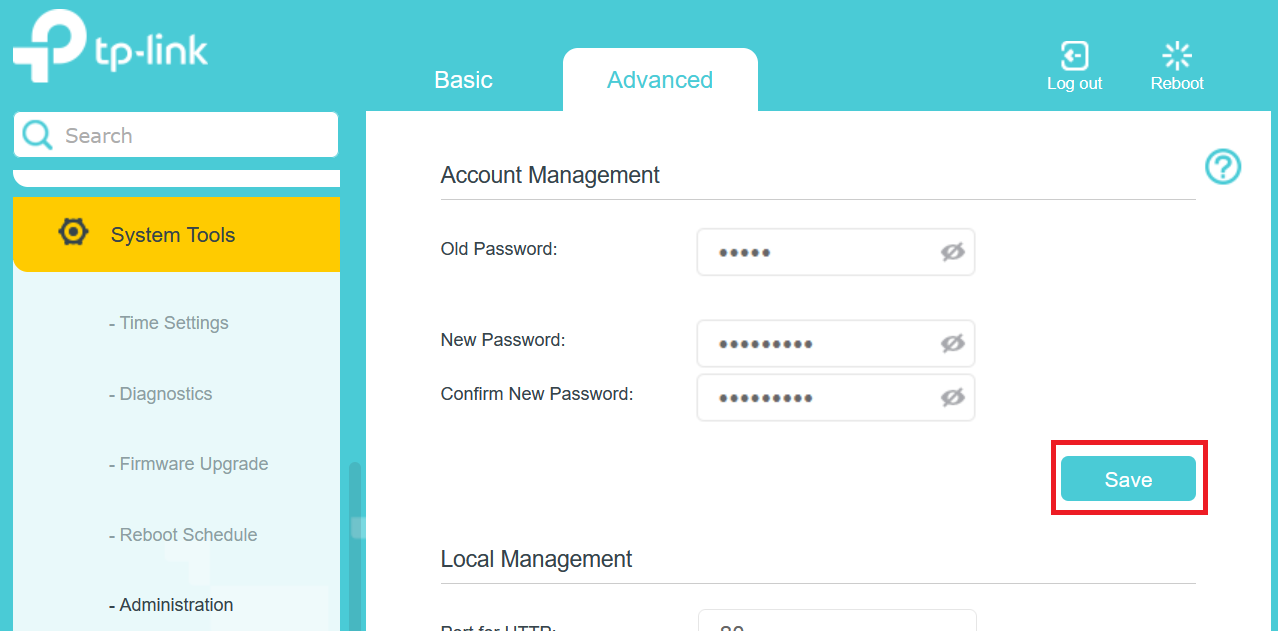
- In the left-hand column, select System Tools, then Administration.
- Under "Account Mangement", enter the Old Password. You can then enter the desired password into the New Password and Confirm New Password boxes below (passwords must match). You can click the eye icon in the text boxes to hide/show the characters as needed.
- Click the Save button to finish.
- From now on, you'll need to use your new custom username and/or password whenever logging in at http://192.168.1.1/. We recommend writing these details down and keeping them somewhere safe for future reference.
Sagemcom 5866
- On a device that’s connected to your modem via Ethernet or WiFi, open your web browser and go to http://192.168.1.1
- Log in with the default username “admin” and the unique default password on your modem's barcode sticker, or use your custom credentials.
- Select Access Control.
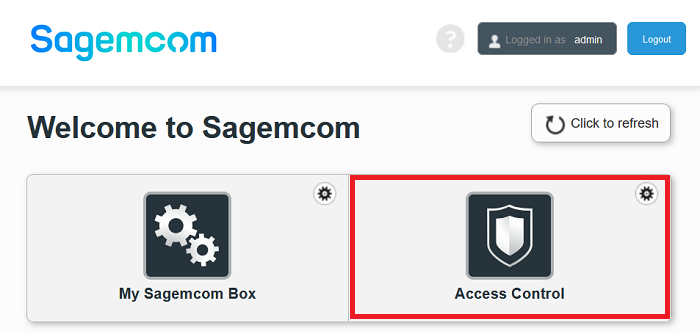
- Select User.
- Enter the Old Password.
- Enter the desired password into the New Password and Confirm New Password boxes (passwords must match). You can tick Show Password to hide/show the characters as needed.
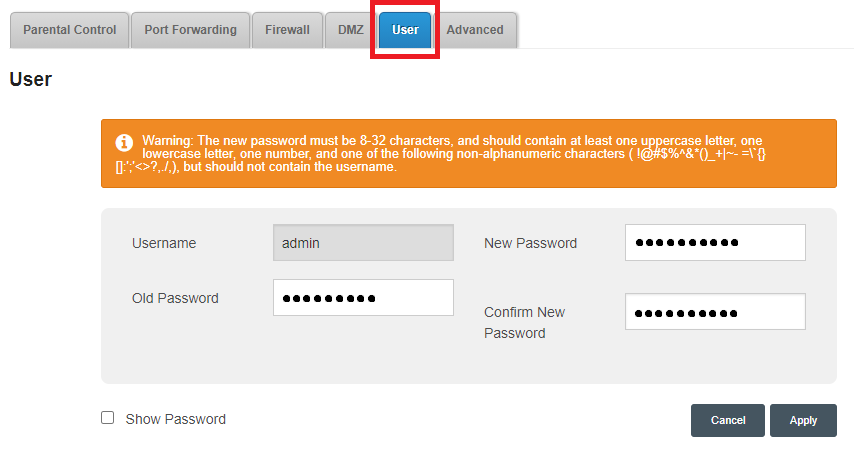
- Click Apply to finish.
- From now on, you'll need to use your new custom password whenever logging in at http://192.168.1.1/. We recommend writing this down and keeping it somewhere safe for future reference.
Nokia FastMile 5G Modem
- Open your web browser and go to http://192.168.1.254
- Log in with the default username “userAdmin” and the unique default password on your modem's barcode sticker, or use your custom password.
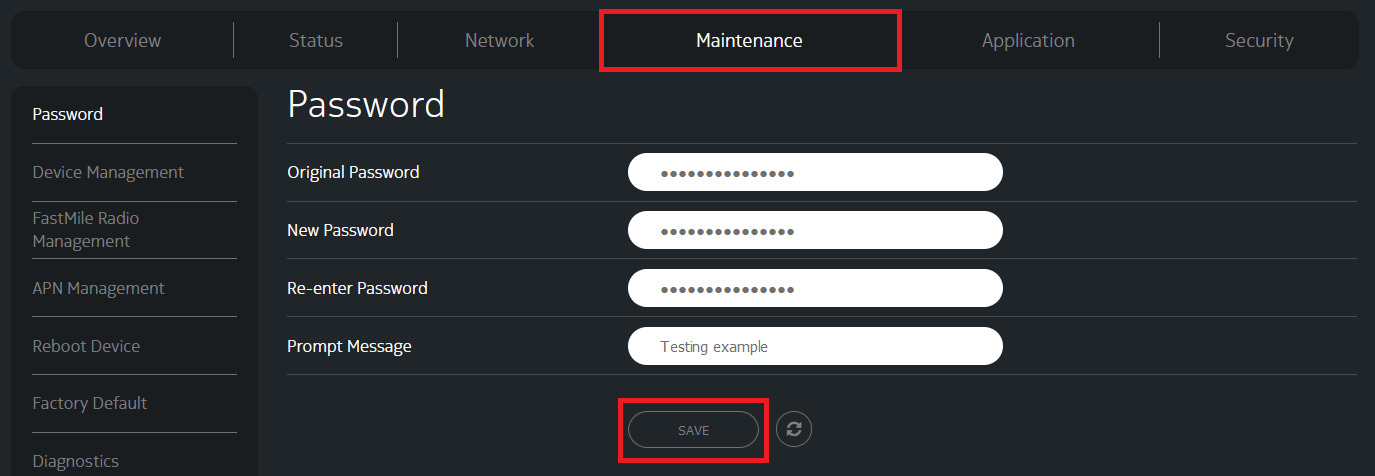
- Select Maintenance.
- On the "Password" page, enter the Original Password.
- Enter the desired password in the New Password and Re-enter Password boxes (passwords must match).
Optional: You can set a Prompt Message that will be shown on the login screen. For example, you may wish to set your password to be the answer to a question that only you would know. Make sure that your Prompt Message will not give unauthorised persons enough information to guess your password. - Click Save to finish.
- From now on, you'll need to use your new custom password whenever logging in at http://192.168.1.254/. We recommend writing this down and keeping it somewhere safe for future reference.
TP-Link VR1600v
- Open your web browser and go to http://192.168.1.1
- Log in with the default username and password, which are both "admin". If you have changed your username/password from the defaults, use your custom login details instead.
- Click Advanced.
- In the left-hand column, select System Tools, then Administration.
- Under "Account Mangement", enter the Old User Name and Old Password. You can then enter the desired New User Name and New Password into the boxes below. You'll need to type your new password again in the Confirm New Password box and make sure they match. You can click the eye icon in the text boxes to hide/show the characters as needed.
- Click the Save button to finish.
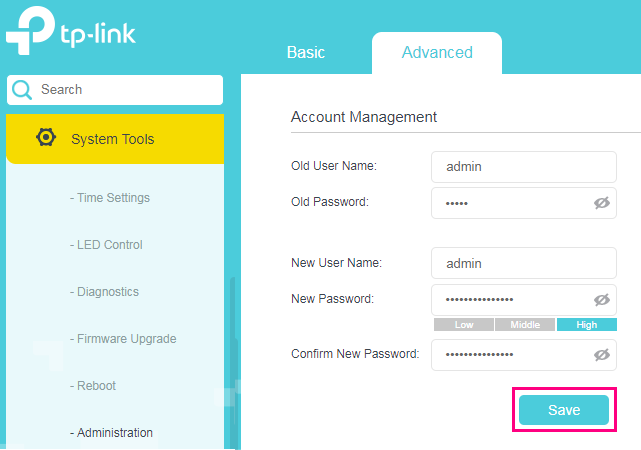
- From now on, you'll need to use your new custom username and/or password whenever logging in at http://192.168.1.1/. We recommend writing these details down and keeping them somewhere safe for future reference.
TG-789 Broadband Gateway
- Open your web browser and go to http://10.1.1.1
- Log in with the default username "password" and default password “admin”. If you have changed these details from the default, use your custom login details instead.
- Click the Management panel on the dashboard.
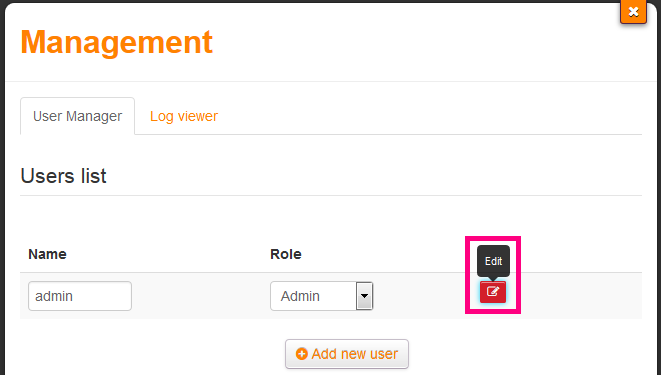
- Under Users list, click tht Edit button to the right of the existing Admin entry.
Note: While it is possible to add additional admin users with their own usernames and passwords, we recommend having just one in order to keep track of your home network security more easily.
- Under Change password, enter your desired new password in the first box and then repeat the same password in the second box.

- Click the Apply button to finish.
- From now on, you'll need to use your new custom username and/or password whenever logging in at http://10.1.1.1/. We recommend writing these details down and keeping them somewhere safe for future reference.
Cable Gateway Pro (CG3000)
- Open your web browser and go to http://192.168.0.1
- Log in with the username "admin" and the unique default password found on your modem's barcode sticker, or use your custom password.
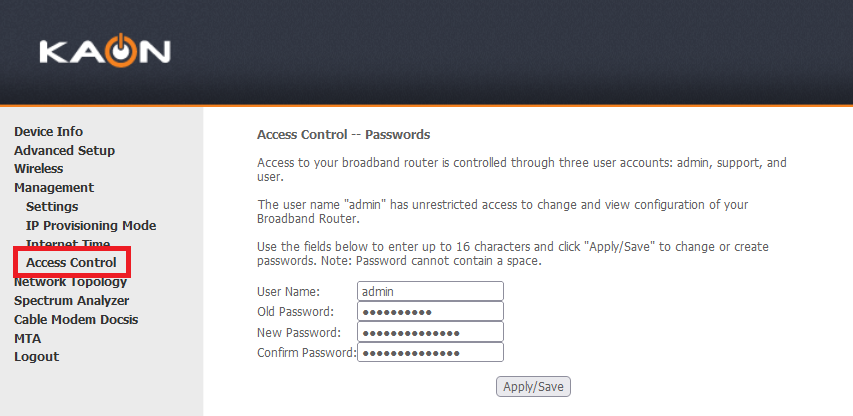
- Select Management, then Access Control.
- For Username, enter "admin". Please note that it is not possible to customise the admin username on this modem.
- Enter the Old Password.
- Enter your desired password in both the New Password and Confirm Password fields, then click Apply/Save to finish.
- From now on, you'll need to use your new custom admin password whenever logging in at http://192.168.0.1/. We recommend writing these login details down and keeping them somewhere safe for future reference.
Cable Gateway Pro (CG2200)
- Open your web browser and go to http://192.168.0.1
- Log in with the default username "admin" and default password “password”. If you have changed these details from the default, use your custom login details instead.
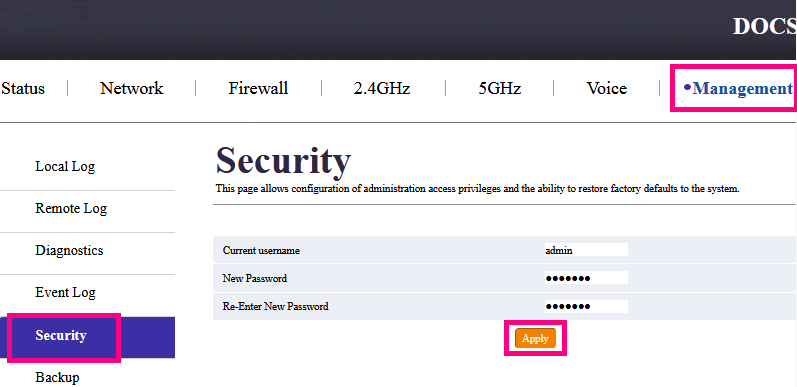
- Click Management in the top menu bar.
- Select Security.
- Adjust the Current username as desired, then enter and re-enter the New Password and click Apply to finish.
- From now on, you'll need to use your new custom username and/or password whenever logging in at http://192.168.0.1/. We recommend writing these details down and keeping them somewhere safe for future reference.
Cable Gateway Pro (EPC3940L)
- Open your web browser and go to http://192.168.0.1
- Log in with the default username "admin" and default password “password”. If you have changed these details from the default, use your custom login details instead.
- Click Advanced in the top menu bar.
- Select Administration > Change password.
- Enter your new username and/or password as desired, then click Save Settings to finish.
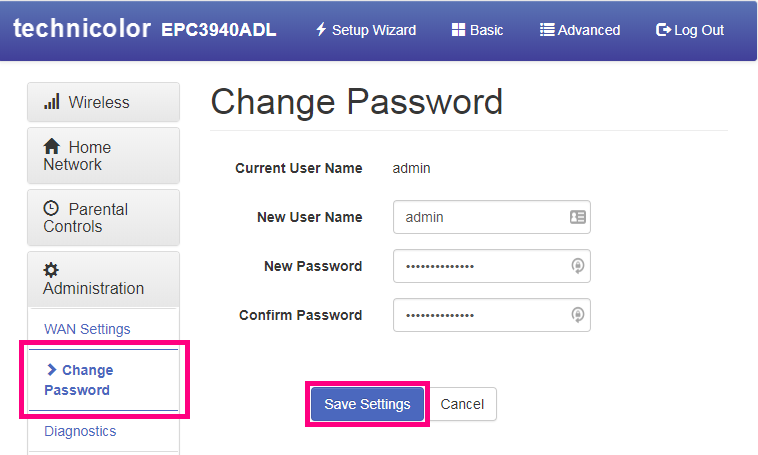
- From now on, you'll need to use your new custom username and/or password whenever logging in at http://192.168.0.1/. We recommend writing these details down and keeping them somewhere safe for future reference.
Important: The model of modem shipped under this offer may change without notice based on stock levels and other factors. The modem we send you will always be suitable for your selected plan.
NBN® plans
NBN® services include NBN® FTTP, FTTB, FTTN, HFC, Wireless and Satellite.
 |
Smart Modem Gateway (VX420-G2H)
|
|
|
VX220-G2V Modem
|
Home Wireless Broadband plans
|
|
Smart Modem Gateway (VX420-G2H)
|
5G Home Broadband plans
 |
Nokia FastMile 3.2 5G Modem (Supplied from 29 March 2023)
|
 |
Sagemcom 5866 5G Modem
|
ULTRA Broadband Cable plans
 |
Cable Gateway Pro CG3000
|
ULTRA Broadband FTTB or VDSL2 plans
 |
VX420-G2V Modem
|
FTTH (OptiComm/RedTrain) plans
 |
VX220-G2V Modem
|
If your modem is a non-iiNet-supplied modem, please see Non-iiNet Modem Setup Guides.
Select your modem

Note: If you have an old modem that you don't want to keep, please consider eWaste recycling facilities that may be offered by your local council.
Nokia FastMile 3.2 5G Modem
More guides
Smart Modem Gateway (VX420-G2H)
Please select your broadband technology. This should be mentioned in any emails from us about your broadband order.
- Set up Home Wireless Broadband
- Set up nbn FTTP
- Set up nbn FTTC
- Set up nbn FTTN/B
- Set up nbn HFC
- Set up nbn Fixed Wireless
- Set up nbn Satellite
- Set up ULTRA FTTB
- Set up ULTRA VDSL2
- Set up FTTH (OptiComm/RedTrain)
More guides
VX220-G2V Modem
Please select your broadband technology. This should be mentioned in any emails from us about your broadband order.
- Set up nbn FTTP
- Set up nbn FTTC
- Set up nbn FTTB/N
- Set up nbn HFC
- Set up nbn Fixed Wireless
- Set up nbn Satellite
- Set up ULTRA FTTB
- Set up ULTRA VDSL2
- Set up FTTH (OptiComm/RedTrain)
More guides
VX420-G2V Modem
Please select your broadband technology. This should be mentioned in any emails from us about your broadband order.
- Set up nbn FTTP
- Set up nbn FTTC
- Set up nbn FTTN/B
- Set up nbn HFC
- Set up nbn Fixed Wireless
- Set up nbn Satellite
- Set up ULTRA FTTB
- Set up ULTRA VDSL2
- Set up FTTH (OptiComm/RedTrain)
More guides
Sagemcom 5866 5G Modem
More guides
Nokia FastMile R1 5G Modem
More guides
TP-Link VR1600v Modem
Please select your broadband technology. This should be mentioned in any emails from us about your broadband order.
- Set up nbn FTTP
- Set up nbn FTTC
- Set up nbn FTTN/B
- Set up nbn HFC
- Set up nbn Fixed Wireless
- Set up nbn Satellite
- Set up ULTRA FTTB
- Set up ULTRA VDSL2
- Set up FTTH (OptiComm/RedTrain)
More guides
- Factory reset modem
- Change WiFi password
- Change modem password
- Modem status lights
- TP-Link Download Centre
- Note: WPS is disabled by default. It can be manually enabled by logging into the modem settings at http://192.168.1.1 and selecting Advanced > Wireless > Advanced Settings, then tick Enable for WPS and Save.
Cable Gateway Pro (CG2200 & CG3000)
More guides
We may provide an interim Mobile Broadband solution when an nbn connection or fault is delayed by more than 3 days.
Select your modem to get started:
|
 |
Pocket WiFi® 4 |
Pocket WiFi® 4
Setup
- Insert the SIM into the slot with its chip side facing down and the notched side facing out.
- Use the supplied power cable to connect the Pocket WiFi® 4 to an electrical socket. You’ll see a charge indicator on the screen.
- Once fully charged, press and hold the Power button on the side of the Pocket WiFi®4 4G until it lights up.
Note: The device automatically searches for the mobile network after it is powered on and the LED signal light will turn white. - Connect the Pocket WiFi® 4 to your devices to access the Internet. Refer to the Reminder Card in the box or remove the back cover to view the default Wi-Fi name (SSID) and password (WIFI KEY).
Note: You can also connect a computer to the Pocket WiFi® 4 using the Micro USB cable included. You’d be using a Local Area Network (LAN), instead of Wi-Fi, so it should automatically connect.

Changing the WiFi name and password
- On a device that's connected to your Pocket WiFi®4, open your web browser and go to https://pocket.wifi or https://192.168.0.1.
Note: If you’re connected to the Pocket WiFi® 4 using the Micro USB cable from your PC, you can also open the dashboard by clicking on the shortcut icon on your desktop. - Log in with the default password “admin”, or use your custom password.
Note: If you’ve changed the admin password but don’t remember it, you can reset it by factory resetting the device. - From the Pocket WiFi tab, select Wi-Fi and then click Security.
- Enter your desired network name in the SSID field.
- Enter your desired new password in the Key field.
- Hit Save to finish.
Troubleshooting
Unable to connect to the Internet
- Check that your Pocket WiFi® 4 is turned on and has sufficient charge
Press the Power button on your Pocket WiFi. If indicators light up, your Pocket WiFi®4 is in sleep mode. If there is no response after you press the Power button, your device is powered off. Press and hold the Power button to power it back on.
- Restart the Pocket WiFi® 4
Turn the Pocket WiFi off and on and then try reconnecting your device. If this doesn’t work, turn the device you’re trying to connect off and back on and then try reconnecting to the Wi-Fi signal.
- Check the number of connected devices
The Pocket WiFi® 4 can handle up to 10 connected devices.
Coverage
Check the status display on your Pocket WiFi® 4 to see how many bars of coverage you're getting. If you’re inside a building and receiving poor coverage, try placing the Pocket WiFi near a window.
If the Pocket WiFi® 4 constantly jumps between 3G and 4G, you can change the network preference:
- Open your web browser and go to https://pocket.wifi or https://192.168.0.1.
Note: If you’re connected to the Pocket WiFi®4 using the Micro USB cable from your PC, you can also open the dashboard by clicking on the shortcut icon on your desktop. - Log in with the default password “admin”, or use your custom password.
- From the Pocket WiFi tab, select Mobile Broadband and then click Network.
- Select an option from the network settings window and press Save.
Factory reset your Pocket WiFi® 4
This is recommended as a last resort.
- While the Pocket WiFi® 4 is on, take off the back cover and find the reset button.
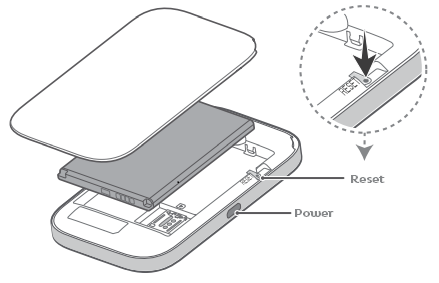
- Using a pen or paper clip, press the rest button and hold it down for 5 seconds, until it restarts.
- Replace the battery cover. Once the device restarts, it will be restored to factory settings, including the WiFi network name (SSID) and password (Wi-Fi Key).
Creating a backup of your mailbox is required when migrating your hosted email services.
Exporting a backup
- Open the Mac Mail app.
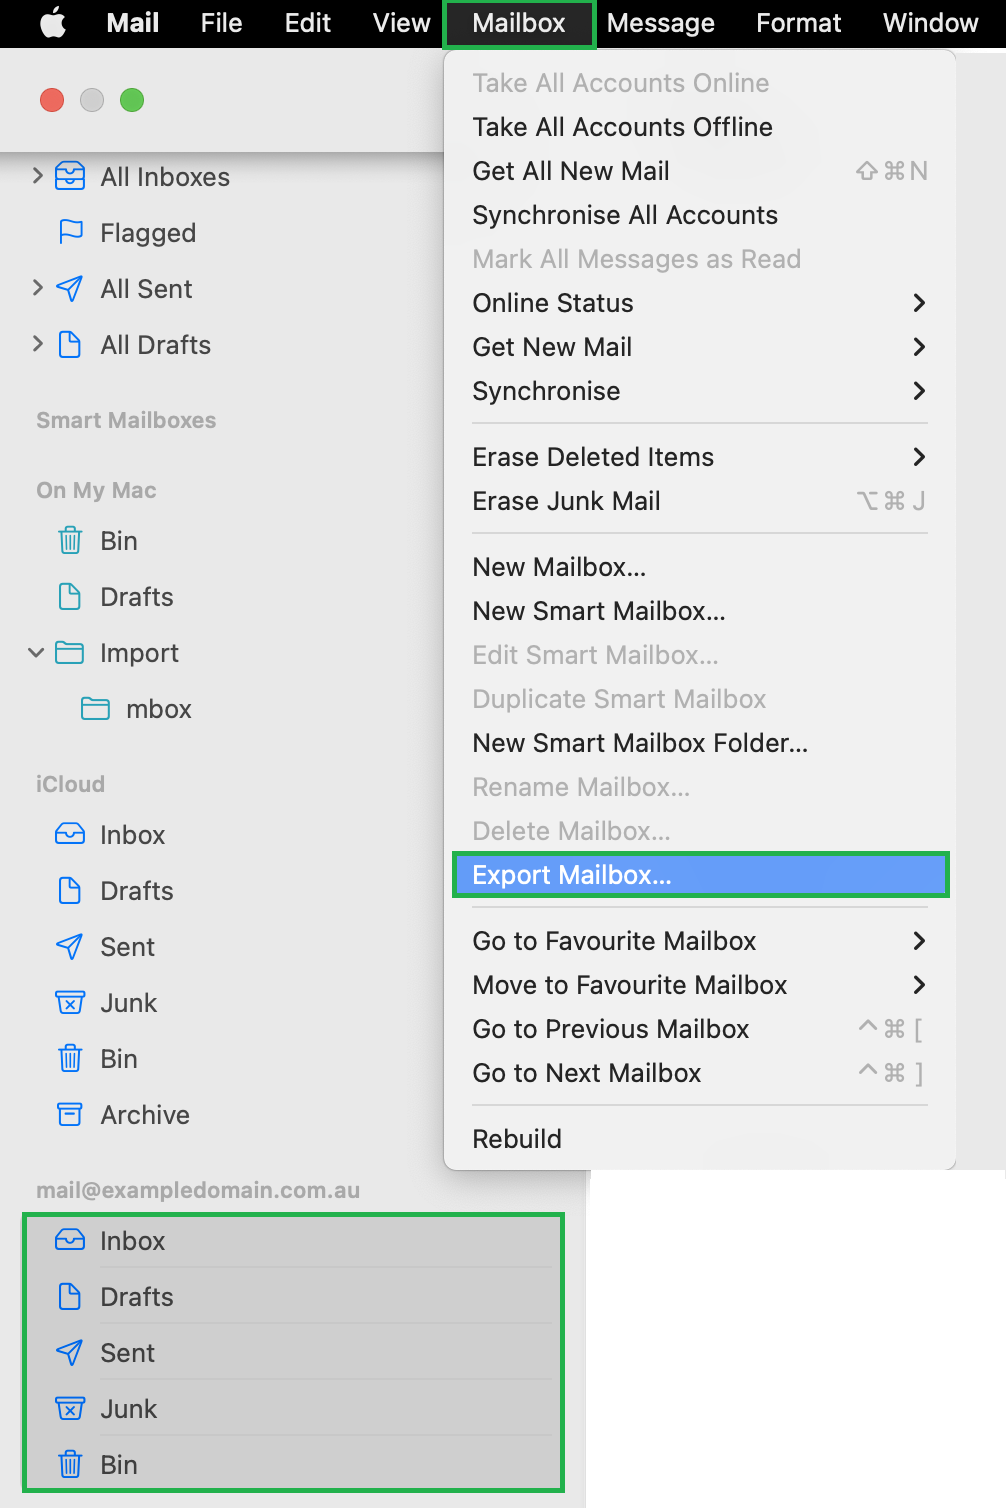
- Select the contents of the mailbox by clicking on the top folder, holding down the Shift key, then clicking on the bottom folder.
- While these folders are selected, hit Mailbox > Export Mailbox in the top menu bar.
- Choose or create a destination folder to save your backup, then click Choose.
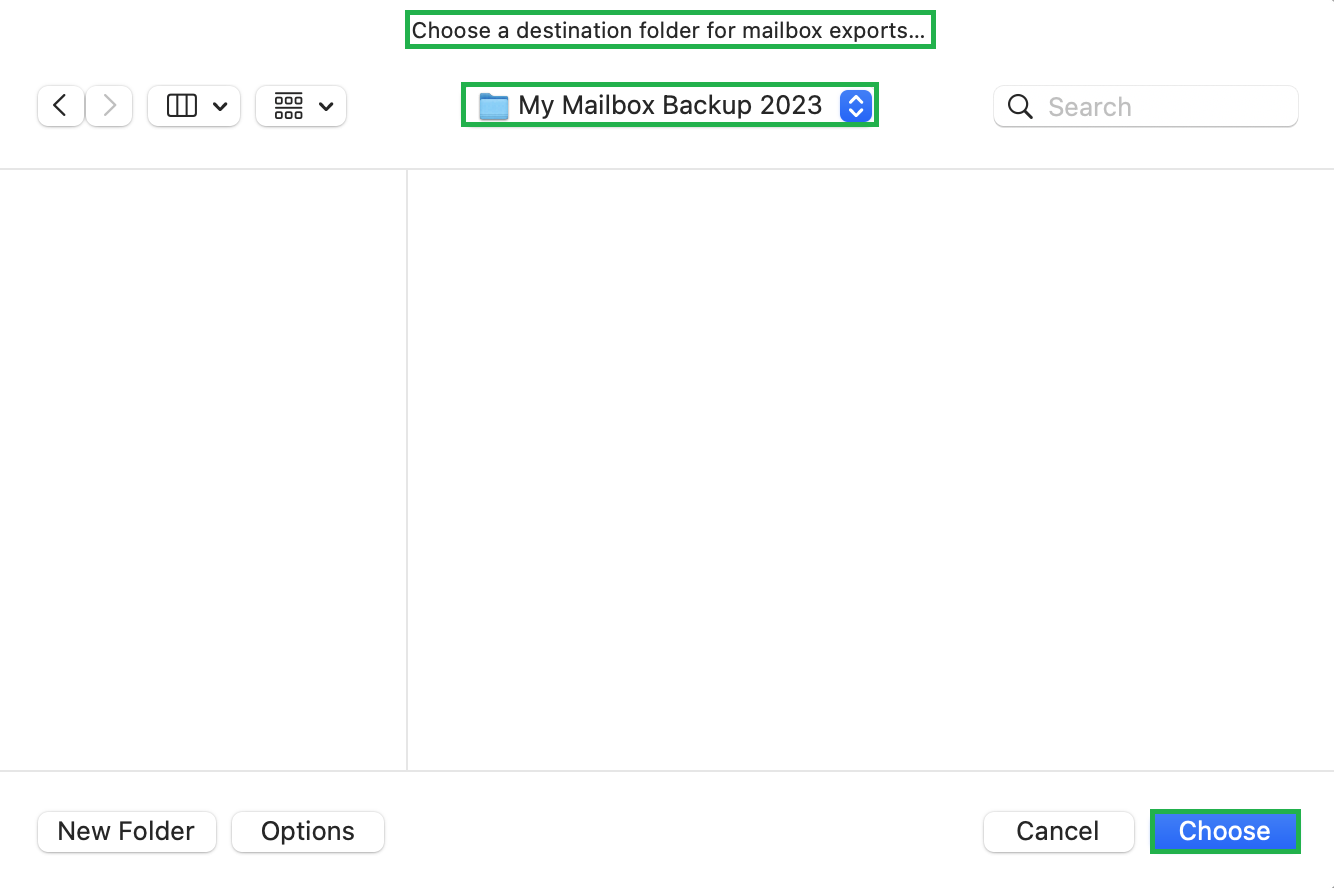
- Mail exports the mailboxes as .mbox packages. If you have previously exported a mailbox, Mail won’t overwrite the existing .mbox file. Instead, it will create a new .mbox file, e.g. “My Mailbox 2.mbox.”
- Mail won’t notify you when the backup is completed. For larger mailboxes, it’s best to leave the program running overnight to ensure all data is exported.
Once your backup is exported, we recommend that you import the backup to ensure it contains all of your files and folders. Once you have done this, it’s safe to remove the existing version of the mailbox and replace it with the details from your new email host.
Importing your backup
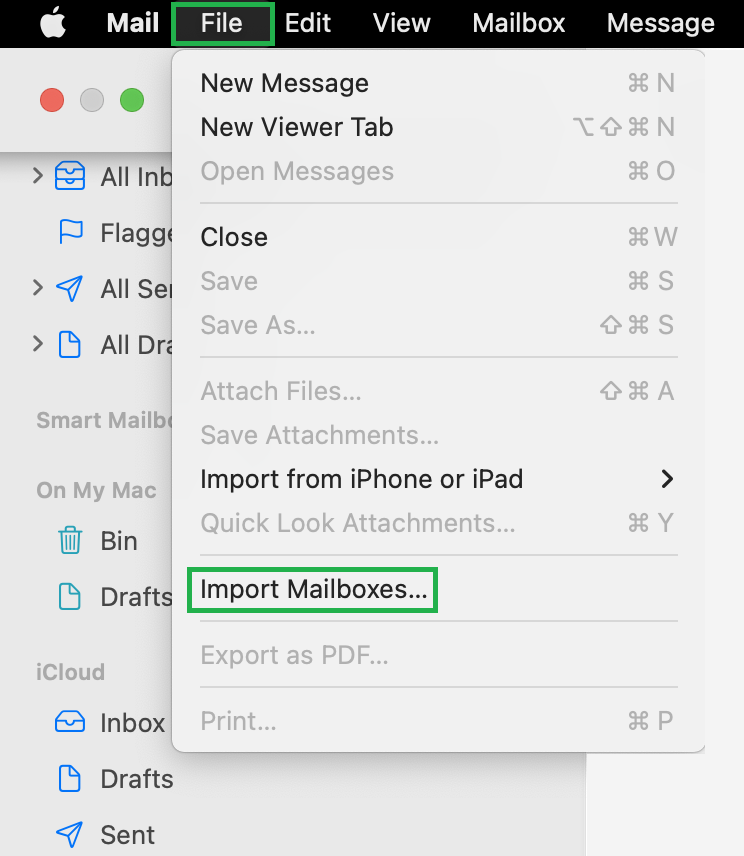
- To import the backup, select File > Import Mailboxes.
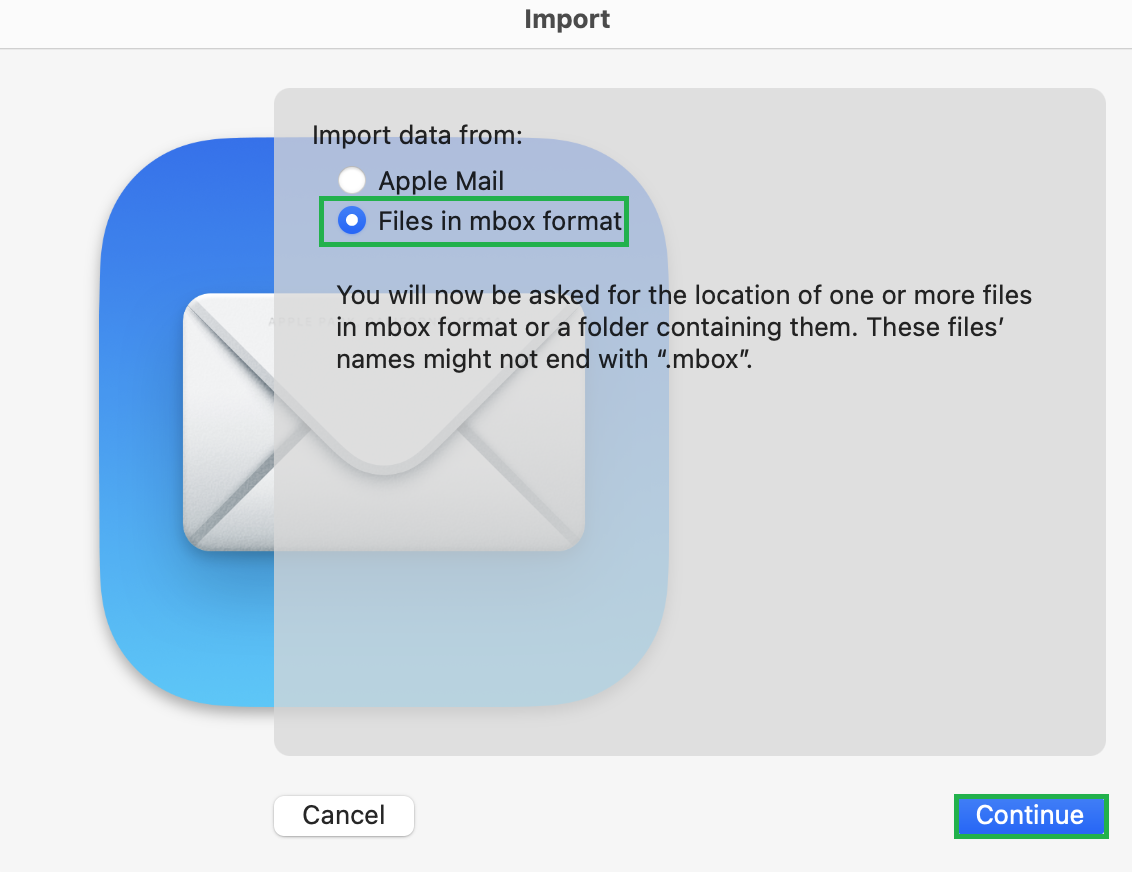
- Select Files in mbox format and click Continue.
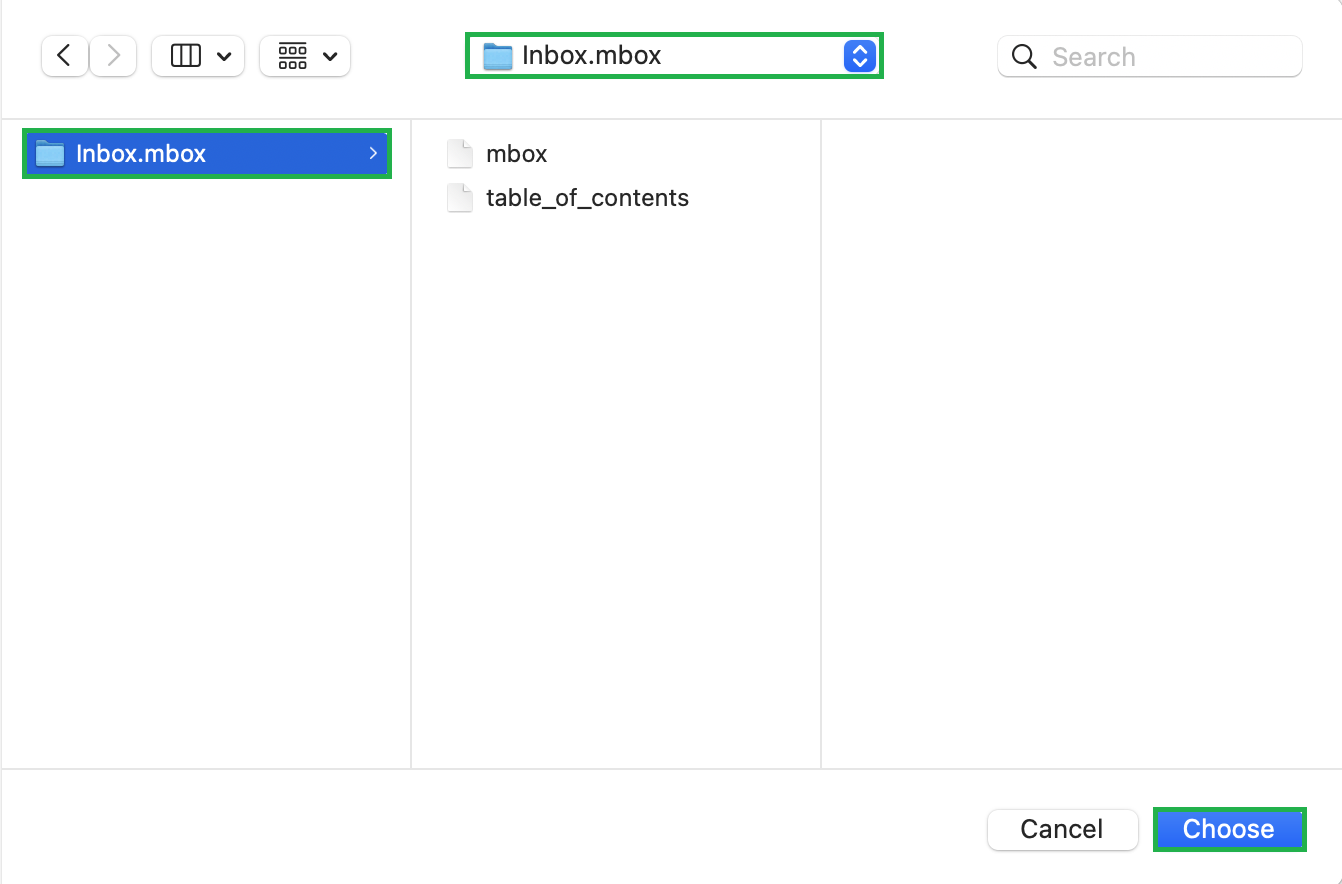
- Select the folder containing your exported backup, then click Choose.
- Once the import has completed, click Done.
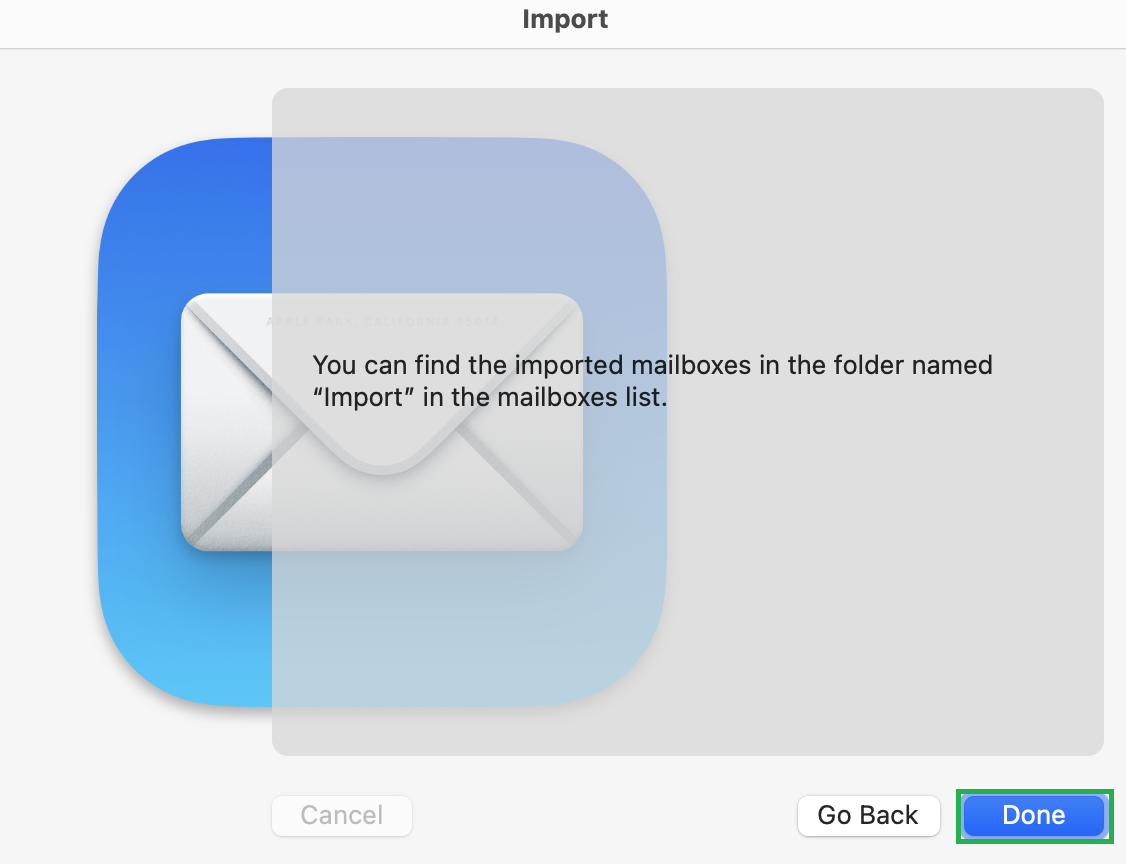
- The imported data will be available under On My Mac in the Import folder. You can now drag folders and messages from the import mailbox to new or existing mailboxes, then delete the Import mailbox.
For more help with Mac Mail, please visit Apple Support.
Emergency calls should be used to request help from an emergency service organisation in a life threatening and/or time critical event.
If you’re considering making an emergency call, stay focused, stay relevant and pose these questions to yourself.
- Is someone seriously injured or in need of urgent medical help?
- Is your life or property being threatened?
- Have you just witnessed a serious accident or crime?
If yes, then call triple zero (000). Triple zero calls are free.
You’ll be asked whether you want to speak with:
- Police
- Fire
- Ambulance
Stay calm, don't shout, speak slowly and clearly. Tell them exactly where to go — give an address or location.
Select one of the links below to jump to a query:
Other emergency numbers
Text Emergency Call - 106 text emergency call. You can call from teletypewriters. Tell us which service you need and where to come to.
Storm and flood assistance – call 132 500
Fire – other than in an emergency, contact your state or territory service.
Emergencyplus – Download and read about the emergencyplus application.
Police – call 131 444 for police other than in an emergency
Crime Stoppers – call 1800 333 000 to help solve a crime
Poisons Information Centre – call 13 11 26
There's more information about emergency calls on the federal government's triple zero website.
Advances in technology have improved the range of accessible services for people who are deaf, hard of hearing or have a speech impairment. For more information, check out Access Hub.
If you dial 112 while you're in a coverage area overseas, you'll be connected to the emergency service for that country. You can also check Smartraveller for details on the country you are visiting too, as they will have their own Emergency Service Numbers.
In Australia emergency calls to Triple Zero can be made with or without an active SIM in your phone.
If your phone does not have access to the iiNet network you may still be able to make an emergency call on another mobile network, which is why you may see 'Emergency calls only' or similar on the screen.
Emergency calls can be made wherever your phone can see any mobile telecommunications network, however if you are travelling in a rural or remote area you should not rely upon your mobile phone to make an emergency call as there may be no mobile telecommunications network available, instead you should have other means of communications such as a satellite phone and for emergencies, carry an emergency beacon.
When calling an emergency call number, information such as your number, name and service location (where available) will be disclosed to the emergency call person (the operator) and the emergency service organisations, regardless of your caller ID settings.
Using a device other than an approved device may impact your ability to call emergency services.
Location information
Location information is critical in providing emergency services to provide the necessary service. In particular, the ability to provide enhanced location information is important where the caller may be unable to identify their location.
In the event of making an emergency call we will supply relevant location information to the emergency call person and the relevant emergency service organisation (police, fire or ambulance) to enable them to corroborate your location. We use a range of technical solutions to do this and they are constantly being reviewed and improved.
These include:
- Push Mobile Location Information (MoLI). MoLI is the location of the cell site from which a mobile call to Triple Zero is made. This is supplied to emergency services for all emergency calls.
- Advanced Mobile Location (AML). AML is technology that allows mobile devices to send a location estimate when a call is made to Triple Zero. This improved outcomes for mobile callers in Australia and has the potential to save lives, as it is doing in the countries in which it has already been deployed.
For more information about AML, head to the federal government's triple zero website.
What is costs
There is no charge for calls made to emergency services regardless of whether your service is active or inactive.
This article will explain the status lights found on the Nokia FastMile 3.2 5G Modem, which may be useful during setup and troubleshooting.
This modem was supplied from March 2023 onwards.
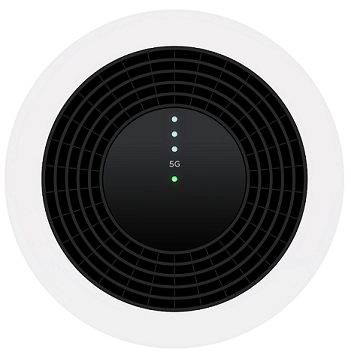
The circular LED panel is located on the top of the modem.
| Light | State | Meaning | |
| Centre | Off | Modem is turned off. | |
| Green | 4G/LTE signal found. | ||
| Flashing yellow | Searching for network. | ||
| Red | No 4G/LTE signal. Reposition the modem (see ideal location). | ||
| Flashing red (slow) | SIM not detected or possible SIM error. Check the SIM is present in the SIM slot. Please call us on 13 22 58 if the SIM is missing or the issue persists. | ||
| Flashing red (fast) | Factory reset in progress. | ||
| Flashing white | WPS connection to WiFi is in progress. If the WPS connection is successfully, the LED will quickly flash 3 times. If the WPS connection fails, the LED will flash slowly for 1-2 minutes then return to a state that indicates 4G/LTE signal. | ||
| 5G | Off | No 5G signal or no active 5G traffic*. Try browsing to a website and if the light remains off, reposition the modem (see ideal location). Please call us on 13 22 58 if the issue persists. |
|
| White | 5G signal found. | ||
| Signal 3 LEDs above the 5G LED |
Off | Modem is turned off or 5G signal not detected. Reposition the modem (see ideal location). | |
| White | All 3 LEDs will illuminate when there is a very good signal, 2 LEDs means there's a good signal & 1 LED means the signal is weak. | ||
*The 5G LED may turn off when there’s no active flow of data on the network.