iiNet Modem Basic WiFi Settings
If you have a third party modem, please consult your modem's user manual or check the manufacturer's website for support information.
Select your modem:


Note: If your modem is not listed here, please refer to our Legacy Resources page.
Nokia FastMile 3.2 5G Modem
Please note: Band steering which routes your devices on 2.4GHZ and 5GHz bands, based on usage, speed, coverage and distance, is on by default. This cannot be managed in the Nokia Wifi App.
- On a device that's connected to your modem, open your web browser and go to 192.168.1.1.
- Log in with the default username “admin” and the unique default password on your modem's barcode sticker, or use your custom password.

- From the left pane, select Network.
- From the Wi-Fi Networks dropdown, select 2.4GHz.
- Make sure that Enable Wi-Fi 2.4GHz is ON.
- Make sure that Enable Single SSID and is ON.
Note: If Single SSID Broadcast is disabled, then a second 5GHz SSID with the same password will be created. Devices can then only connect to either the existing 2.4GHz SSID or the new 5GHz SSID rather than steered between the two to the strongest WiFi signal. - If you made any changes, click Save at the bottom of the page.

- Next, the same checks need to be made for the 5GHz WiFi network.
- From the Wi-Fi Networks dropdown, select 5GHz.
- Make sure that Enable Wi-Fi 5GHz is ON.
- Make sure that Enable Single SSID and is ON.
Note: If Single SSID Broadcast is disabled, then a second 5GHz SSID with the same password will be created. Devices can then only connect to either the existing 2.4GHz SSID or the new 5GHz SSID rather than steered between the two to the strongest WiFi signal. - If you made any changes, click Save at the bottom of the page.

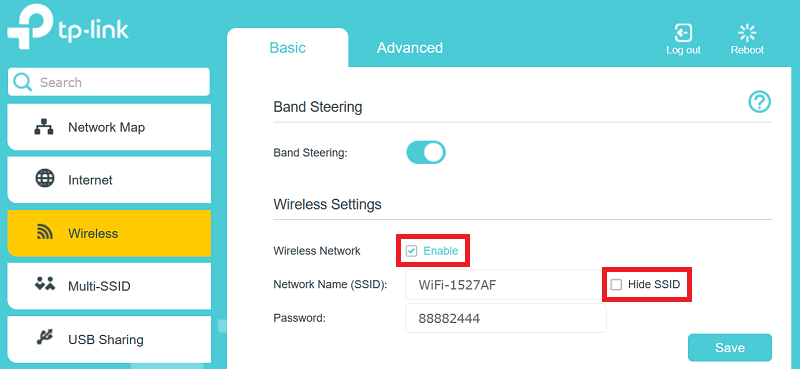
Smart Modem Gateway (VX420-G2H)
- On a device that's connected to your modem, open your web browser and go to http://192.168.1.1
- Log in with the default password “admin”, or use your custom password.
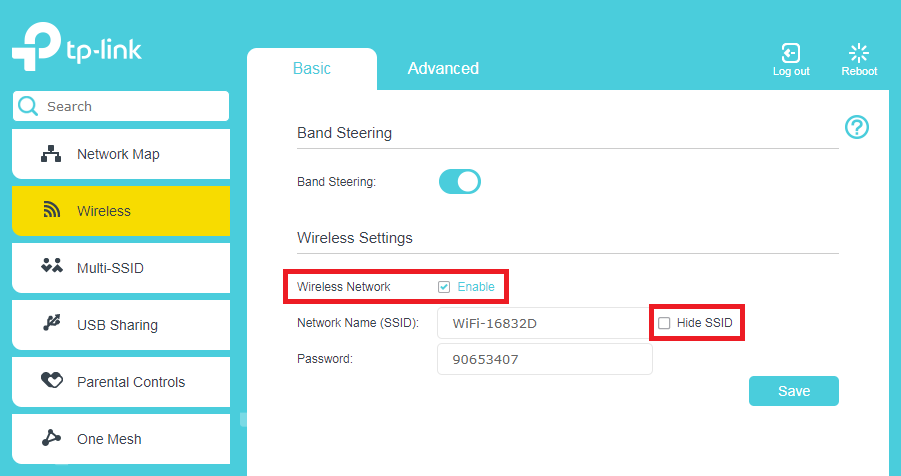
- Select Wireless.
- By default, Band Steering will be turned ON, and you'll see one set of Wireless settings which will be applied to both the 2.4GHz and 5GHz WiFi networks.
Note: If Band Steering is turned OFF, you will see separate 2.4GHz and 5GHz settings, and your devices will not automatically switch between the 5GHz/2.4GHz WiFi networks depending on the best available signal. - Make sure that Wireless Network - Enable is ticked.
- Make sure that Hide SSID is NOT ticked. If the SSID is hidden, then your WiFi network name(s) won't show up in the list of available networks when you try to connect.
- On these pages, you'll also find the WiFi Network Name (SSID) and Password.
- If you made any changes, click Save to finish.
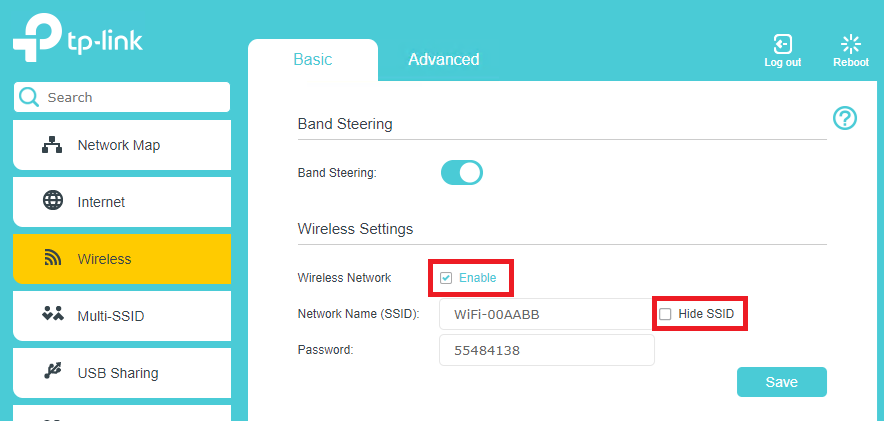
VX220-G2V Modem
- On a device that’s connected to your modem via Ethernet or WiFi, open your web browser and go to http://192.168.1.1
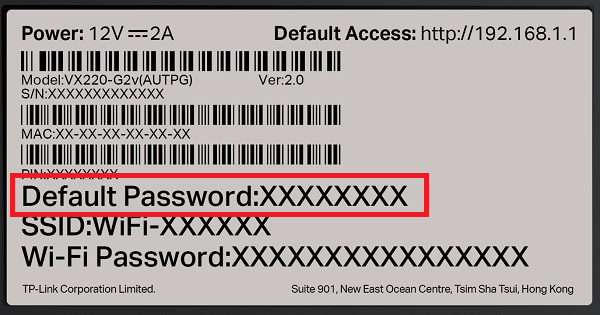
- Log in with the unique default password found on your modem's barcode sticker, or use your custom password.
- Select Wireless.
- By default, Band Steering will be turned ON, and you'll see one set of Wireless settings which will be applied to both the 2.4GHz and 5GHz WiFi networks.
Note: If Band Steering is turned OFF, you will see separate 2.4GHz and 5GHz settings, and your devices will not automatically switch between the 5GHz/2.4GHz WiFi networks depending on the best available signal. - Make sure that Wireless Network - Enable is ticked.
- Make sure that Hide SSID is NOT ticked. If the SSID is hidden, then your WiFi network name(s) won't show up in the list of available networks when you try to connect.
- On these pages, you'll also find the WiFi Network Name (SSID) and Password.
- If you made any changes, click Save to finish.
VX420-G2V Modem
- On a device that's connected to your modem, open your web browser and go to http://192.168.1.1
- Log in with the default password “admin”, or use your custom password.
- Select Wireless.
- By default, Band Steering will be turned ON, and you'll see one set of Wireless settings which will be applied to both the 2.4GHz and 5GHz WiFi networks.
Note: If Band Steering is turned OFF, you will see separate 2.4GHz and 5GHz settings, and your devices will not automatically switch between the 5GHz/2.4GHz WiFi networks depending on the best available signal. - Make sure that Wireless Network - Enable is ticked.
- Make sure that Hide SSID is NOT ticked. If the SSID is hidden, then your WiFi network name(s) won't show up in the list of available networks when you try to connect.
- On these pages, you'll also find the WiFi Network Name (SSID) and Password.
- If you made any changes, click Save to finish.
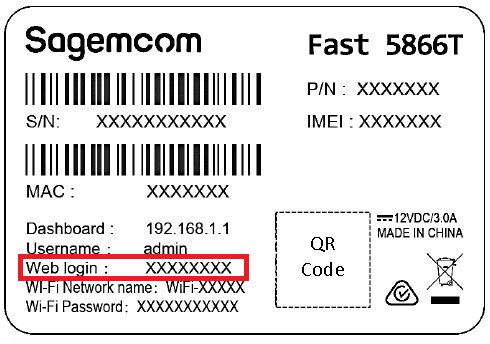
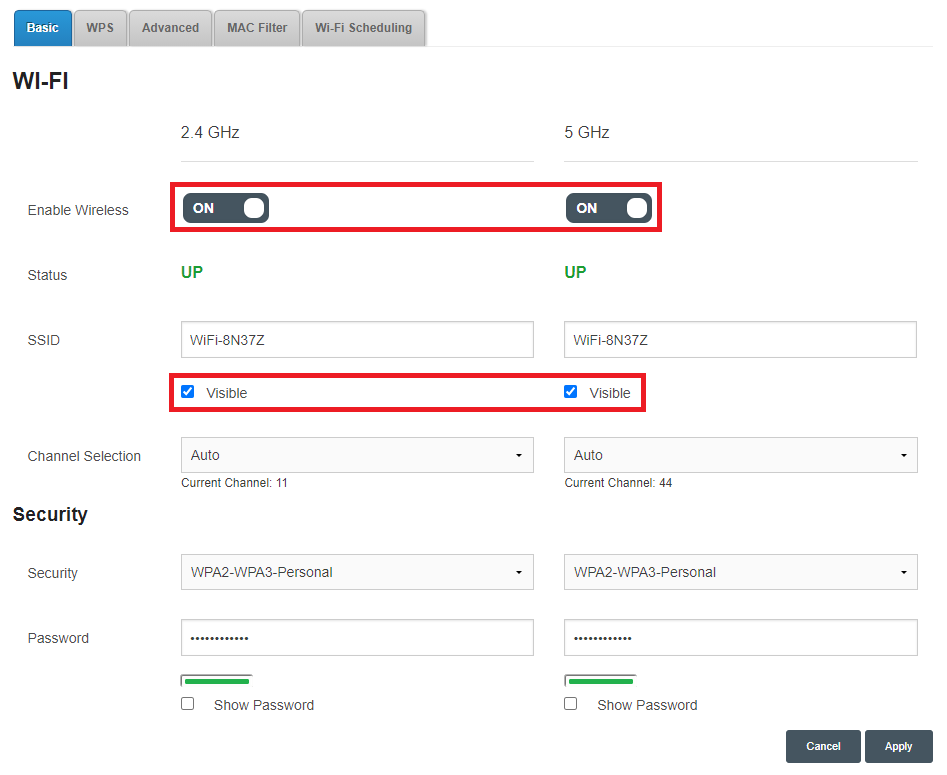
Sagemcom 5866
- On a device that’s connected to your modem via Ethernet or WiFi, open your web browser and go to http://192.168.1.1
- Log in with the default username “admin” and the unique default password on your modem's barcode sticker, or use your custom credentials.
- Select the cog icon on the Wi-Fi 2.4GHz or 5GHz panel.
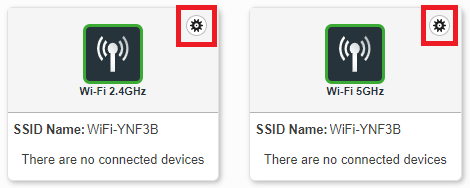
- Make sure that Enable Wireless is set to ON for both the 2.4GHz and 5GHz WiFi networks.
- Make sure that Visible is ticked. If this box is NOT ticked, then the SSID will be hidden and your WiFi network name(s) won't show up in the list of available networks when you try to connect.
- On this page, you'll also find the WiFi Network Name (SSID) and Password.
- If you made any changes, click Apply to finish.
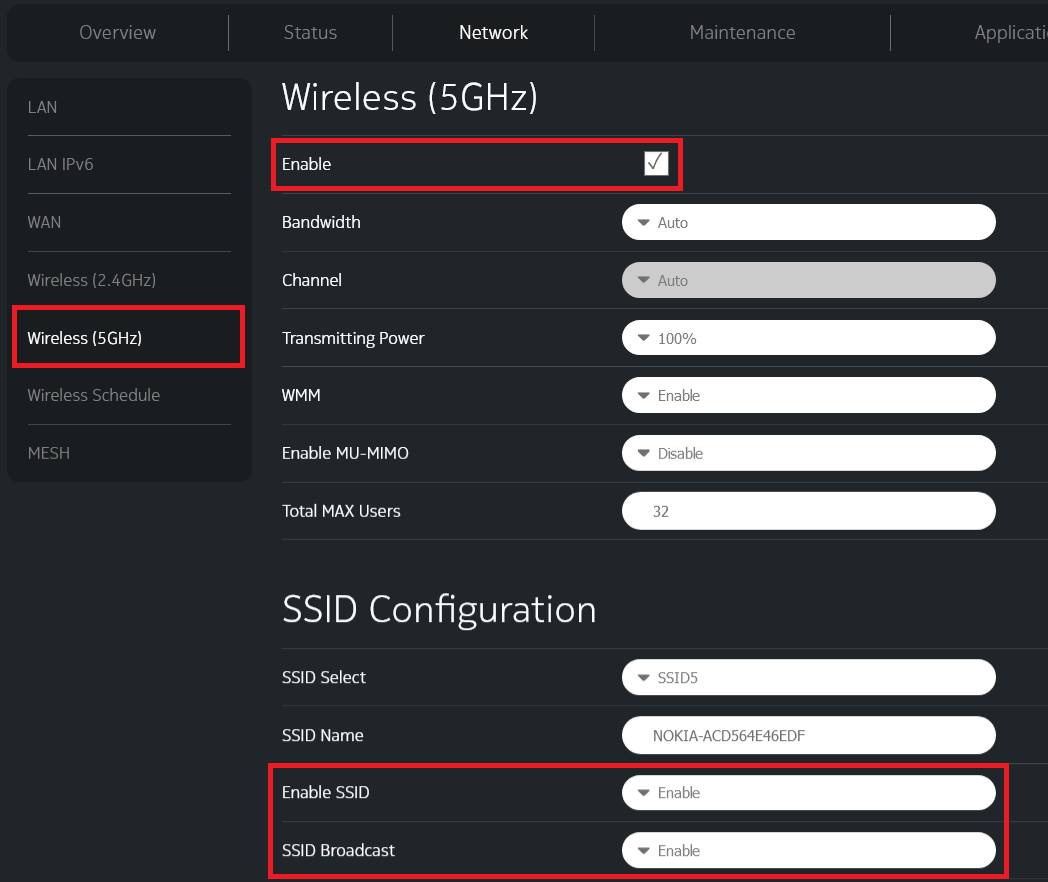
Nokia FastMile 5G Modem
- On a device that's connected to your modem, open your web browser and go to http://192.168.1.254
- Log in with the default username “userAdmin” and the unique default password on your modem's barcode sticker, or use your custom password.

- Select Network.
- Select Wireless (2.4GHz).
- Make sure that Enable is ticked.
- Make sure that Enable SSID and SSID Broadcast are both set to Enable. If SSID Broadcast is disabled, then your WiFi network name won't show up in the list of available networks when you try to connect.
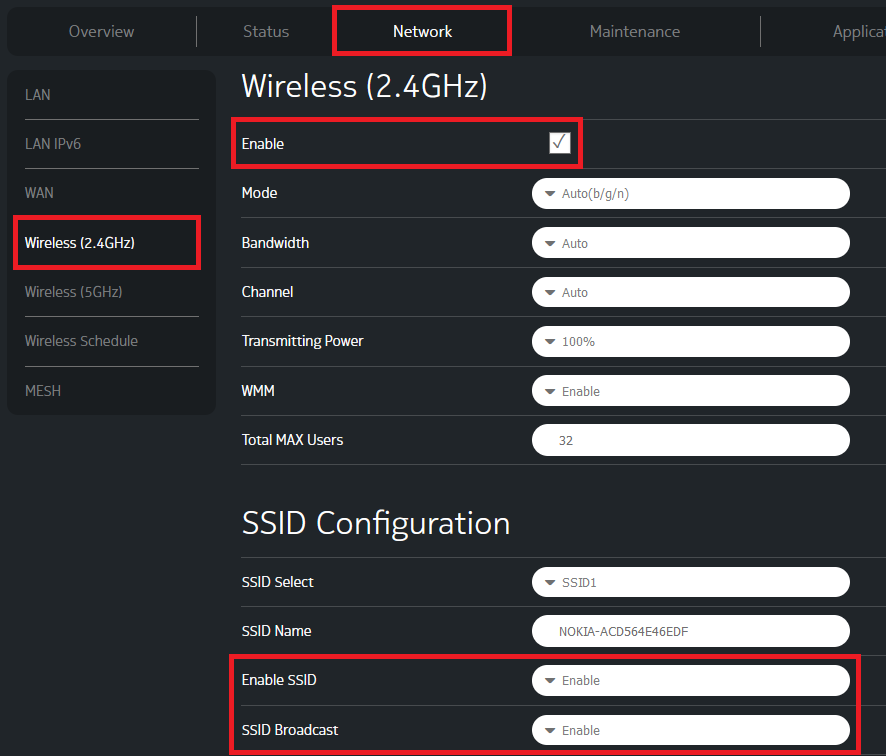
- If you made any changes, click Save at the bottom of the page.
- Next, the same checks need to be made for the 5GHz WiFi network. Select Wireless (5GHz).
- Make sure that Enable is ticked.
- Make sure that Enable SSID and SSID Broadcast are both set to Enable.
- Note: On both the Wireless 2.4GHz and 5GHz pages, you'll also find the WiFi Network Name (SSID Name) and Password (WPA Key). If making any changes to these details, it's best to make sure that the SSIDs and passwords match for both 2.4GHz and 5GHz. This will allow devices to automatically switch between networks for the best WiFi signal.
- If you made any changes, click Save at the bottom of the page to finish.
TP-Link VR1600v
- On a device that's connected to your modem, open your web browser and go to http://192.168.1.1
- Log in with the default username "admin" and default password “admin”, or use your custom login details.
- Select the Advanced tab and then select Wireless > Wireless Settings from the left-hand menu. By default, you'll see the settings for the 2.4GHz WiFi network. You can switch between 2.4GHz and 5GHz settings using the tabs in the upper right corner.
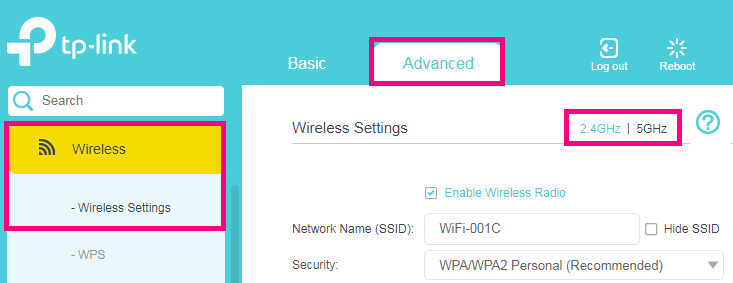
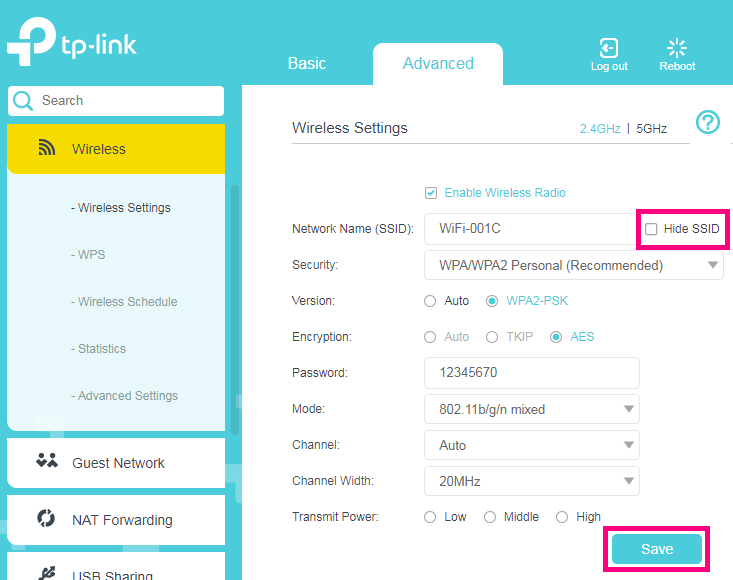
- Make sure that Enable Wireless Radio is ticked for both 2.4GHz and 5GHz WiFi.
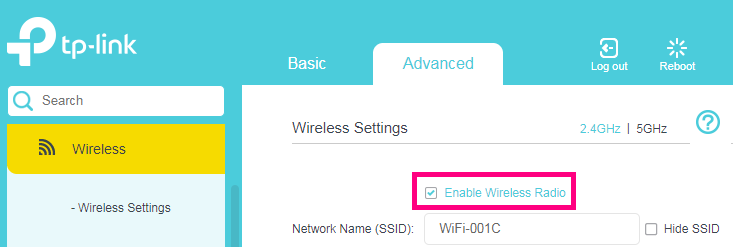
- Make sure that Hide SSID is NOT ticked for either 2.4GHz or 5GHz WiFi. If the SSID is hidden, then your WiFi network name won't show up in the list of available networks when you try to connect.
- On these pages, you'll also find the WiFi Network Name (SSID) and Password.
- If you made any changes, click Save to finish.
TG-789 Broadband Gateway
- On a device that's connected to your modem, open your web browser and go to http://10.1.1.1.
- For TG-1s: Log in with the default username "admin" and default password “admin”, or use your custom login details.
For TG-789s: Log in with the unique default password printed on the modem's barcode sticker (example below) or use your custom login details.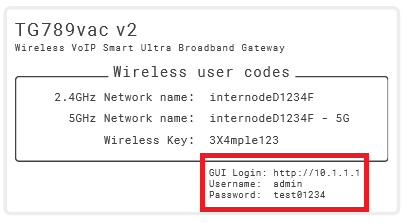
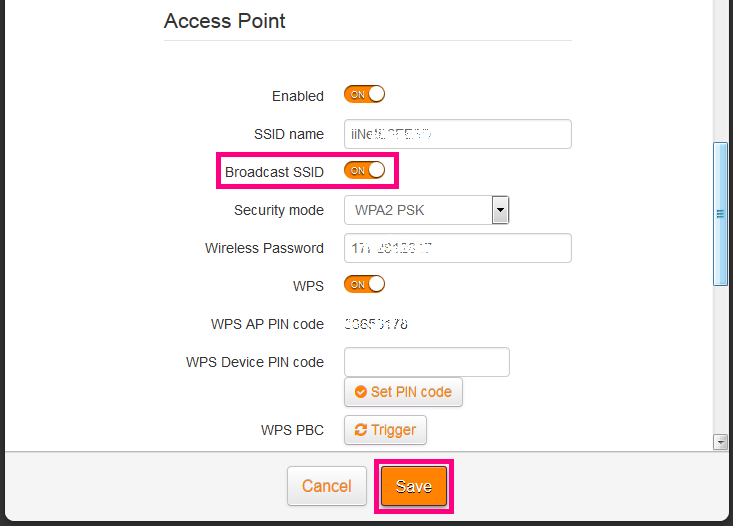
- On the dashboard, make sure the switch in the corner of the Wireless panel is set to ON.
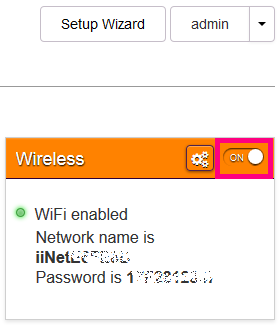
- Click the cog/gears icon next to it to open the Wireless settings, then click Show advanced in the top-right corner.
- Scroll down. Under Access Point, make sure Broadcast SSID is set to ON. If this switch it set to OFF, then your WiFi network name won't show up in the list of available networks when you try to connect.
- On this page, you'll also find the WiFi network name (SSID name) and Wireless Password.
- If you made any changes, click Save to finish.
Cable Gateway Pro (CG3000)
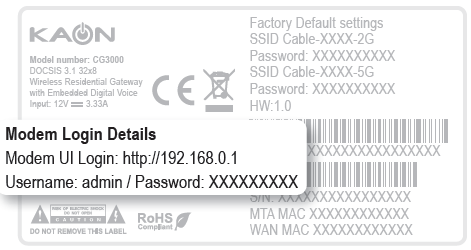
- On a device that's connected to your modem, open your web browser and go to http://192.168.0.1
- Log in with the username "admin" and the unique default password found on your modem's barcode sticker, or use your custom password.
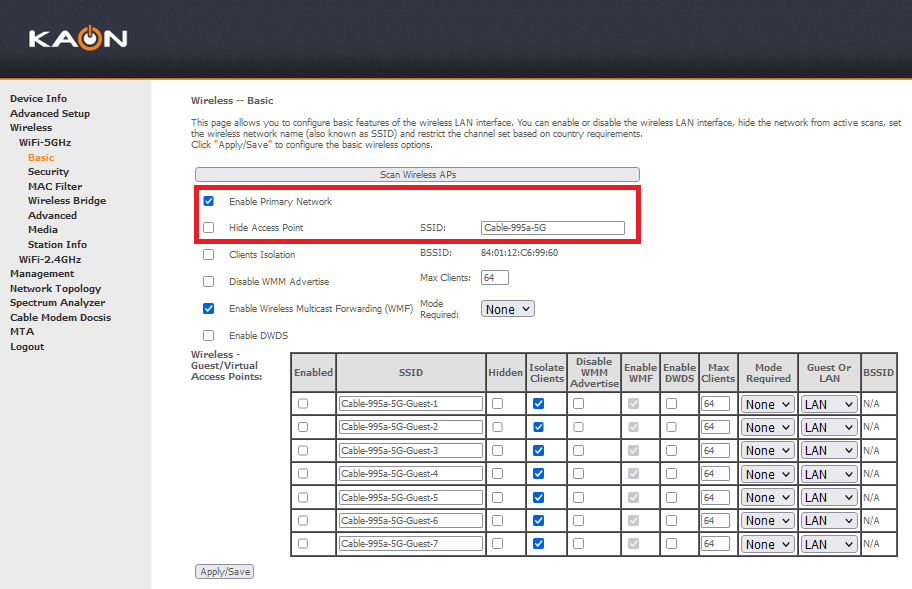
- Select Wireless > WiFi-5GHz > Basic.
Note: Using the 5GHz WiFi network is recommended for the best performance. If you have older WiFi devices and need to check the 2.4GHz WiFi network, select Wireless > WiFi-2.4GHz > Basic instead. - Make sure Enable Primary Network is ticked.
- Make sure Hide Access Point is not ticked. If the access point is hidden, then your WiFi network name won't show up in the list of available networks when you try to connect.
- On this page, you'll also find the WiFi Network Name (SSID).
- If you made any changes, hit Apply/Save to finish.
Cable Gateway Pro (CG2200)
- On a device that's connected to your modem, open your web browser and go to http://192.168.0.1
- Log in with the default username "admin" and default password “admin”, or use your custom login details.
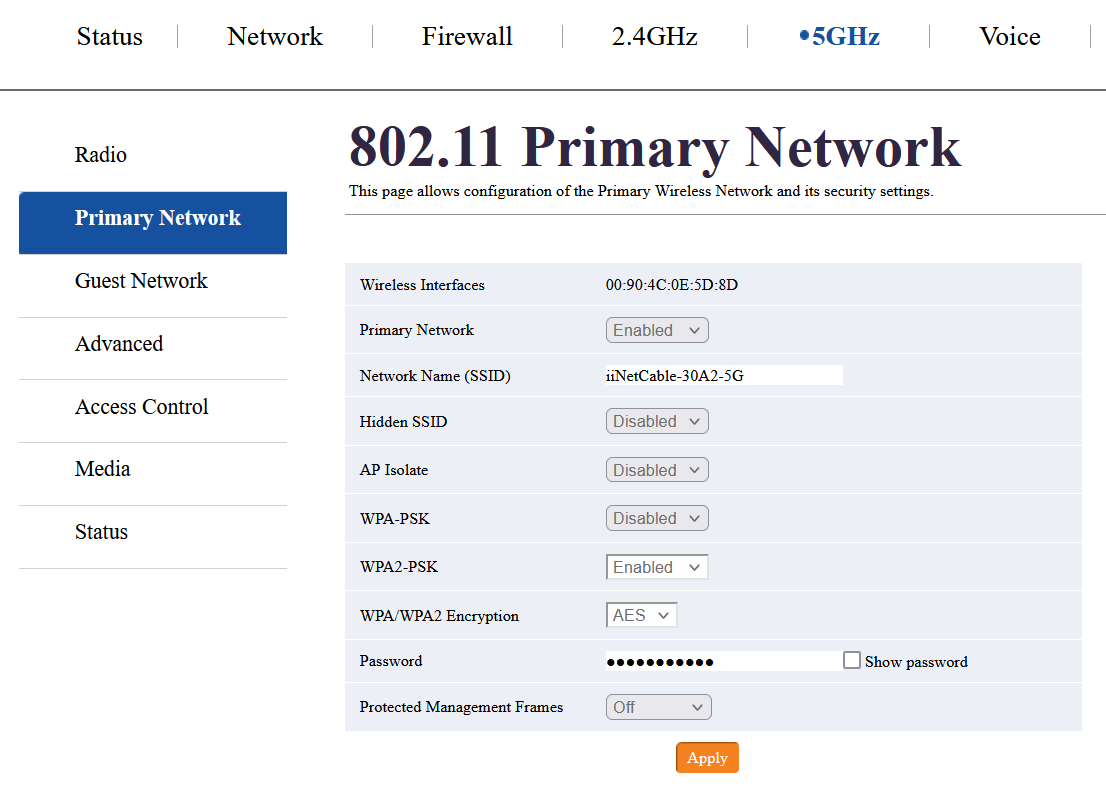
- On the menu bar, you'll see options for both the 2.4GHz network and 5GHz network. Select the network you use (5GHz is recommended).
- Select Primary Network.
- Make sure Primary Network is set to Enabled.
- Make sure Hidden SSID is set to Disabled. If Hidden SSID is enabled, then your WiFi network name won't show up in the list of available networks when you try to connect.
- On this page, you'll also find the WiFi Network Name (SSID) and Password.
- If you made any changes, hit Apply to finish.
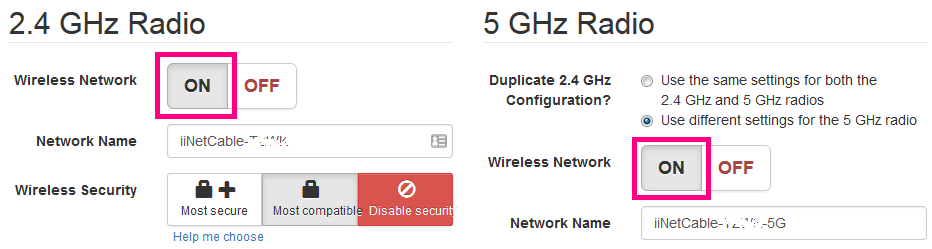
Cable Gateway Pro (EPC3940L)
- On a device that's connected to your modem, open your web browser and go to http://192.168.0.1
- Log in with the default username "admin" and default password “password”, or use your custom login details. If this fails, try leaving both fields blank.
- On the dashboard, click the blue Wireless panel.
- On the Wireless Configuration page, you'll see settings for both the 2.4GHz network and 5GHz network. Make sure Wireless Network is set to ON for the network you use.
- On this page, you'll also find the WiFi Network Name and Password (Wireless Passphrase).
- If you made any changes, click Save Settings to finish.
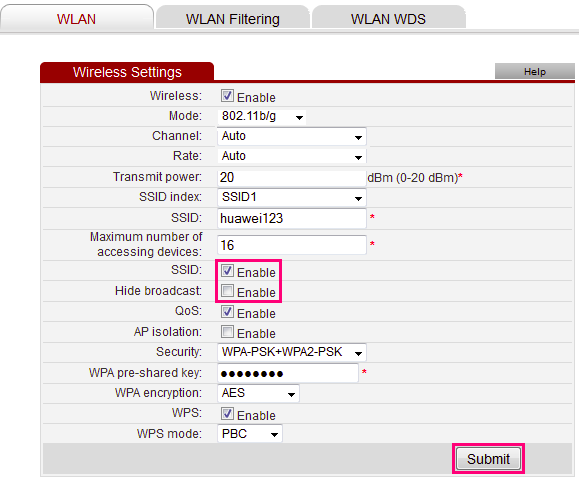
Huawei HG532d, HG658 or HG659
- On a device that's connected to your modem, open your web browser and go to http://192.168.1.1
- Log in with the default username "admin" and default password “admin”, or use your custom login details.
- In the left-hand column, click Basic and then select WLAN. Make sure Enable is ticked for Wireless.
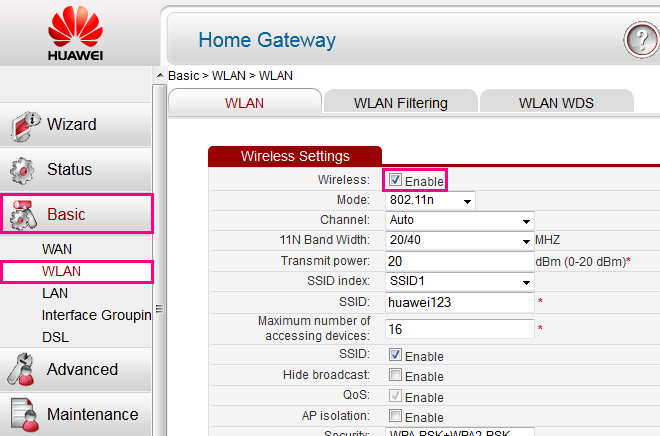
- Make sure Enable for SSID is ticked, but do not tick Hide broadcast. If the SSID broadcast is hidden, then your WiFi network name won't show up in the list of available networks when you try to connect.
- On this page, you'll also find the WiFi network name (SSID) and Password (WPA pre-shared key).
- If you made any changes, click Submit to finish.